
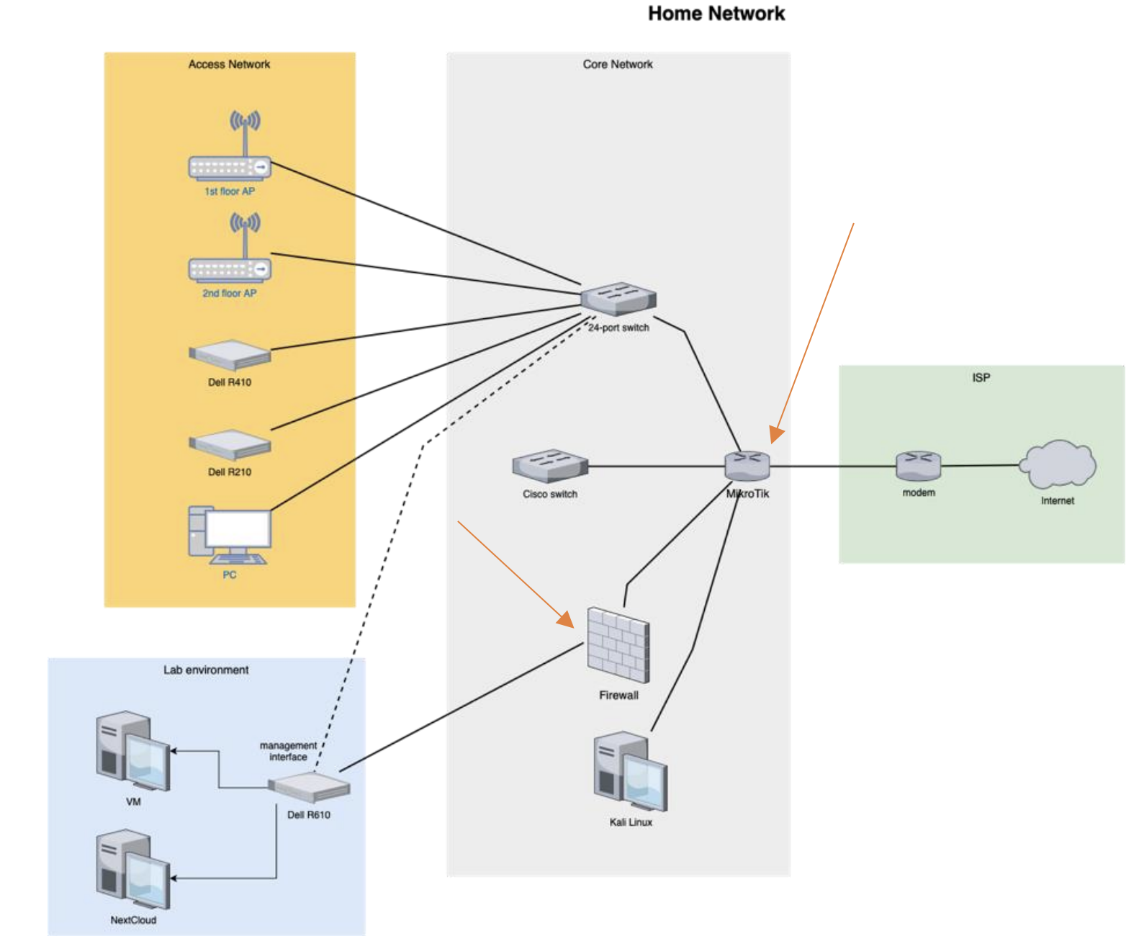
In the first part of my thesis series, I showed you my hardware setup and explained the decision I made while building my lab environment.
In this part, it’s time to get more hands-on and explore all the configurations running on the firewall in depth. I will go through the services one by one, explaining every design decision I have made. Using this guide, anyone with basic networking knowledge can replicate this setup.
Note: Every service should be enabled with the following command to automatically start when the system rebooted:
sudo systemctl enable nameoftheservice
Interfaces
# This is the network config written by 'subiquity'
network:
ethernets:
eno1:
addresses: [192.168.1.115/24]
gateway4: 192.168.1.1
nameservers:
addresses: [1.1.1.1,1.0.0.1]
match:
macaddress: 5c:f9:dd:74:32:12
set-name: wan0
enp3s0f0:
addresses: [192.168.100.1/24]
match:
macaddress: 00:10:18:ae:a9:d0
set-name: lan0
enp3s0f1:
dhcp4: true
enp4s0f0:
dhcp4: true
enp4s0f1:
dhcp4: true
This yaml file is located under the /etc/netplan folder and is responsible for configuring interfaces. First, using the match keyword, I was able to rename the eno1 to wan0 and enp3s0f0 to lan0 for easier identification. I also set static IP addresses for both interfaces. The other three interfaces are part of the 4-port ethernet adapter, which I did not use.
Modifications in the start-up sequence using Systemd derivatives
It was necessary to modify two service start-up config files as both NFTables and the CrowdSec bouncer rely on the renamed interfaces. Using the following command makes it easy to edit/override service files:
sudo systemctl edit nameoftheservice
The most important keyword to add or modify is the After derivative. It makes sure that the service will not start before the predefined service. This ensures that the interfaces have been properly configured and renamed before NFTables or bouncer. NFTables service configuration file after modification:
[Unit]
Description=nftables
Documentation=man:nft(8) http://wiki.nftables.org
After=network-online.target
Conflicts=shutdown.target
DefaultDependencies=no
[Service]
Type=oneshot
RemainAfterExit=yes
StandardInput=null
ProtectSystem=full
ProtectHome=true
ExecStart=/usr/sbin/nft -f /etc/nftables.conf
ExecReload=/usr/sbin/nft -f /etc/nftables.conf
ExecStop=/usr/sbin/nft flush ruleset
[Install]
WantedBy=sysinit.target
NFTables
NFTables is a modern Linux packet classification framework. Iptables is an excellent tool to filter out traffic, perform NAT, log activities, and many other things. However, it comes with limitations. These limitations inspired the development of NFTables. It is available with Linux kernel newer than 3.13, it also comes with a new command-line utility called nft. Furthermore, the new structures introduced in NFTables reduce the number of rules that need to be inspected until reaching the final action on a packet.
Configuration
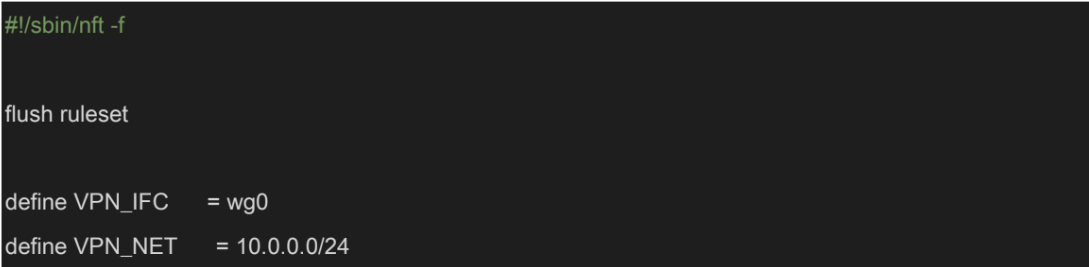
In the first part, I defined basic variables: the VPN interface and the subnet reserved for the VPN. Also, it resets all nft tables (used to take ten lines with Iptables).
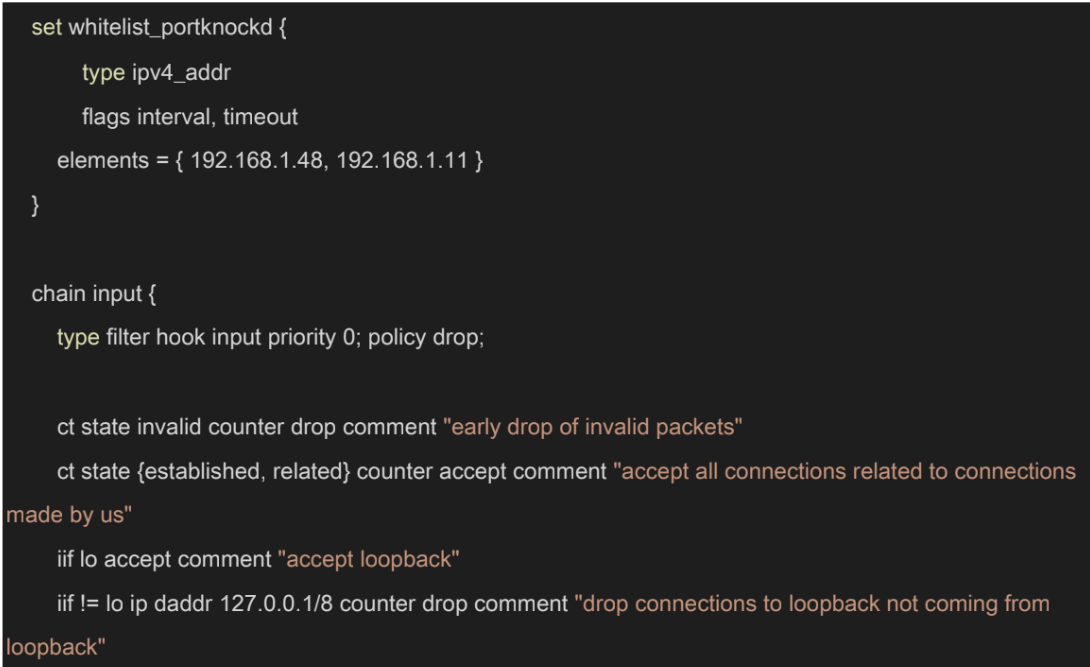
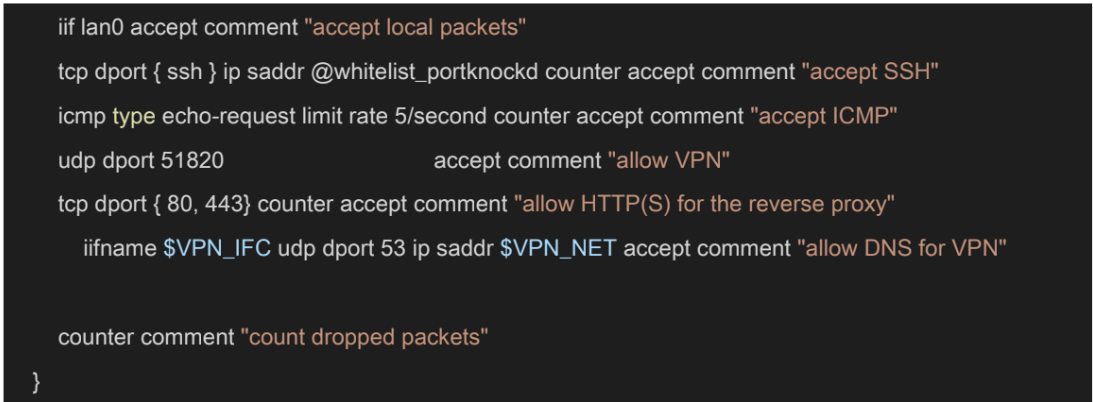
The first table, filter, creates IP sets. It is a table that contains IP addresses with expiry dates, I have added two default values in the elements section: the IP of my laptop and desktop PC. This was necessary because I did not want to port knock every single time. Port knocking is integrated into this NFT configuration. The configuration drops every invalid packet right away to optimize processing. We want to accept packets coming from the LAN side, loopback interface, or established connections. Furthermore, the config accepts packets coming to port 22 (SSH) if the source IP is in the IP set. I opened UDP port 51820 (for Wireguard), TCP port 80, and 443 (for the reverse proxy). Lastly, the service accepts DNS requests coming from the VPN connection, so the user can utilize PiHole when connected via Wireguard.
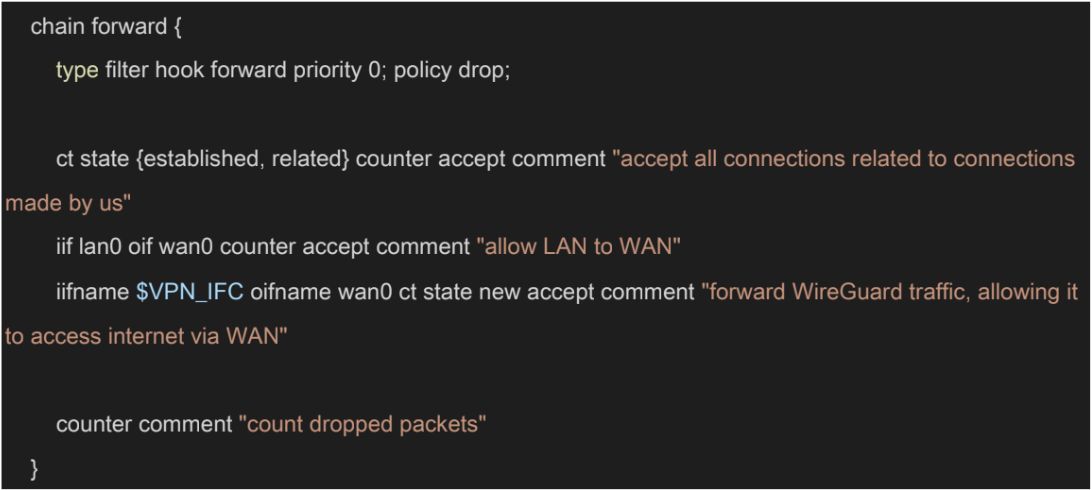
This is related to prerouting, too. It is not enough to accept the packet since it can be passing two interfaces, we also need to forward this in the forward rules. In addition, the service should also forward packets going to the internet. Lastly, as the comment suggests, NFTables forwards WireGuard traffic, allowing it to access the internet via WAN. 38 If you are not counting packets in the post routing, the output chain can be omitted.

In NAT, we are defining what happens to packets that are incoming and destined to another machine behind the firewall. The postrouting chain is about telling what IP should be used for translating IPs coming from various subnets. There are two rules, one for the LAN and one for the VPN. It is faster to set static snat address. However, most people have dynamic addresses, which means masquerading is required.
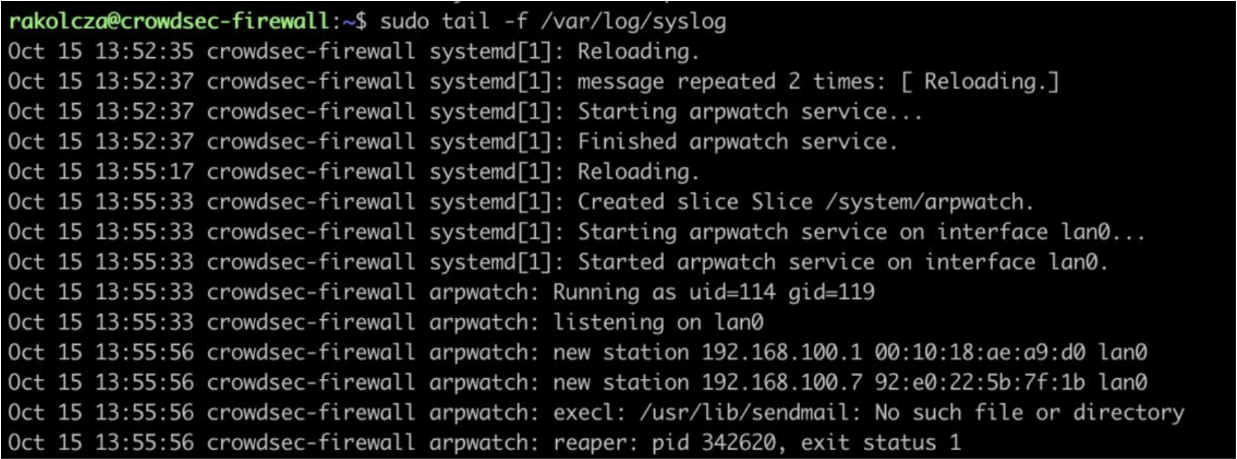
Arpwatch
Arpwatch is a simple utility that keeps track of Ethernet / IP address pairings. It logs events into syslog and can report certain changes via email. The utility uses pcap to listen for ARP packets on the preconfigured local ethernet interface.
Configuration
lan0 -a -n 192.168.100.0/24 # /etc/arpwatch.conf file
Arpwatch is not a complex service to configure, but it could make your internal network much more secure. First, you must declare the interface and the subnet where you want arpwatch to listen on.
These are the most important files and their directories:
- /var/arpwatch — Default directory
- /var/arpwatch/arp.dat — Main ethernet/ip address records database
- /var/arpwatch/ethercodes.dat — Vendor ethernet block list
- /etc/sysconfig/arpwatch — Main configuration file
- /usr/sbin/arpwatch — Binary command to start and stop tool using the terminal
- /var/log/messages — System log file where arpwatch writes any changes or unusual
You can further secure this service by notifying someone via email when there’s a new connection to your network. Add this to your arpwatch.conf file:
-m deviceyouremailaddress@yourdomain.com
Port knocking
In computer networking, port knocking is a method for opening ports externally by generating connection attempts on a predefined set of closed ports. This makes opening ports more secure and automated scans harder for attackers.
Configuration
[options]
UseSyslog
[openSSH]
sequence = 7000,8000,9000
seq_timeout = 10
command = nft add element ip filter whitelist_portknockd "{ %IP%
timeout 180s }"
tcpflags = syn
The knockd.conf is the most important file when discussing the service’s configuration. I have setup only one event for SSH, but I could have used this service to further restrict VPN and reverse proxy connections.
- sequence is the order of ports in the knock. You can optionally specify the protocol for the given port (TCP is the default).
- seq_timeout is the timeframe in seconds for the execution of the full sequence to trigger the command. If the time elapses before the knock is complete, it is discarded.
- tcpflags are the types of packets ports expect to receive. When using TCP flags, knockd will ignore packets that do not match the flags. (TCP SYN is the default flag, as
- command is the command to be executed when a client makes the correct portknock. All instances of %IP% will be replaced with the knocker’s IP address. For this example, I have used the NFTables to add the IP to the given whitelisted IP set.
The final step is to edit /etc/default/knockd and enable it:
# control if we start knockd at init or not
# 1 = start
# anything else = don't start
# PLEASE EDIT /etc/knockd.conf BEFORE ENABLING
START_KNOCKD=1
# command line options
KNOCKD_OPTS=""
Install the knockd package on the client-side machine, as it includes a tool called knock. To send a knock sequence to the server use:
knock [host] [sequence]
Wireguard
Wireguard is a simple and fast VPN solution with secure cryptography. It aims to replace IPsec, which is a widely used but rather complicated service. It is designed as a general-purpose solution; it was initially released for Linux, but it is now cross-platform.
VPNs extend a private network across a public network and allow devices to send data as if they were directly connected to that specific private network. This has many advantages from security and usability standpoints.
Configuration
Note: This configuration is IPv4-only but can be extended to support IPv6. This example assumes that clients live within the address space 10.0.0.2 through 10.0.0.254.
It is very important to mention that in the lab environment, the firewall’s public IP address is a private IP (192.168.1.115) because of the double NAT. Thus, I can only connect to this VPN if I am connected to the home network. This issue is not relevant in a production environment.
NFTables configuration
Wireguard configuration requires modification in the NFTables rules. I have explained these rules more in-depth in the NFTables section above.
In summary:
- Opening the port that WireGuard listens on, 51820 by default
- Allowing Wireguard clients to make DNS requests
- Forwarding client traffic to the internet
- Masquerading traffic so it looks like it comes from the server
Server configuration
[Interface]
Address = 10.0.0.1/24
ListenPort = 51820
PrivateKey = [Server Private Key]
[Peer]
PublicKey = [Client A Public Key]
PresharedKey = [Client A Pre-Shared key]
AllowedIPs = 10.0.0.2/24
[Peer]
...
Because the setup uses NFTables, I opted to statically configure it rather than supply PreUp/PostUp/PreDown/PostDown hooks in the server configuration.
It is possible to restrict further which client can access other devices connected to the same VPN by adjusting the subnet. For example, I could have used 10.0.0.2/31 for the address to isolate this client fully.
Client(s) configuration
[Interface]
PrivateKey= [Client Private Key]
Address=10.0.0.2/24
DNS = 192.168.100.1
[Peer]
PublicKey= [Client Public Key]
Endpoint=192.168.1.115:51820
AllowedIPs=0.0.0.0/0
PersistentKeepalive = 15
There are two types of configurations: full-tunnel and split-tunnel. In a split-tunnel configuration, only traffic destined for other clients in the VPN network is routed through the VPN. AllowedIPs should be set to 10.0.0.0/24. In a full-tunnel setup, all traffic is routed through the VPN. I have configured a full-tunnel configuration because I want to use every protective feature of the firewall when I am connected through VPN.
Wireguard is not a particularly “talkative” protocol, so it is considered best practice to use PersisentKeepAlive derivative if you are behind NAT and want WireGuard peer to be able to send you data after a longer pause.
Suricata
Suricata is a widely used IDS/IPS solution. It is high-performance, open-source software used by many companies to protect their assets. While many of its features are free, there are many paid extensions for it, making the service flexible and affordable.
Configuration
Suricata is a versatile and complex service to be configured, it can be used in many ways. The service could be very resource-intensive, hence it requires careful decisions. It is important to mention that I am using Suricata as an IDS to reduce complexity. Suricata has the feature set to prevent malicious activity, however, it is working in “safe” mode, so no network packets drop, only warns.
One-time configuration
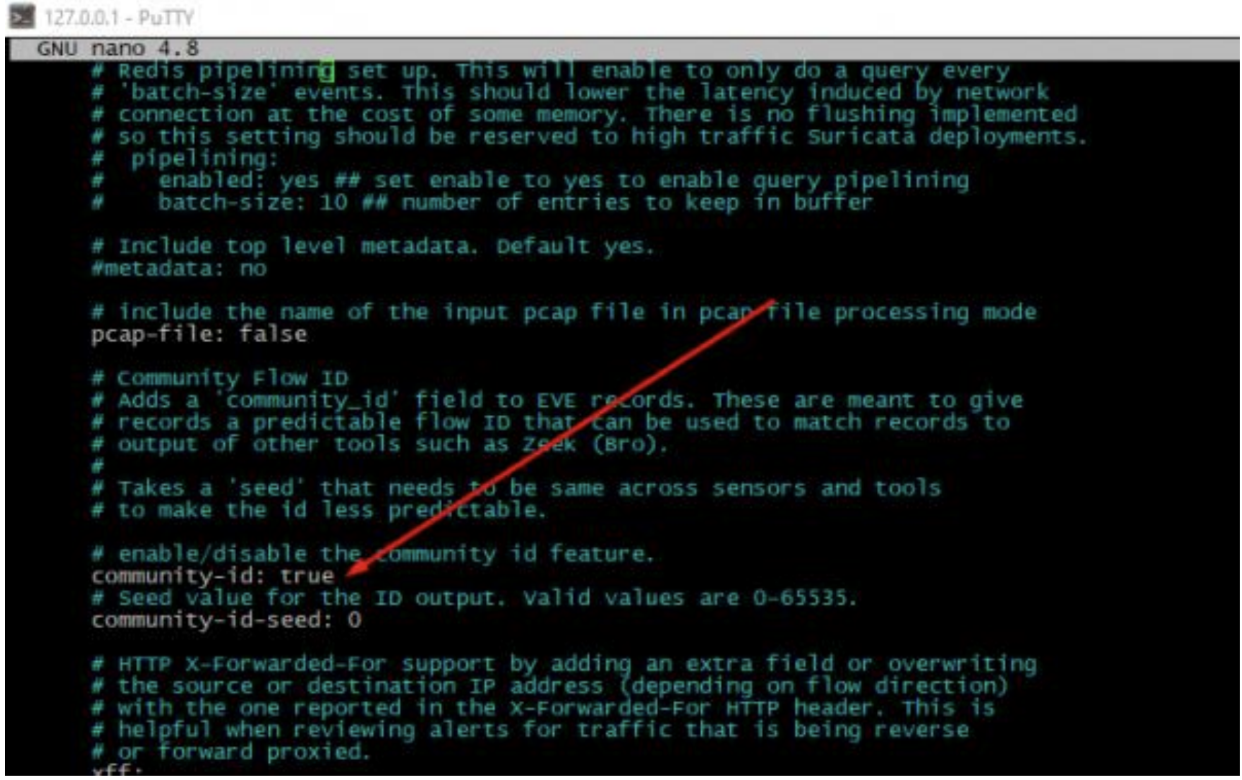
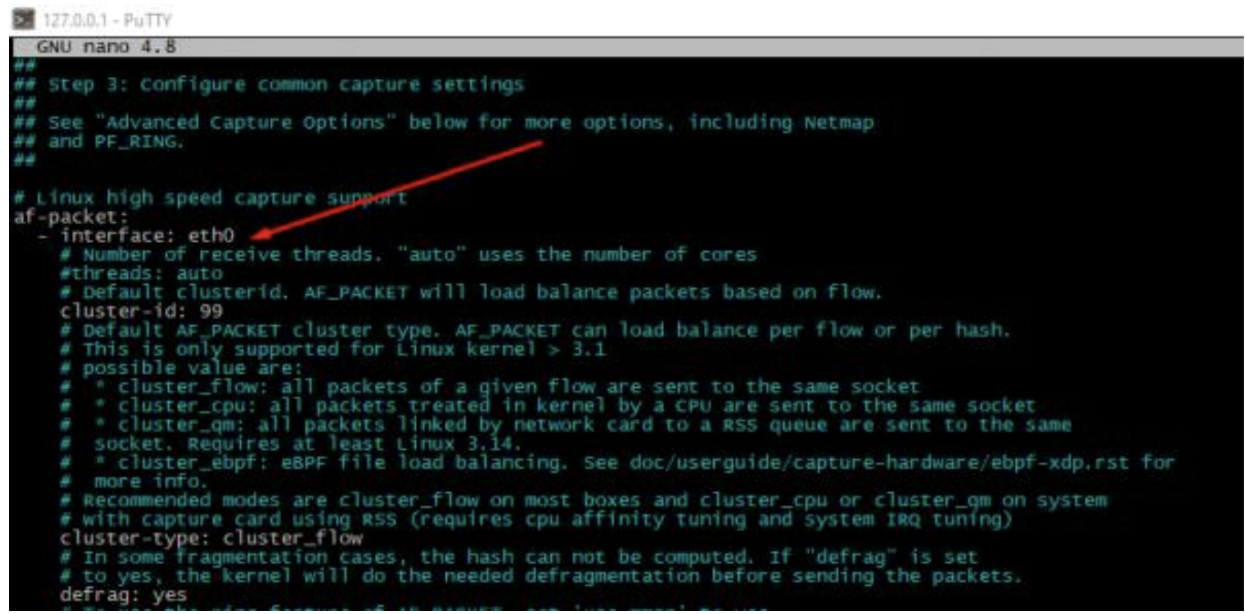
In the /etc/suricata/suricata.yaml file, I have enabled the community-id option and defined which network interface to monitor. In my case, it was the lan0 interface.
Furthermore, I have defined the same interface for packet-captures, but this step is probably unnecessary. Live rule reloading is also available, so with this setting in place, when you edit/update your rule sets, changes will take effect without restarting your Suricata service.
Rules
By default, the Suricata package has a limited ruleset that only detects the most common Internet Protocols located in the /etc/suricata/rules directory. This can be useful as weaker hardware could be utilized to protect against common threats.
Running the command below updates the Suricata instance.
sudo suricata-update
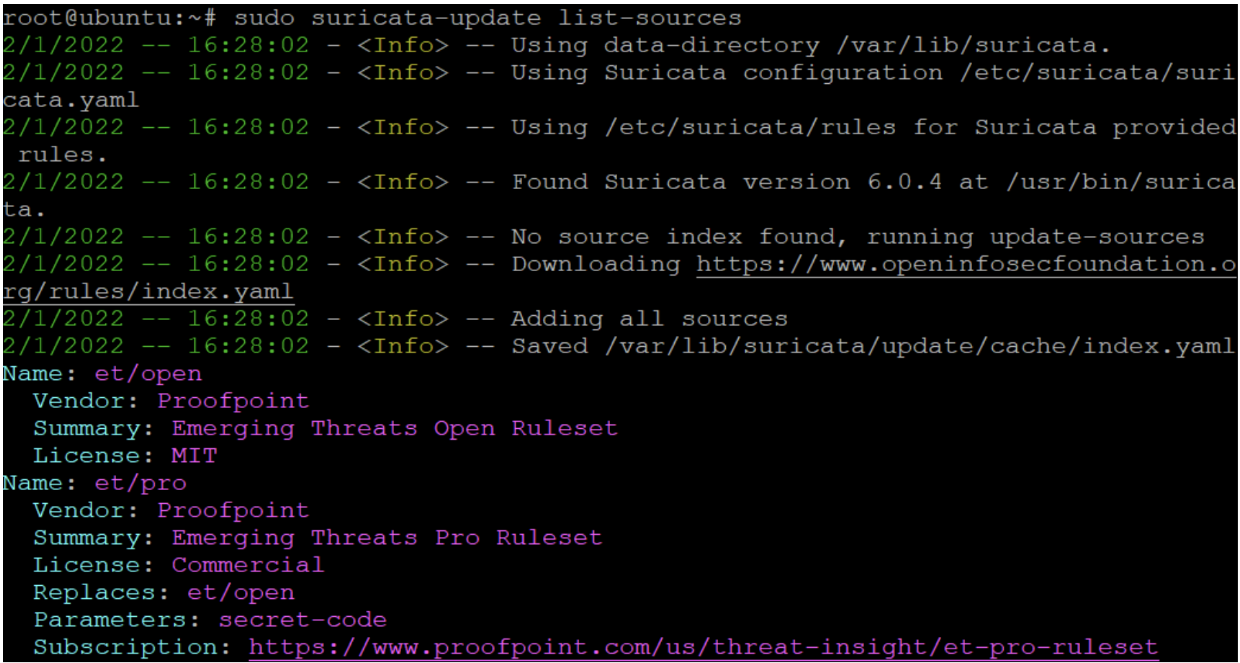
Next, I have selected the rulesets I want to use in my system. I only chose free rulesets, but there are vendors who offer paid rulesets. Listing all the rulesets:
sudo suricata-update list-sources
I installed the two additional rulesets to prevent high CPU usage but detect a big portion of relevant threats: et/open and oisf/trafficid.
It is possible to install open source rulesets built by the community. There are many free rulesets available on GitHub but exploring these are beyond the scope of this article. To finalize the installation, I updated the rules once more.
CrowdSec Security Engine
The goal of the installation is to deploy the CrowdSec Security Engine in a multi-agent setup with one agent sharing signals with others. This is possible because the agent can act as an HTTP REST API server to collect the signals from other agents. Thus, I could make the firewall the “main” agent in the sense that it collects signals from other agents, shares information about detected attacks with other local agents, sends signals to CrowdSec’s central API (CAPI), as well as receiving blocklists via CAPI and distributing those to the other agents.
This ability to function in a distributed setup also means that mitigation does not have to take place on the same agent as detection. Mitigation is done using Remediation Components (previously known as bouncers). Remediation Components rely on the HTTP REST API served by the “main” Security Engine.
Important files
Configuration files
- etc/crowdsec/acquisition.yaml: All data sources and types are defined here
- /etc/crowdsec/bouncers/: Config files for all remediation components
- /etc/crowdsec/profiles.yaml: Config file decides what attacks trigger which mitigation and for how long
Log files
- /var/log/crowdsec.log: CrowdSec Security Engine log file
- /var/log/nameofthebouncer.log: Remediation Component log file
Firewall
#Generated acquisition file - wizard.sh (service: apache2) / files :
journalctl_filter:
- _SYSTEMD_UNIT=apache2.service
labels:
type: apache2
---
#Generated acquisition file - wizard.sh (service: nginx) / files :
/var/log/nginx/access.log /var/log/nginx/error.log
filenames:
- /var/log/nginx/access.log
- /var/log/nginx/error.log
labels:
type: nginx
---
#Generated acquisition file - wizard.sh (service: sshd) / files :
/var/log/auth.log
filenames:
- /var/log/auth.log
labels:
type: syslog
---
#Generated acquisition file - wizard.sh (service: linux) / files :
/var/log/syslog /var/log/kern.log
filenames:
- /var/log/syslog
- /var/log/kern.log
labels:
type: syslog
---
filename: /var/log/suricata/eve.json
labels:
type: suricata-evelogs
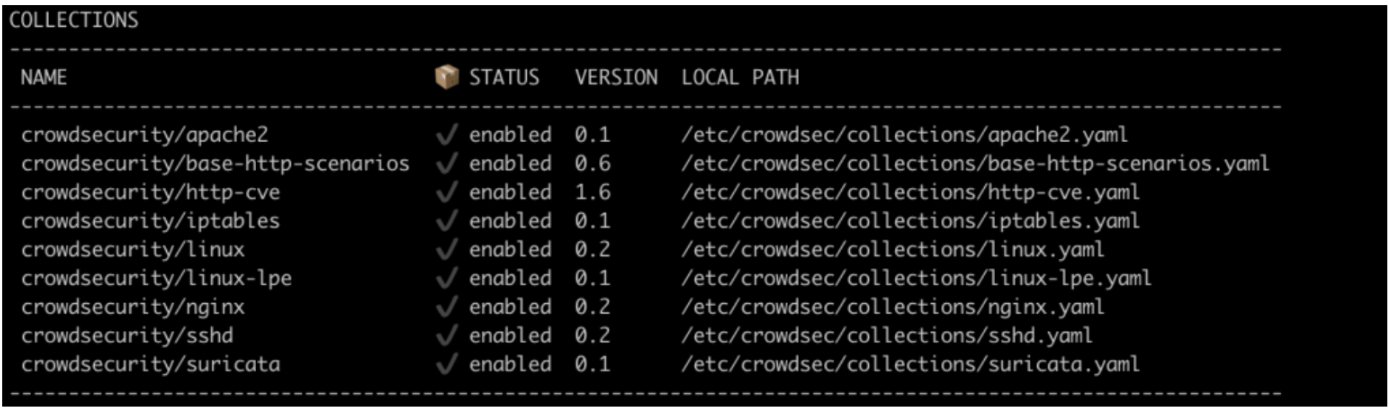
I have installed the following collections from the CrowdSec Hub:
Remediation Component
I have installed a single Remediation Component for the firewall, as none of the internal servers is hosting a publicly available service. Hence, using crowdsec-firewall-bouncer-nftables was enough to drop any suspicious connection if needed to protect the network.
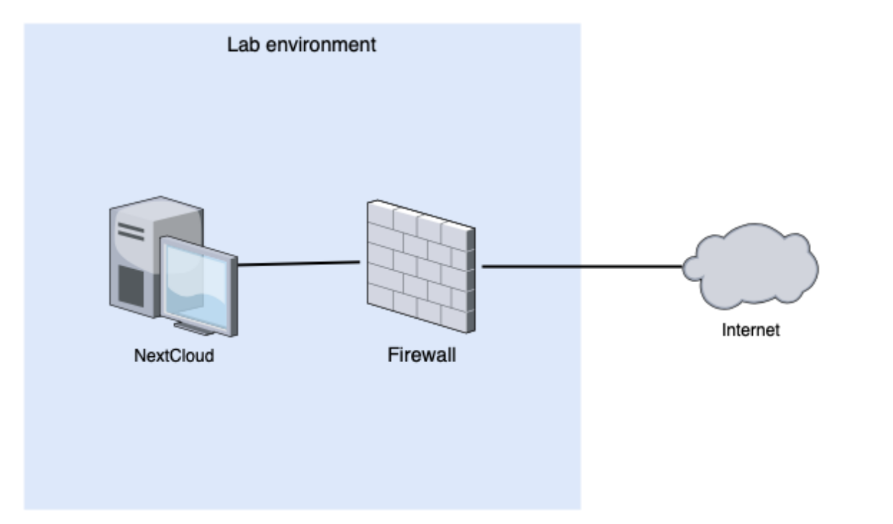
NextCloud Virtual Machine
Using CrowdSec’s decoupled capability means that I was able to install a Security Engine on the internal server hosting a NextCloud instance. This Security Engine is configured to report to the firewall and use the firewall’s Remediation Component to mitigate the attack. Mitigation could be done in several ways, from simply dropping the connection to introducing a CAPTCHA to slow down the attack.

Other services
DHCP server
A DHCP server is a device on the network configured to provide and assign IP addresses, default gateways, and other network parameters to clients. It relies on the standard Dynamic Host Configuration Protocol (DHCP) to respond to broadcast queries.
Configuration
deny declines;
log-facility local7;
authoritative;
subnet 192.168.100.0 netmask 255.255.255.0 {
interface lan0;
range 192.168.100.5 192.168.100.200;
option routers 192.168.100.1;
option broadcast-address 192.168.100.255;
option domain-name-servers 192.168.100.1; # Local PiHole DNS proxy
default-lease-time 259200;
max-lease-time 604800;
}
A DHCP server is an essential part of a complete package. Running a DHCP server will give addresses to machines in the LAN, which the ISP box will not do anymore since it is on the other “side” of the firewall. The most important line in the configuration is the interface on which the service will listen, the IP range, and DNS. I have configured the DHCP server to use the local PiHole instance.
I have reserved the 192.168.100.0/24 private network space for the devices. The server will hand out addresses between 192.168.100.5 and 192.168.100.200, closed interval. This leaves space for some connected appliances to have manually configured static IPs.
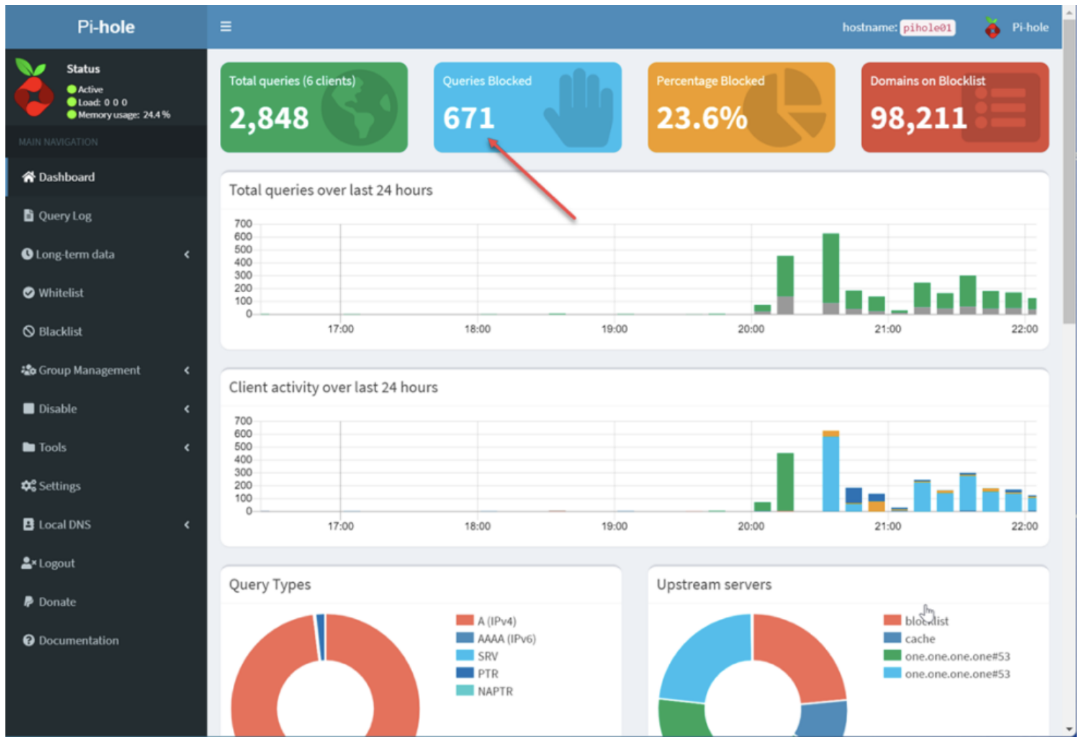
PiHole
As its name implies, Pi-Hole is a network-level Internet ad and tracker blocker that acts as a DNS blackhole. It can be configured as a DHCP server, but this is optional. It was designed for low-powered devices, such as the Rasberry Pi, but it is compatible with almost any Linux machine. Furthermore, it can block traditional web advertisements along with ads in less common places, like smart TVs and mobile operating systems.
Configuration
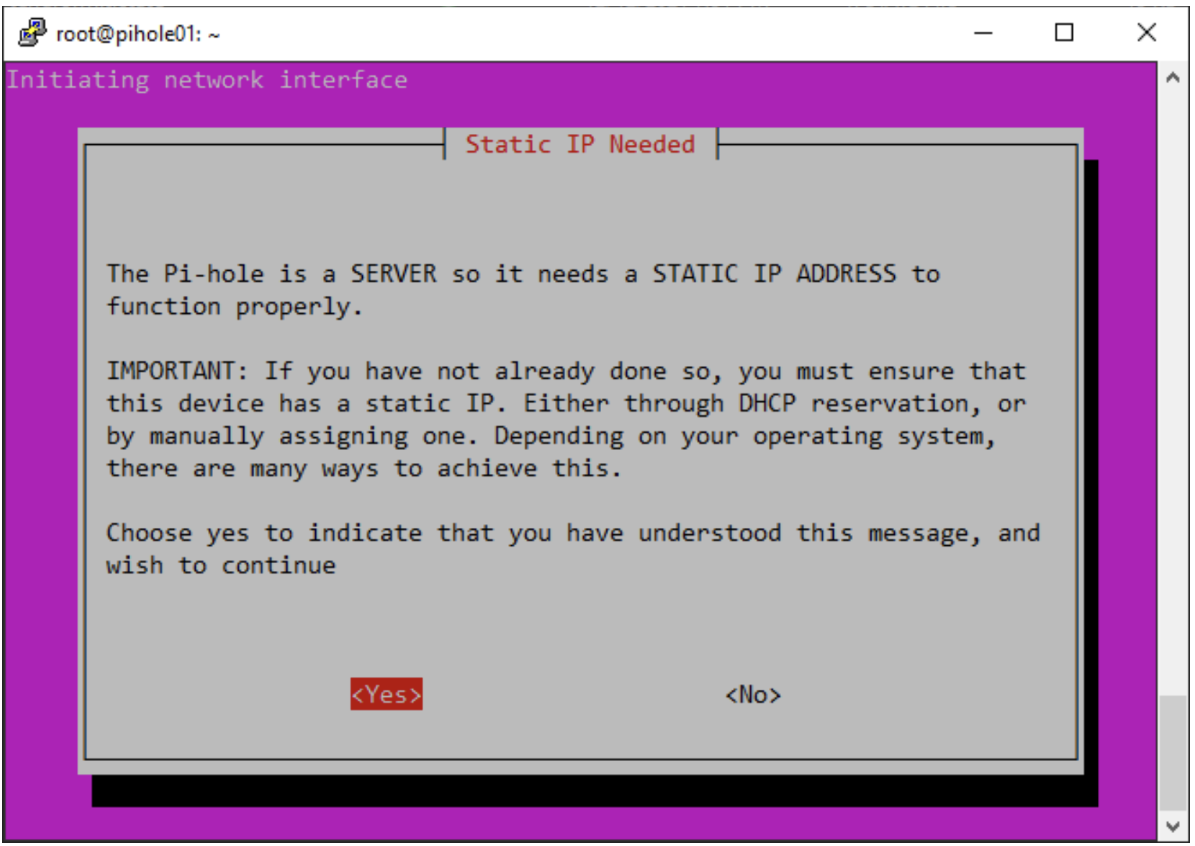
This service configures itself during installation. It is very easy to get started and the process is straightforward too. The installation can be started using one command:
sudo curl -sSL https://install.pi-hole.net | bash
After the installation starts, follow the prompts, seen in the screenshot below, to configure PiHole. One important setting to pay attention to is the Upstream DNS. I chose Cloudflare because it is an extremely reliable and fast DNS provider. However, keep in mind that all the other providers will work fine here as well.
Finishing the whole process, the web interface will be available if visiting the correct static IP address under the /admin page inside the local network.
It is recommended to use PiHole throughout the local network, as manually configuring every single device’s DNS is tedious and unnecessary.
Summing up
This installment of the Building a Network for Small Businesses series was quite long as I walked you through the configurations of all the systems and services I used for this setup.
In the third and last installment, I’ll show you how I implemented and tested attack scenarios and share a couple of closing thoughts on future improvements.
See you there!


