%20(36).jpg&w=3840&q=75)
Hello everyone!
In this tutorial, I’m going to show you how to enhance your Docker security using CrowdSec and Traefik Proxy.
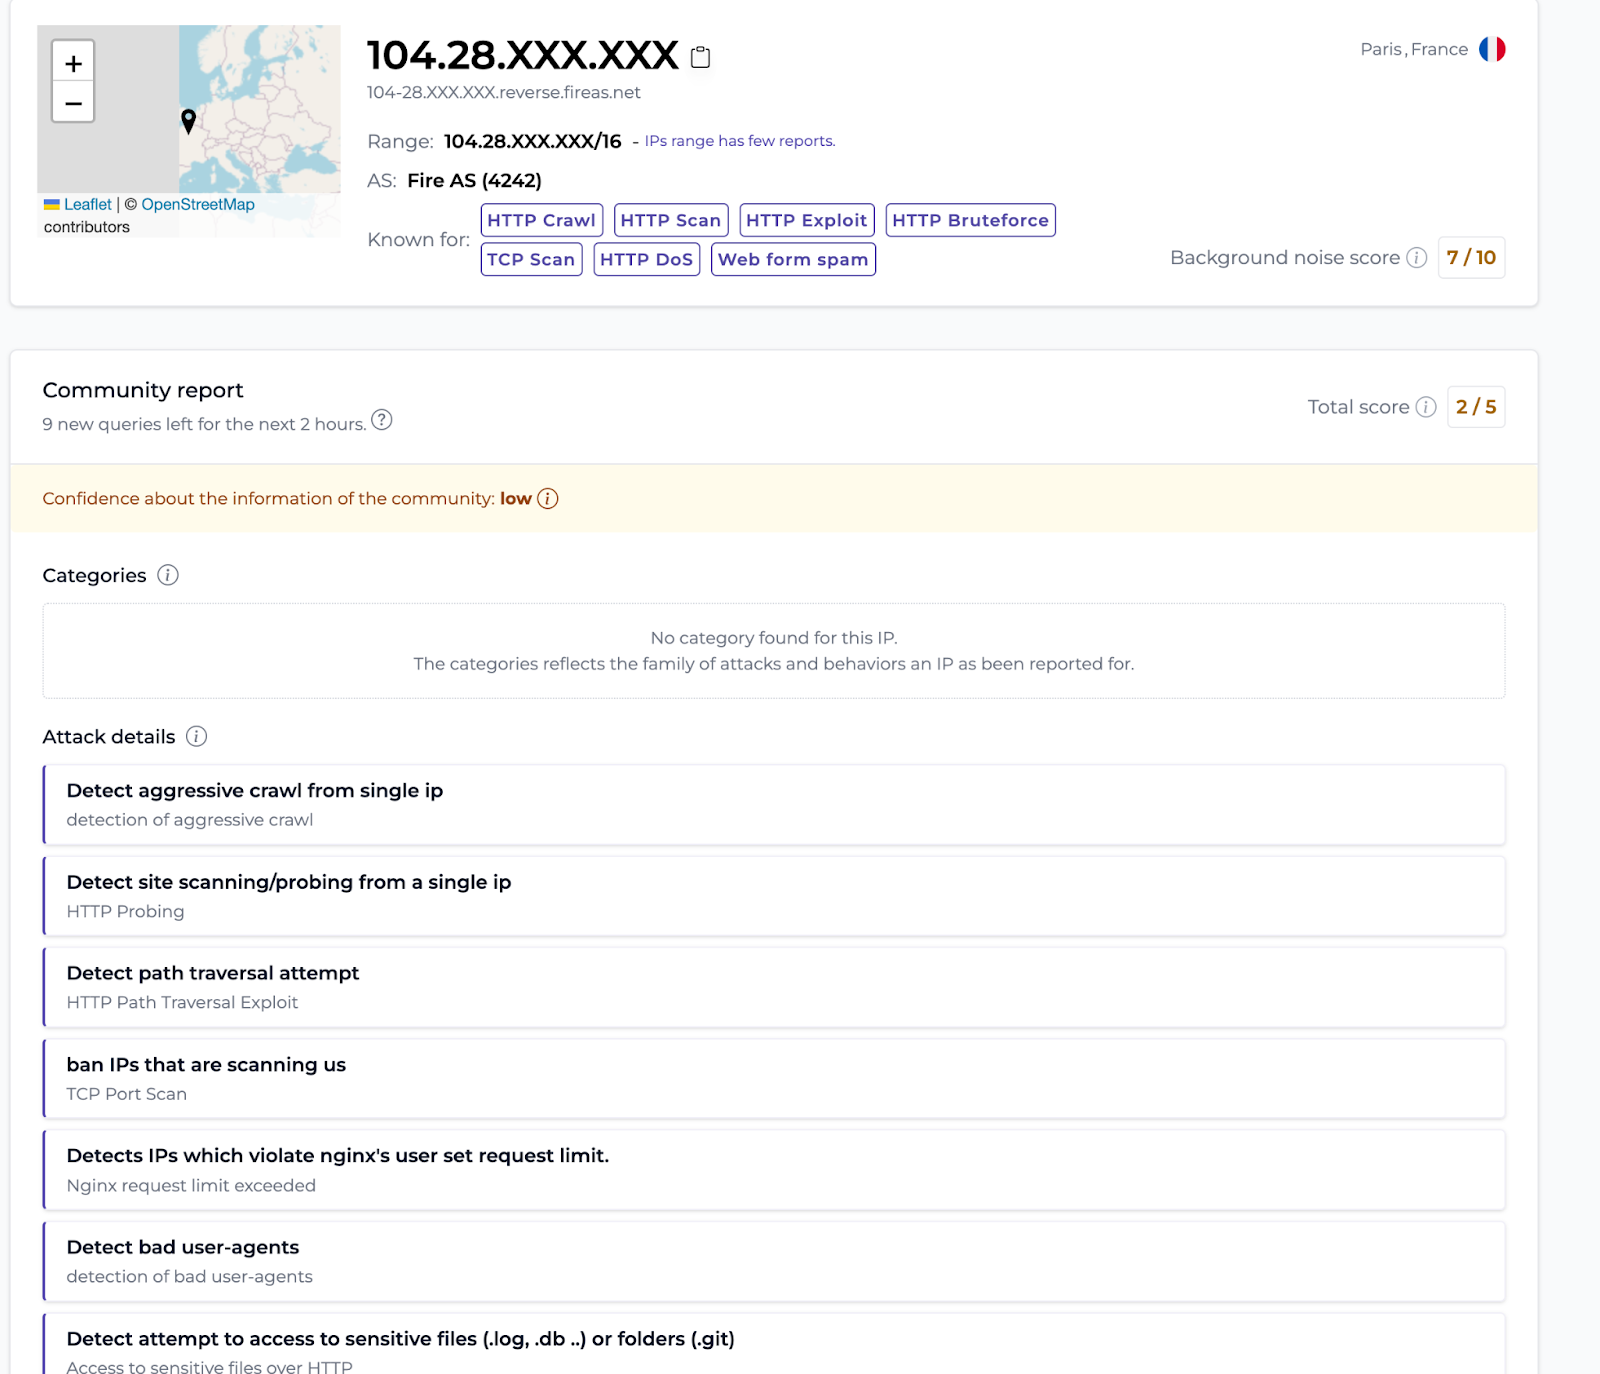
Before we get started, let’s have a quick look at CrowdSec, a community-based security solution! CrowdSec analyzes attacks in real time, and provides access to a console that gives you detailed information on IPs, such as their activity rate, their danger score, and the types of attacks carried out on users within the CrowdSec network.
Isn’t that great? How have you been managing your security without analyzing data? Other solutions exist, but I challenge you to find a simpler and equally powerful one. 😉
Well, now that I got your attention, here’s a diagram illustrating how CrowdSec works technically:
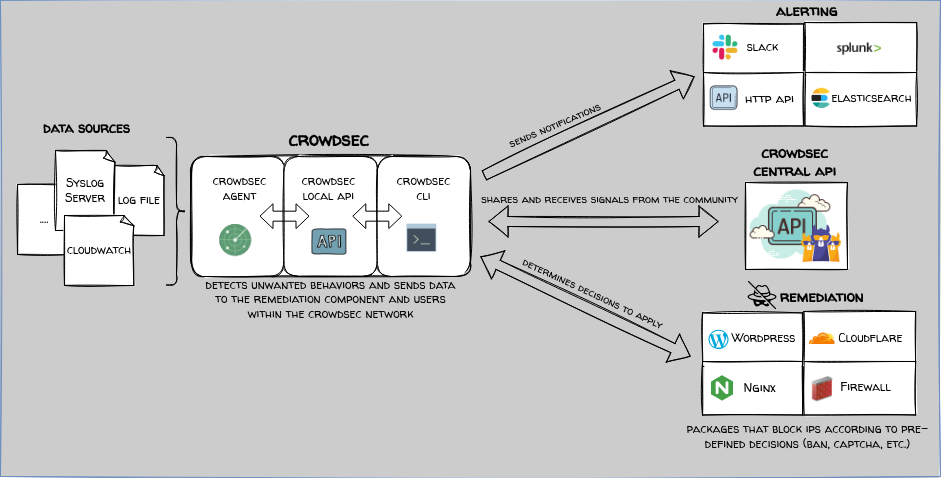
To sum up the illustration in a few words: You have data sources (e.g. reverse proxy connection logs), which are analyzed by the Log Processor that compares your logs to logs that include indications of attacks. The Local API retrieves the process analysis and then does several things:
- LAPI makes a decision and informs the Remediation Component (bouncer) to enforce said decision
- Shares information on malicious attacks with the CrowdSec community
- Sends alerts on configured channels
Here’s an overview of the information available in the CrowdSec Console — super handy!
Shall we move on to the lab?
Useful links
To follow along with this tutorial, here are a few links that will come in handy.
- You can find the Docker Compose file I use in this tutorial in my GitHub repo.
- If you’re not well-versed in the ins and outs of the CrowdSec Security Stack, I recommend you check out the Introduction section of the documentation or take the Academy Course on CrowdSec Fundamentals.
- If you are not familiar with the Middleware concept of Traefik Proxy, you can find the information you need in the Traefik documentation.
- CrowdSec plugin documentation on Traefik is available here.
Setting up
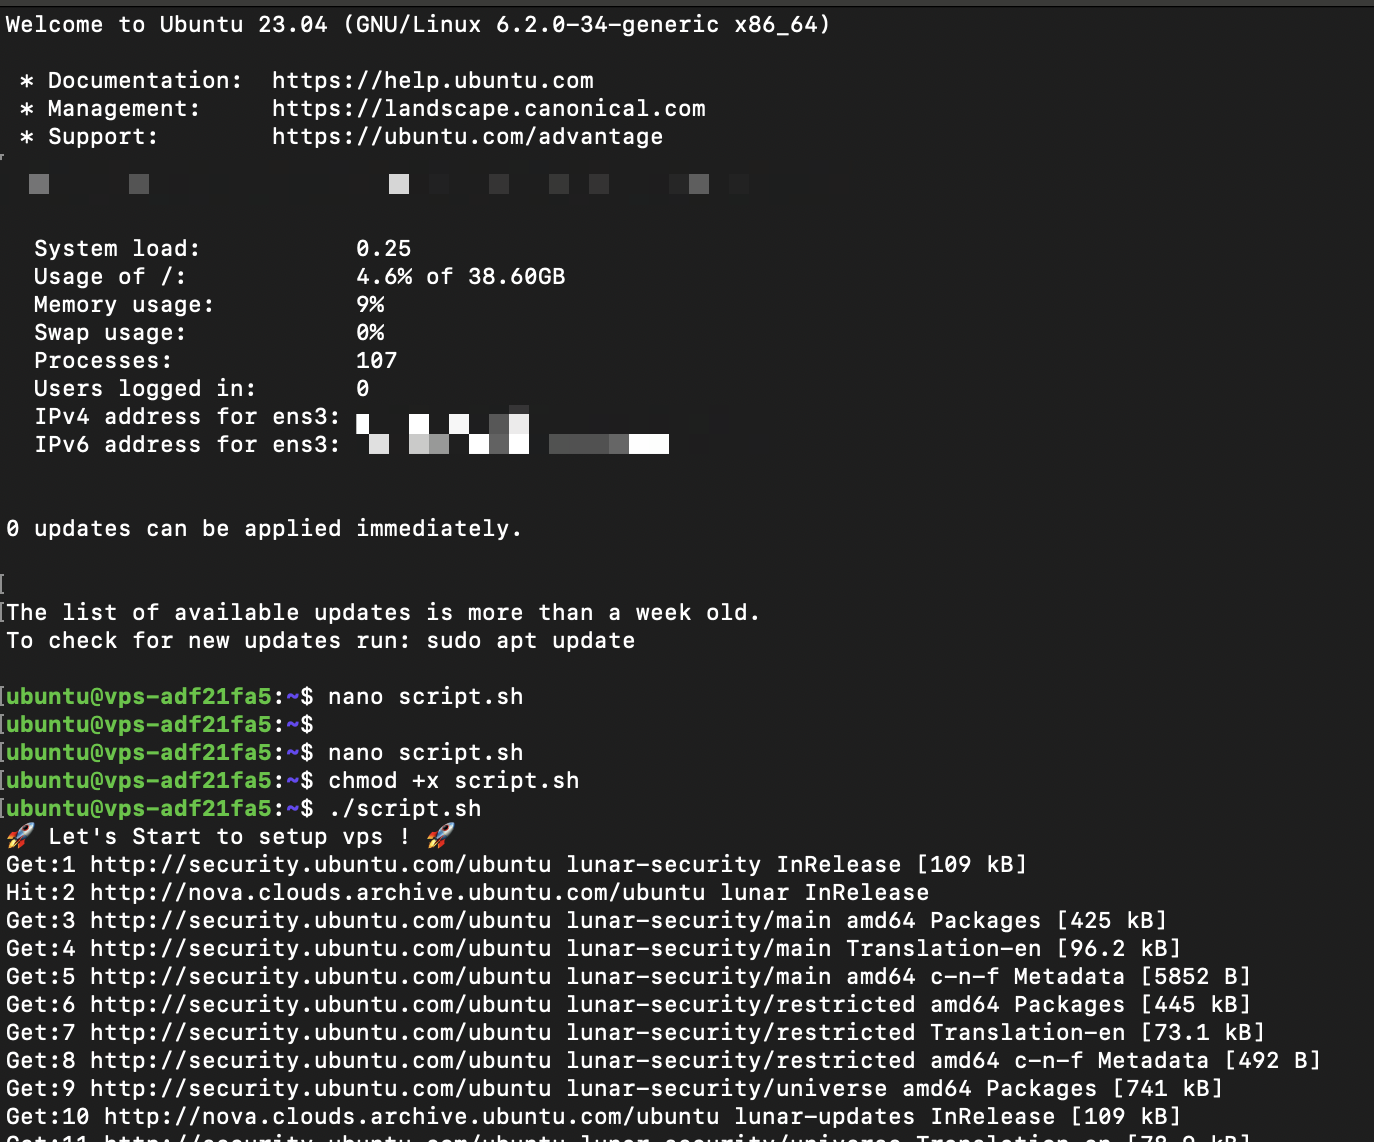
For the demo, I’m going to use a small VPS (Ubuntu 23.04) from OVH. Here’s the basic quick setup.
Note: Modify lines 15 and 16 if you want to secure your SSH port.
#!/bin/bash
echo "🚀 Let's Start to setup vps ! 🚀"
sudo apt update -y && sudo apt upgrade -y
sudo apt install -y ca-certificates curl gnupg lsb-release
sudo mkdir -m 0755 -p /etc/apt/keyrings
curl -fsSL https://download.docker.com/linux/ubuntu/gpg | sudo gpg --dearmor -o /etc/apt/keyrings/docker.gpg
echo "deb [arch=$(dpkg --print-architecture) signed-by=/etc/apt/keyrings/docker.gpg] https://download.docker.com/linux/ubuntu $(lsb_release -cs) stable" | sudo tee /etc/apt/sources.list.d/docker.list > /dev/null
sudo apt update -y
sudo apt install -y docker-ce docker-ce-cli containerd.io docker-buildx-plugin docker-compose-plugin
sudo apt install -y iptables
sudo iptables -A INPUT -i lo -j ACCEPT
sudo iptables -A INPUT -p tcp --dport 80 -j ACCEPT
sudo iptables -A INPUT -p tcp --dport 443 -j ACCEPT
## Modify this line, after -s, indicate your ip public
##sudo iptables -A INPUT -p tcp --dport 22 -s Your_IP_Public -j ACCEPT
##sudo iptables -A INPUT -p tcp --dport 22 -j DROP
sudo -s iptables-save -c
sudo iptables -L --line-numbers
echo "net.ipv4.ip_forward=1" | sudo tee -a /etc/sysctl.conf
echo "🚀 Let's goooo ! 🚀"
And we’re off!
I’m going to start with a basic configuration for Traefik Proxy. Another tutorial for Nginx Proxy Manager is already available, so I won’t go into that here, but you can find the full CrowdSec + Nginx Proxy Manager tutorial here.
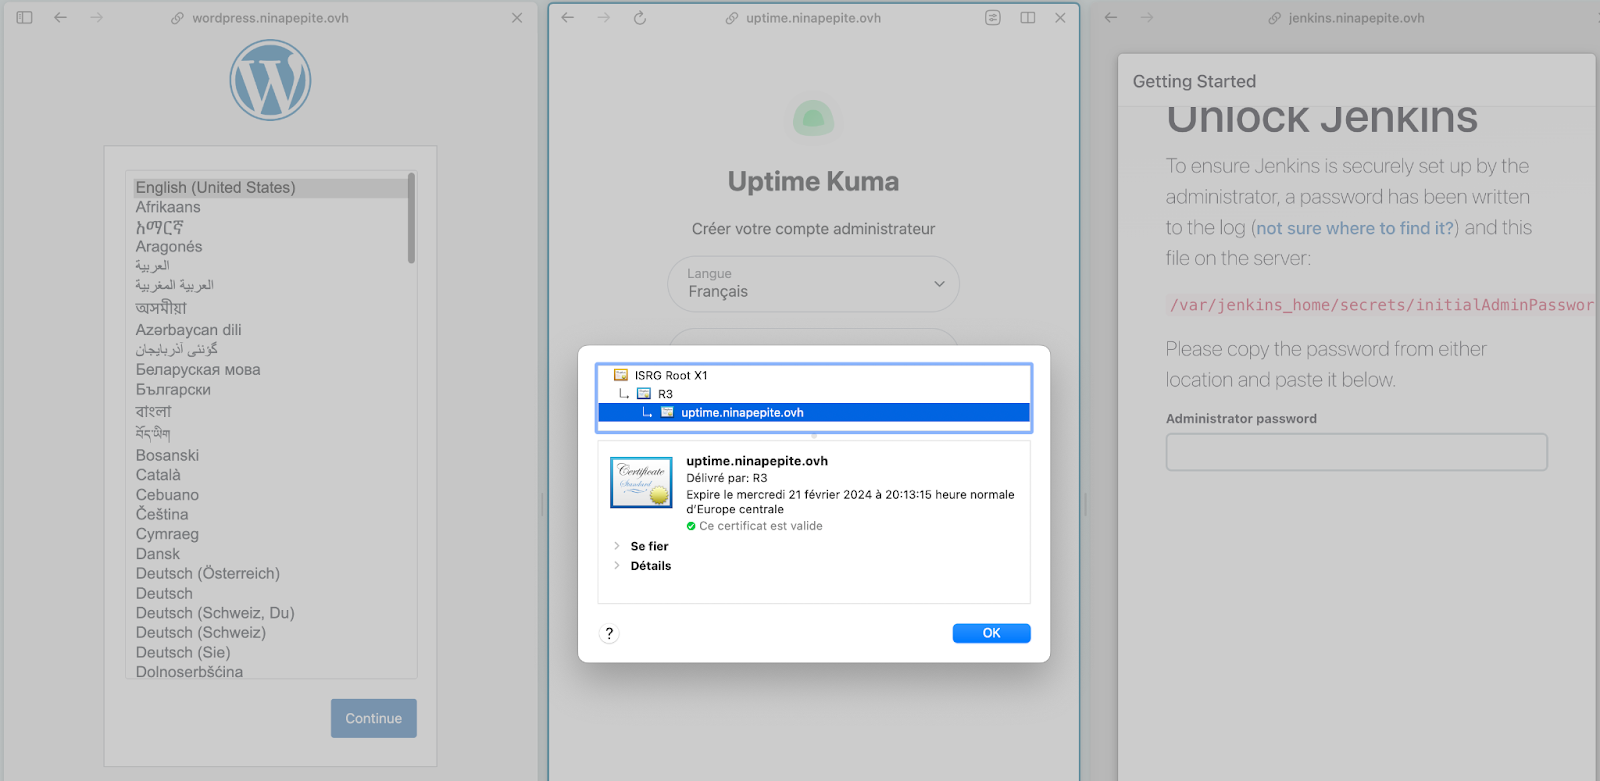
For this tutorial, I am going to use WordPress, Uptime Kuma, and a little Jenkins, so it’ll speak to everyone. Here’s the Docker Compose file — make sure to adapt it to your domain name.
version: '3'

services:
  traefik:
    restart: unless-stopped
    image: traefik:latest
    command:
      - --providers.docker=true
      - --accesslog
      - --accesslog.filepath=/var/log/traefik/access.log
      - --entrypoints.web.address=:80
      - --entrypoints.websecure.address=:443
      - --certificatesresolvers.prodresolver.acme.email=youremail@domain.fr
      - --certificatesresolvers.prodresolver.acme.caserver=https://acme-v02.api.letsencrypt.org/directory
      - --certificatesresolvers.prodresolver.acme.keytype=RSA4096
      - --certificatesresolvers.prodresolver.acme.tlschallenge=true
      - --certificatesresolvers.prodresolver.acme.httpchallenge=true
      - --certificatesresolvers.prodresolver.acme.httpchallenge.entrypoint=web
      - --certificatesresolvers.prodresolver.acme.storage=/letsencrypt/acme.json
    ports:
      - "80:80"
      - "443:443"
    volumes:
      - "./letsencrypt:/letsencrypt"
      - /var/run/docker.sock:/var/run/docker.sock:ro
      - "./logsTraefik:/var/log/traefik"
    networks:
      - proxy
      - backend

  # WordPress Service
  wordpress:
    image: wordpress:latest
    container_name: wordpress
    volumes:
      - wordpress_data:/var/www/html
      ## Traefik labels
    labels:
      - "traefik.enable=true"
      - traefik.http.routers.wordpress.rule=Host(`wordpress.yourdomain.com`)
      - traefik.http.routers.wordpress.tls=true
      - traefik.http.routers.wordpress.tls.certresolver=prodresolver
      - traefik.http.routers.wordpress.entrypoints=websecure
      - traefik.http.services.wordpress.loadbalancer.server.port=80
    environment:
      WORDPRESS_DB_HOST: db
      WORDPRESS_DB_USER: wordpress
      WORDPRESS_DB_PASSWORD: wordpress
      WORDPRESS_DB_NAME: wordpress
    depends_on:
      - db
    restart: always
    networks:
      - backend

  # MySQL Service for WordPress
  db:
    image: mysql:8.0
    container_name: mysql
    volumes:
      - db_data:/var/lib/mysql
    environment:
      MYSQL_ROOT_PASSWORD: somewordpress
      MYSQL_DATABASE: wordpress
      MYSQL_USER: wordpress
      MYSQL_PASSWORD: wordpress
    restart: always
    labels:
      - traefik.enable=false
    networks:
      - backend

  # Uptime Kuma Service
  uptime_kuma:
    image: louislam/uptime-kuma:latest
    container_name: uptime_kuma
    volumes:
      - uptime_kuma_data:/app/data
      ## Traefik labels
    labels:
      - "traefik.enable=true"
      - traefik.http.routers.uptime.rule=Host(`uptime.yourdomain.com`)
      - traefik.http.routers.uptime.tls=true
      - traefik.http.routers.uptime.tls.certresolver=prodresolver
    restart: always
    networks:
      - backend
##Volumes part
volumes:
  wordpress_data:
  db_data:
  uptime_kuma_data:

    ## Networks part
networks:
  proxy:
    external: true
  backend:
    driver: bridge
Before launching Docker Compose, I created the external network manually.
sudo docker network create proxy
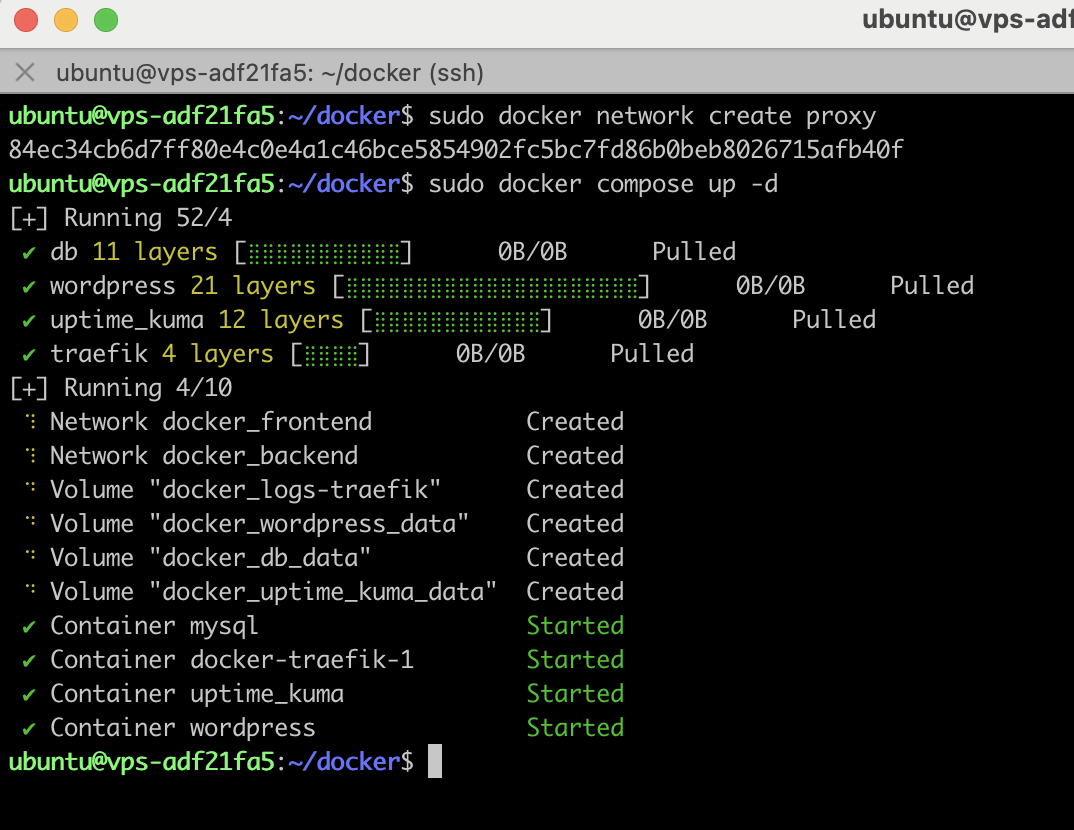
Everything works!
Okay, we’re now ready to integrate CrowdSec.
Integrating CrowdSec
By default, Crowdsec proposes some local dashboards through a Metabase Docker container, but it also provides a console managed at https://app.crowdsec.net.
For the sake of this tutorial, I’m only going to show you the CrowdSec Console.
Before adding the CrowdSec container, prepare the folder to host the logs and at the same time create a directory for the CrowdSec configuration.
sudo mkdir /var/log/crowdsec && sudo chown -R $USER:$USER /var/log/crowdsec
sudo mkdir /opt/crowdsec
sudo mkdir /opt/crowdsec-db
Next, simply add a CrowdSec container.
crowdsec:
    image: crowdsecurity/crowdsec
    container_name: crowdsec
    environment:
      PGID: "1000"
      COLLECTIONS: "crowdsecurity/traefik crowdsecurity/http-cve"
    expose:
      - "8080"
    volumes:
      - /var/log/crowdsec:/var/log/crowdsec:ro
      - /opt/crowdsec-db:/var/lib/crowdsec/data
      - /var/log/auth.log:/var/log/auth.log:ro
      - /opt/crowdsec:/etc/crowdsec
    restart: unless-stopped
    labels:
      - traefik.enable=false
    networks:
      - proxy
      - backend
Okay, now that it’s started, go to your CrowdSec Console to retrieve your enroll command.
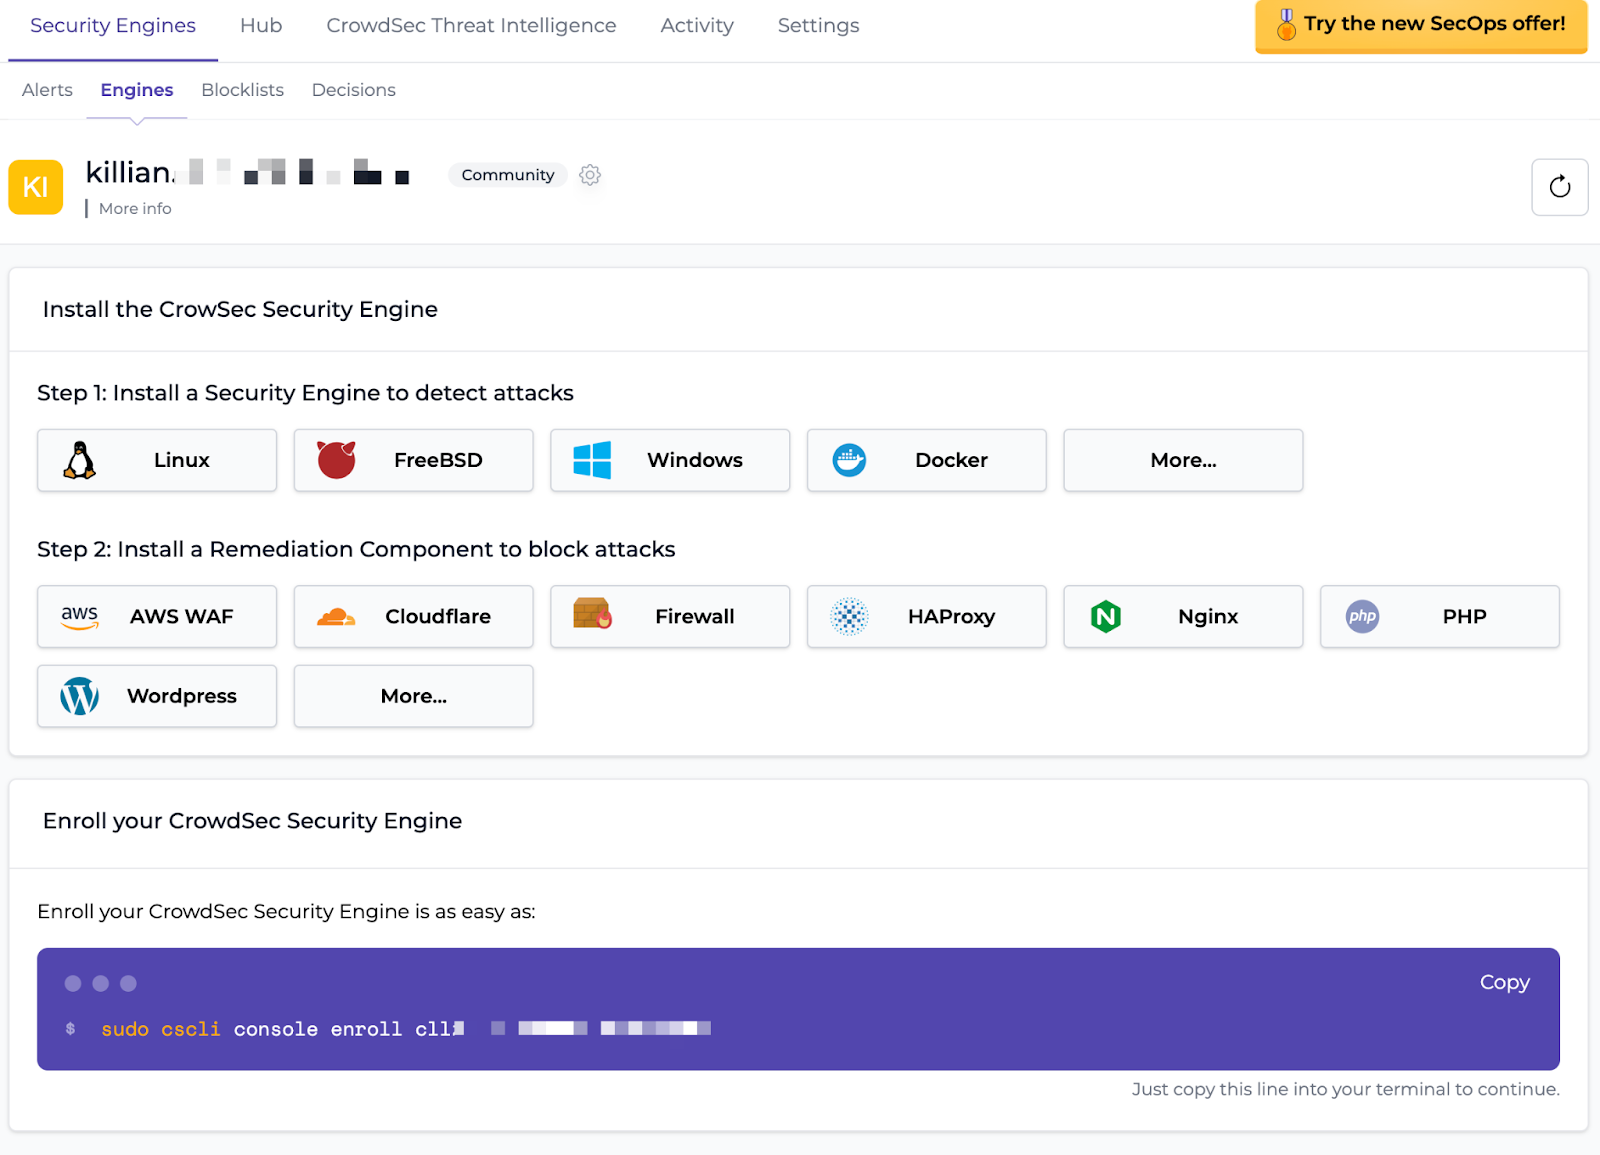
Then use a docker exec to execute the command:
sudo docker exec crowdsec cscli console enroll XXXXX

Back to the Console to accept the enroll. 👀

Everything rolls, doesn’t it? 😆
At this stage of the configuration, CrowdSec doesn’t see the Traefik Proxy logs and no decision will be made, so you need to add a Remediation Component and the Traefik Proxy logs .
Note: Remediation Components are used to apply security measures, such as blocking malicious IP addresses. They act in response to signals and decisions taken by LAPI, which are based on log analysis performed by parsers.
So, let’s generate a key for the Traefik Remediation Component.
sudo docker exec crowdsec cscli bouncers add traefik-bouncer

Start by preparing Traefik Proxy — I’m going to add the Crowdsec plugin (available on Traefik). This plugin will add the Remediation Component to Treafik, which will allow it to communicate with Crowdsec. Then I’ll give Traefik logs access to CrowdSec, so all I need to do is add the logs-traefik volumes to the Traefik container.
The plugin will be installed with two additional command lines on the Traefik container. Here are the lines to add:
      - --experimental.plugins.crowdsec-bouncer.modulename=github.com/maxlerebourg/crowdsec-bouncer-traefik-plugin
      - --experimental.plugins.crowdsec-bouncer.version=v1.2.1
For more information, you can refer directly to the Traefik documentation.
Here’s the new Traefik configuration. I’ve also added a depend on starting Traefik once Crowdsec is up.
 traefik:
    restart: unless-stopped
    image: traefik:latest
    command:
      - --providers.docker=true
      - --accesslog
      - --accesslog.filepath=/var/log/traefik/access.log
      - --entrypoints.web.address=:80
      - --entrypoints.websecure.address=:443
      - --certificatesresolvers.prodresolver.acme.email=youremail@domain.fr
      - --certificatesresolvers.prodresolver.acme.caserver=https://acme-v02.api.letsencrypt.org/directory
      - --certificatesresolvers.prodresolver.acme.keytype=RSA4096
      - --certificatesresolvers.prodresolver.acme.tlschallenge=true
      - --certificatesresolvers.prodresolver.acme.httpchallenge=true
      - --certificatesresolvers.prodresolver.acme.httpchallenge.entrypoint=web
      - --certificatesresolvers.prodresolver.acme.storage=/letsencrypt/acme.json
      - --experimental.plugins.crowdsec-bouncer.modulename=github.com/maxlerebourg/crowdsec-bouncer-traefik-plugin
      - --experimental.plugins.crowdsec-bouncer.version=v1.2.1
    ports:
      - "80:80"
      - "443:443"
    depends_on:
      - crowdsec
    volumes:
      - "./letsencrypt:/letsencrypt"
      - /var/run/docker.sock:/var/run/docker.sock:ro
      - "./logsTraefik:/var/log/traefik"
    networks:
      - proxy
      - backend
Top! Now I’ll add the Traefik log volumes to CrowdSec.
- ./logsTraefik:/var/log/traefik:ro
Modify the Crowdsec acquisition file which allows it to specify which logs to parse.
Path to file is /opt/crowdsec/acquis.yaml.
---
filenames:
 - /var/log/traefik/access.log
labels:
  type: traefik

All right, I’ve got the Traefik logs, which CrowdSec will now monitor. There’s just one last step: adding middleware to CrowdSec.
I’ll simply ask the WordPress router to pass through the middleware, then activate the CrowdSec middleware of the Traefik plugin, and finally, indicate the API key of the Remediation Component to communicate with LAPI.
Here are the three lines to be added to the labels:
     #Define midleware
      - "traefik.http.routers.wordpress.middlewares=crowdsec-wordpress@docker"
      ## Middleware configuration
      - "traefik.http.middlewares.crowdsec-wordpress.plugin.crowdsec-bouncer.enabled=true"
      - "traefik.http.middlewares.crowdsec-wordpress.plugin.crowdsec-bouncer.crowdseclapikey=BOUNCER-API-KEY"
Here is the new WordPress configuration:
# WordPress Service
  wordpress:
    image: wordpress:latest
    container_name: wordpress
    volumes:
      - wordpress_data:/var/www/html
      ## Traefik labels
    labels:
      - "traefik.enable=true"
      - traefik.http.routers.wordpress.rule=Host(`wordpress.yourdomain.com`)
      - traefik.http.routers.wordpress.tls=true
      - traefik.http.routers.wordpress.tls.certresolver=prodresolver
      - traefik.http.routers.wordpress.entrypoints=websecure
      - traefik.http.services.wordpress.loadbalancer.server.port=80
      - traefik.http.routers.wordpress.service=wordpress
      #Define midleware
      - "traefik.http.routers.wordpress.middlewares=crowdsec-wordpress@docker"
      ## Middleware configuration https://doc.traefik.io/traefik/middlewares/overview/
      - "traefik.http.middlewares.crowdsec-wordpress.plugin.crowdsec-bouncer.enabled=true"
      - "traefik.http.middlewares.crowdsec-wordpress.plugin.crowdsec-bouncer.crowdseclapikey=BOUNCER-API-KEY"
    environment:
      WORDPRESS_DB_HOST: db
      WORDPRESS_DB_USER: wordpress
      WORDPRESS_DB_PASSWORD: wordpress
      WORDPRESS_DB_NAME: wordpress
    depends_on:
      - db
    restart: always
    networks:
      - backend
Additional information
By default, the plugin is configured to communicate with crowdsec via the http://crowdsec:8080 address.
Here, we don’t need to change this value, as our crowdsec container is called crowdsec, so it can be reached at http://crowdsec:8080 within our internal docker network.
If you wish to change the connection url, you can do so by setting the CrowdsecLapiHost value. For more details, please refer to the Traefik Proxy plugin documentation.
Here is the complete Docker Compose file:
version: '3'

services:

  traefik:
    restart: unless-stopped
    image: traefik:latest
    command:
      - --providers.docker=true
      - --accesslog
      - --accesslog.filepath=/var/log/traefik/access.log
      - --entrypoints.web.address=:80
      - --entrypoints.websecure.address=:443
      - --certificatesresolvers.prodresolver.acme.email=youremail@domain.com
      - --certificatesresolvers.prodresolver.acme.caserver=https://acme-v02.api.letsencrypt.org/directory
      - --certificatesresolvers.prodresolver.acme.keytype=RSA4096
      - --certificatesresolvers.prodresolver.acme.tlschallenge=true
      - --certificatesresolvers.prodresolver.acme.httpchallenge=true
      - --certificatesresolvers.prodresolver.acme.httpchallenge.entrypoint=web
      - --certificatesresolvers.prodresolver.acme.storage=/letsencrypt/acme.json
      - --experimental.plugins.crowdsec-bouncer.modulename=github.com/maxlerebourg/crowdsec-bouncer-traefik-plugin
      - --experimental.plugins.crowdsec-bouncer.version=v1.2.1
    ports:
      - "80:80"
      - "443:443"
    depends_on:
      - crowdsec
    volumes:
      - "./letsencrypt:/letsencrypt"
      - /var/run/docker.sock:/var/run/docker.sock:ro
      - "./logsTraefik:/var/log/traefik"
    networks:
      - proxy
      - backend

  crowdsec:
    image: crowdsecurity/crowdsec
    container_name: crowdsec
    environment:
      PGID: "1000"
      COLLECTIONS: "crowdsecurity/traefik crowdsecurity/http-cve"
    expose:
      - "8080"
    volumes:
      - /var/log/crowdsec:/var/log/crowdsec:ro
      - /opt/crowdsec-db:/var/lib/crowdsec/data
      - /var/log/auth.log:/var/log/auth.log:ro
      - /opt/crowdsec:/etc/crowdsec
      - "./logsTraefik:/var/log/traefik"
    restart: unless-stopped
    labels:
      - traefik.enable=false
    networks:
      - proxy
      - backend

  # WordPress Service
  wordpress:
    image: wordpress:latest
    container_name: wordpress
    volumes:
      - wordpress_data:/var/www/html
      ## Traefik labels
    labels:
      - "traefik.enable=true"
      - traefik.http.routers.wordpress.rule=Host(`wordpress.yourdomain.fr`)
      - traefik.http.routers.wordpress.tls=true
      - traefik.http.routers.wordpress.tls.certresolver=prodresolver
      - traefik.http.routers.wordpress.entrypoints=websecure
      - traefik.http.services.wordpress.loadbalancer.server.port=80
      - traefik.http.routers.wordpress.service=wordpress
      #Define midleware
      - "traefik.http.routers.wordpress.middlewares=crowdsec-wordpress@docker"
      ## Middleware configuration
      - "traefik.http.middlewares.crowdsec-wordpress.plugin.crowdsec-bouncer.enabled=true"
      - "traefik.http.middlewares.crowdsec-wordpress.plugin.crowdsec-bouncer.crowdseclapikey=BOUNCER-API-KEY"
    environment:
      WORDPRESS_DB_HOST: db
      WORDPRESS_DB_USER: wordpress
      WORDPRESS_DB_PASSWORD: wordpress
      WORDPRESS_DB_NAME: wordpress
    depends_on:
      - db
    restart: always
    networks:
      - backend

  # MySQL Service for WordPress
  db:
    image: mysql:8.0
    container_name: mysql
    volumes:
      - db_data:/var/lib/mysql
    environment:
      MYSQL_ROOT_PASSWORD: somewordpress
      MYSQL_DATABASE: wordpress
      MYSQL_USER: wordpress
      MYSQL_PASSWORD: wordpress
    restart: always
    labels:
      - traefik.enable=false
    networks:
      - backend

  # Uptime Kuma Service
  uptime_kuma:
    image: louislam/uptime-kuma:latest
    container_name: uptime_kuma
    volumes:
      - uptime_kuma_data:/app/data
      ## Traefik labels
    labels:
      - "traefik.enable=true"
      - traefik.http.routers.uptime.rule=Host(`uptime.yourdomain.fr`)
      - traefik.http.routers.uptime.tls=true
      - traefik.http.routers.uptime.tls.certresolver=prodresolver
    restart: always
    networks:
      - backend
##Volumes part
volumes:
  wordpress_data:
  db_data:
  uptime_kuma_data:

    ## Networks part
networks:
  proxy:
    external: true
  backend:
    driver: bridge
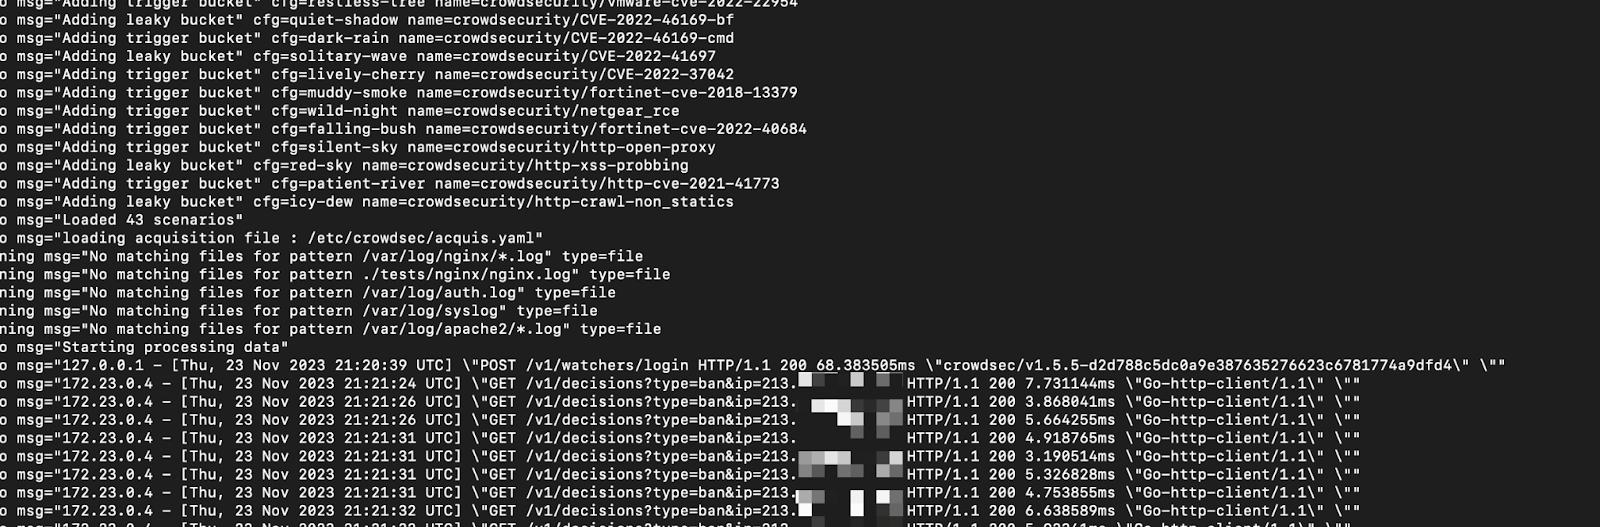
To verify that everything’s OK and that public IPs have been transferred, use the Docker logs.
sudo docker logs crowdsec
Note: If you don’t retrieve the public IP, remember to use echo “net.ipv4.ip_forward=1” | sudo tee -a /etc/sysctl.conf.
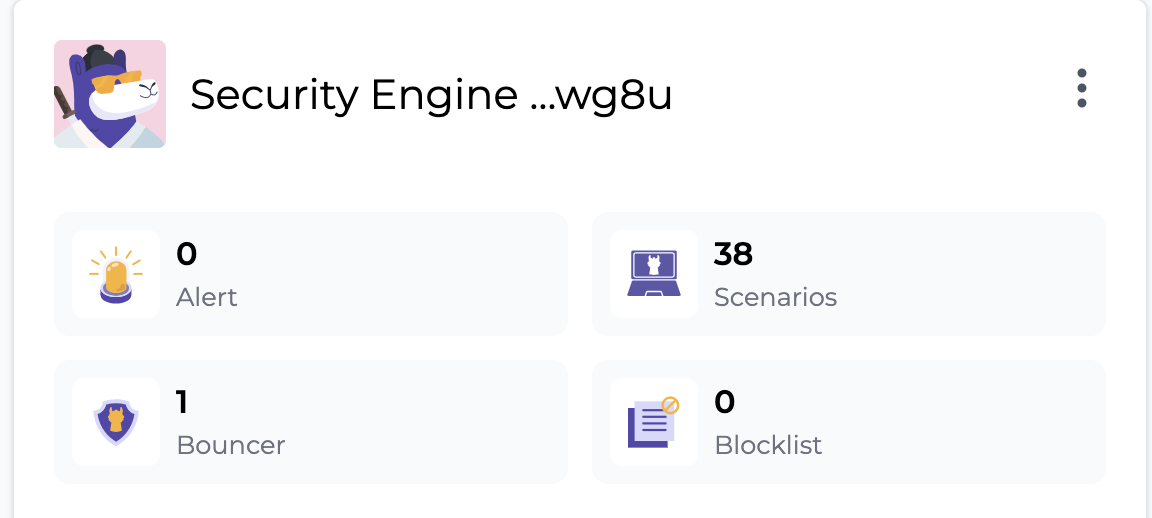
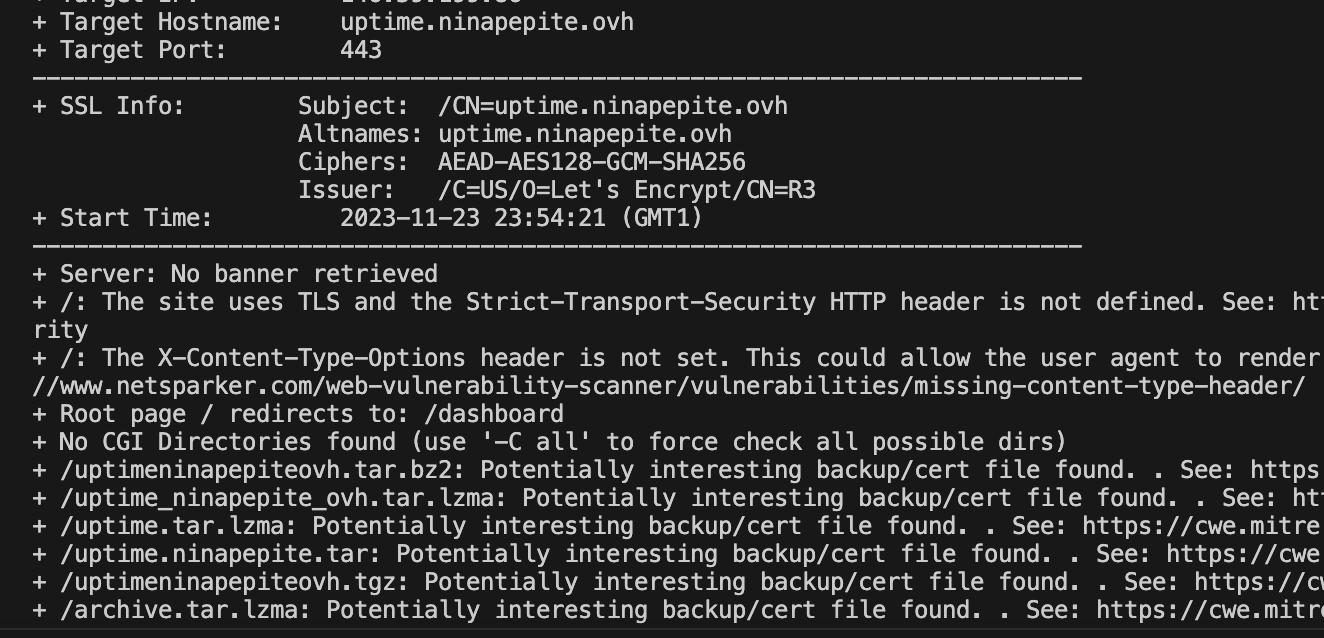
The CrowdSec Console checks that the bouncer is present, and I’ll do a scan with Nikto to see if the bouncer is active.
The results are available after a few seconds.
sudo docker exec crowdsec cscli decisions list

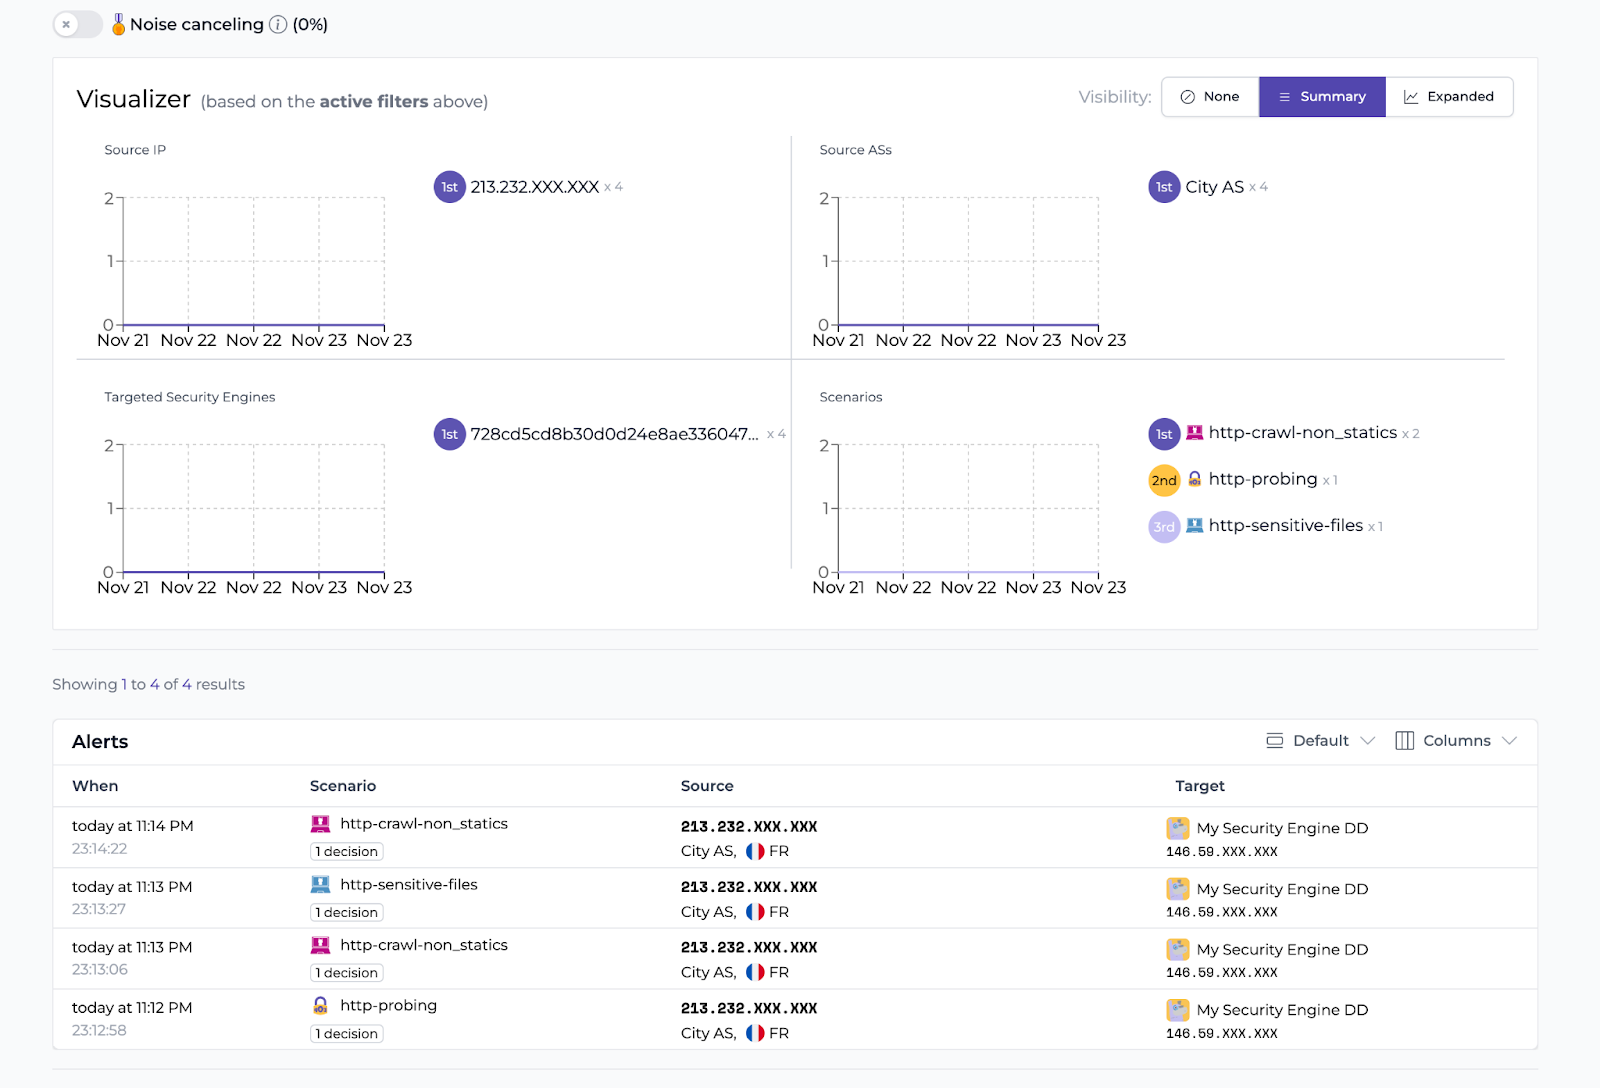
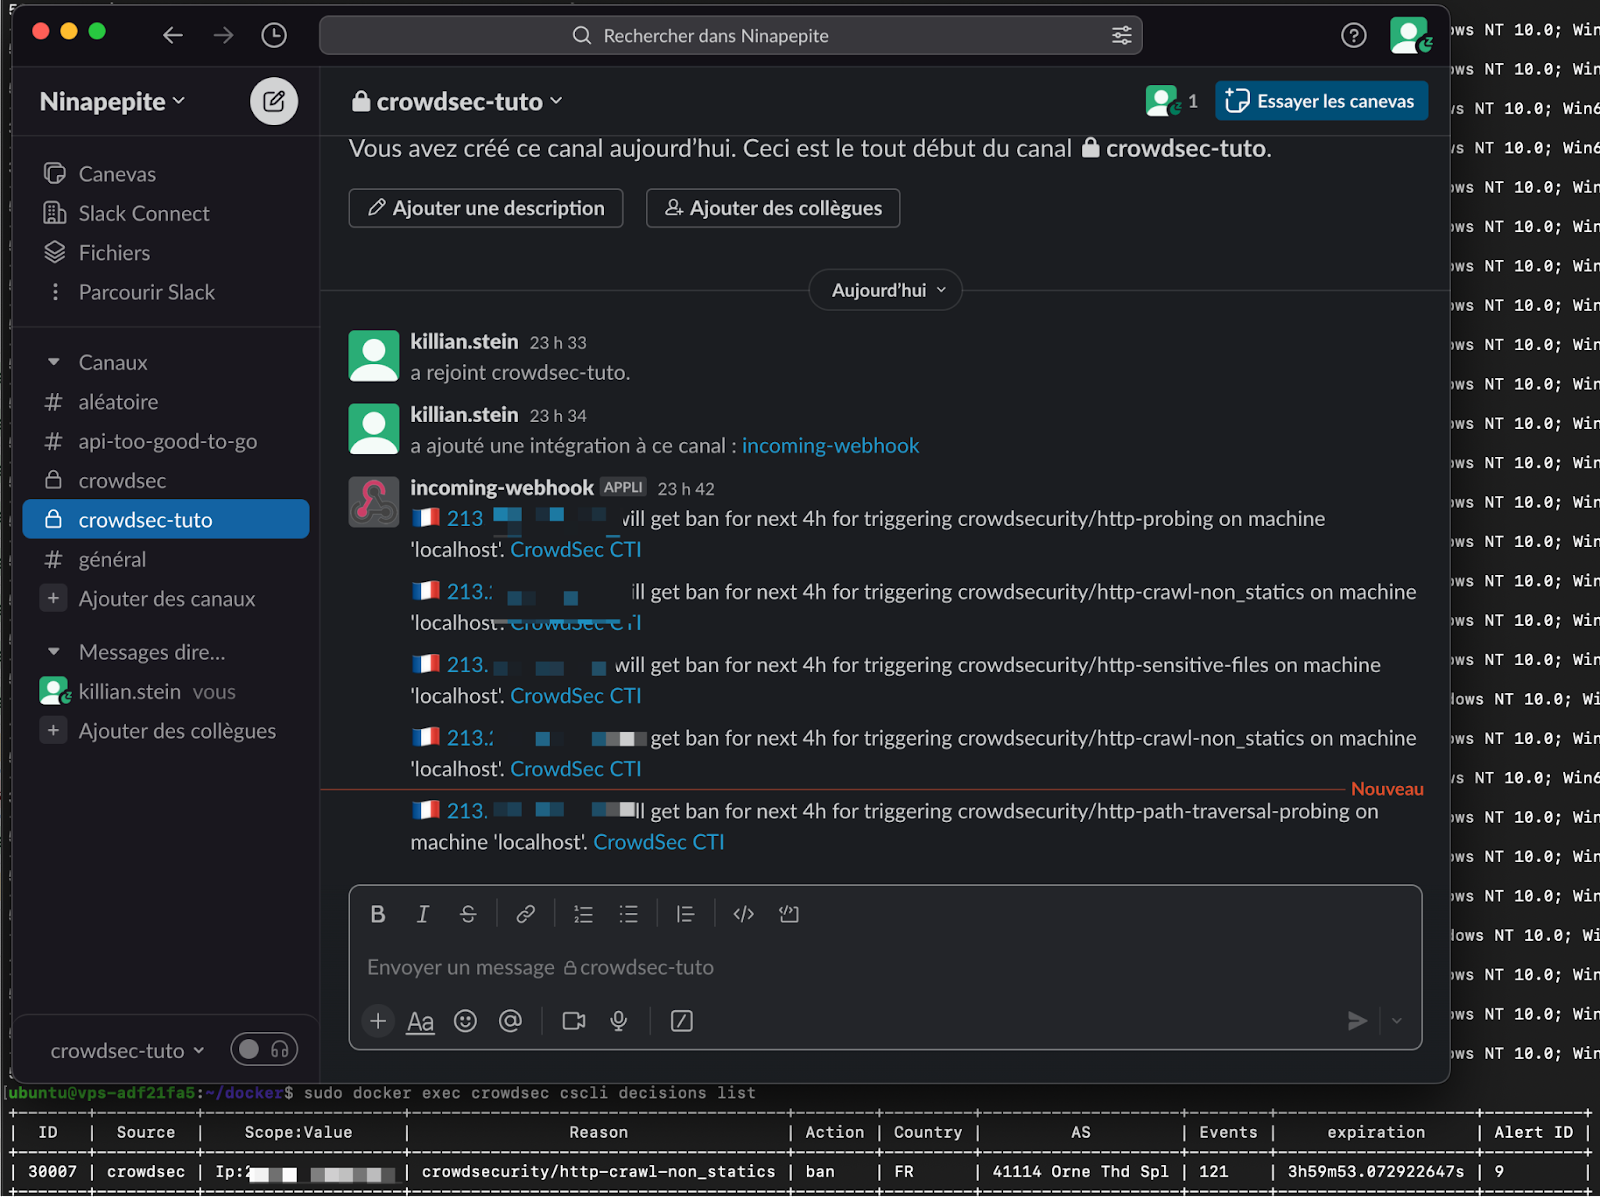
And here are the alerts inside the CrowdSec Console:
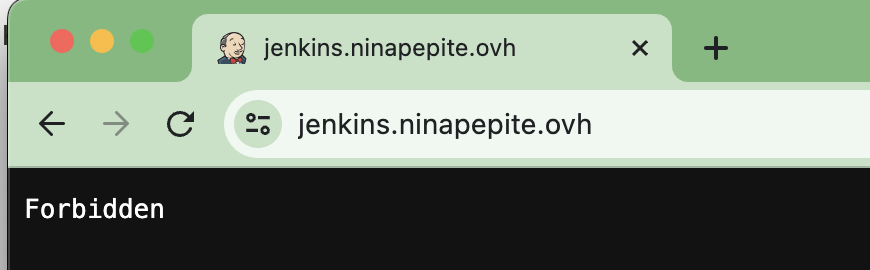
Now, if you try to get to jenkins.ninapepite.ovh you will be denied access.
Not bad, eh?
We have several alerts on the same IP, you might to tell me, but we can still make attacks? No! The network packet flow explains why:
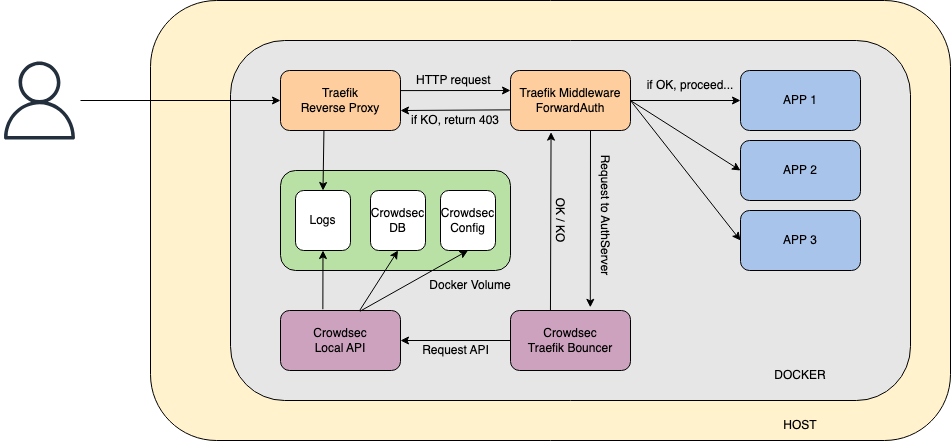
The packet is received, marked as malicious, an alert is generated, then returns a 403 error to the attacker. Wonderful!
Note: To unban your IP use the following:
sudo docker exec crowdsec cscli decisions delete -i X.X.X

Setting up alerts
So far so good, but now I’d like to be alerted without having to go to the CrowdSec Console. Phone notifications are great for production, aren’t they?
For this tutorial, I’m going to use Slack, but you can connect to any other application of this kind. You can find detailed instructions in the CrowdSec documentation.
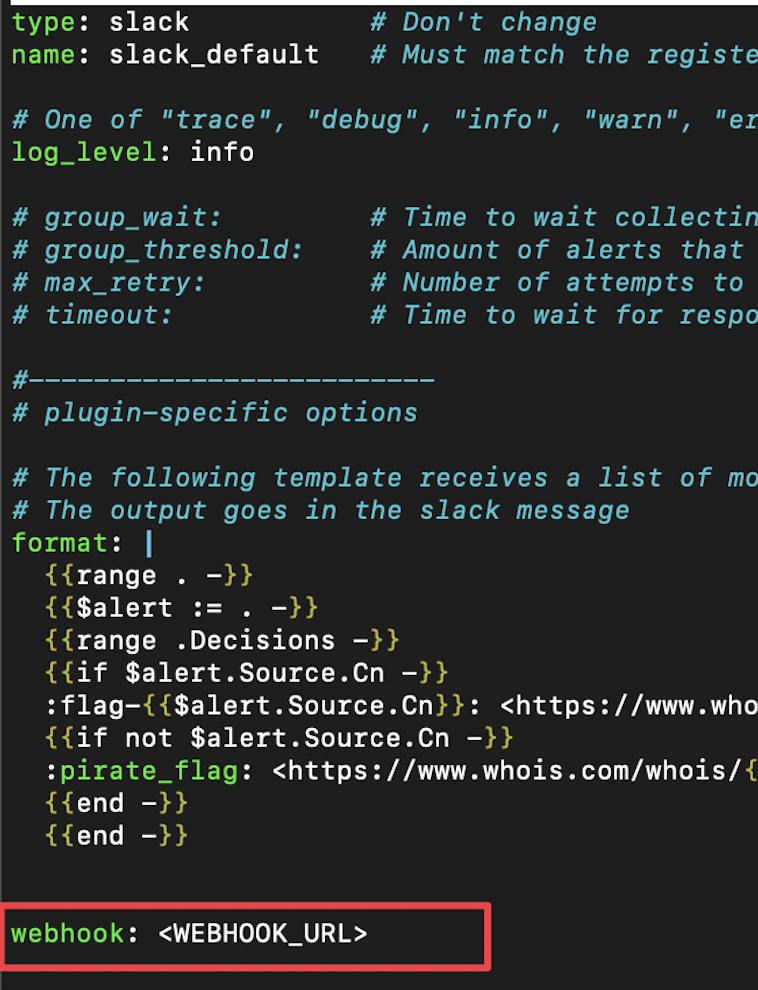
Make a small edit to the /opt/crowdsec/notifications/slack.yaml file and you’ll see how the CrowdSec team made our job easier!
All you have to do now is indicate the URL.
Next, tell the ban profile to send a notification about our slack_default configuration. Again, you need to edit the /opt/crowdsec/profiles.yaml file.
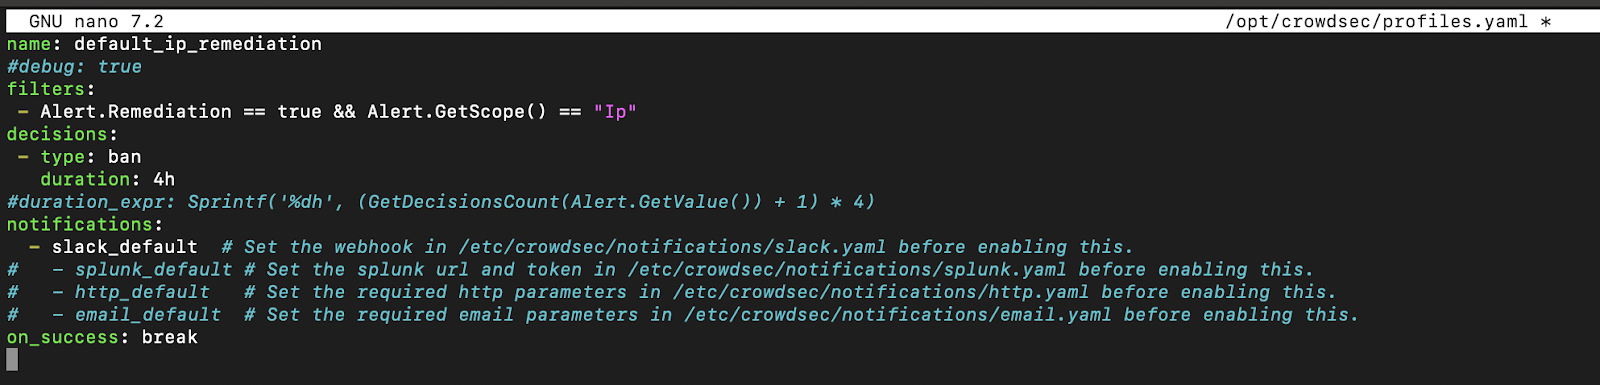
Note: The profile is the link between the alert and the notification. As soon as an alert matches the profile filter, a notification will be sent to the indicated source.
Now let’s restart CrowdSec.

Important note: Be extra careful with the scans. After testing on various platforms, my mobile operator’s IP doesn’t score very well on CrowdSec.
After the scan, the notifications came in.
Setting up allowlists
Allowlists can be very useful, especially in production. If something goes wrong with your internal connections, you’ll have a way of mitigating it quickly.
Let’s create a whitelist_custom.yaml file in /opt/crowdsec/parsers/s02-enrich/whitelists_custom.yaml.
##https://app.crowdsec.net/hub/author/crowdsecurity/configurations/whitelists
name: crowdsecurity/whitelists
description: "Whitelist events from private ipv4 addresses"
whitelist:
 reason: "private ipv4/ipv6 ip/ranges"
 ip:
   - "127.0.0.1"
   - "::1"
 cidr:
   - "192.168.0.0/16"
   - "10.0.0.0/8"
   - "172.16.0.0/12"

Let’s restart Docker and test it!
After the restart, if I do a scan, I won’t be banned.
Last but not least — blocklists
I’ve got one last thing to show you, the blocklists. Just take a look at this. 👀
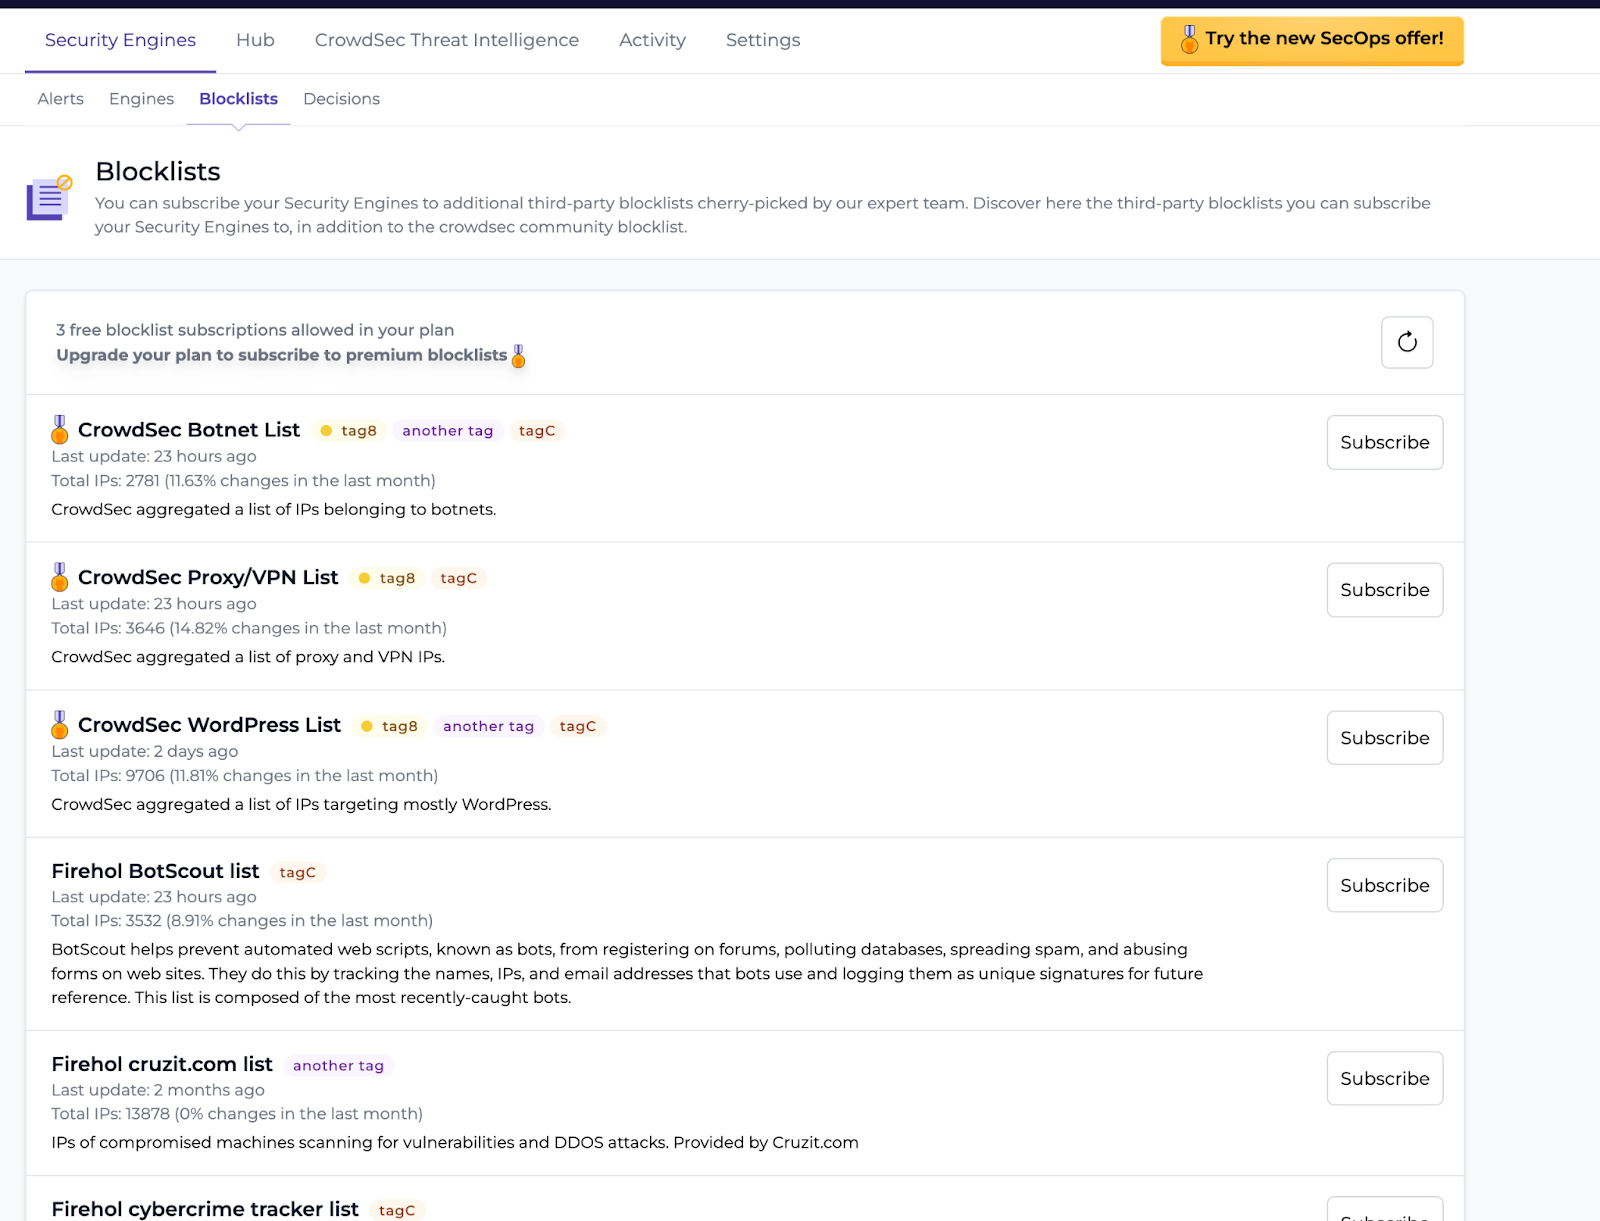
A dynamic fail2ban →
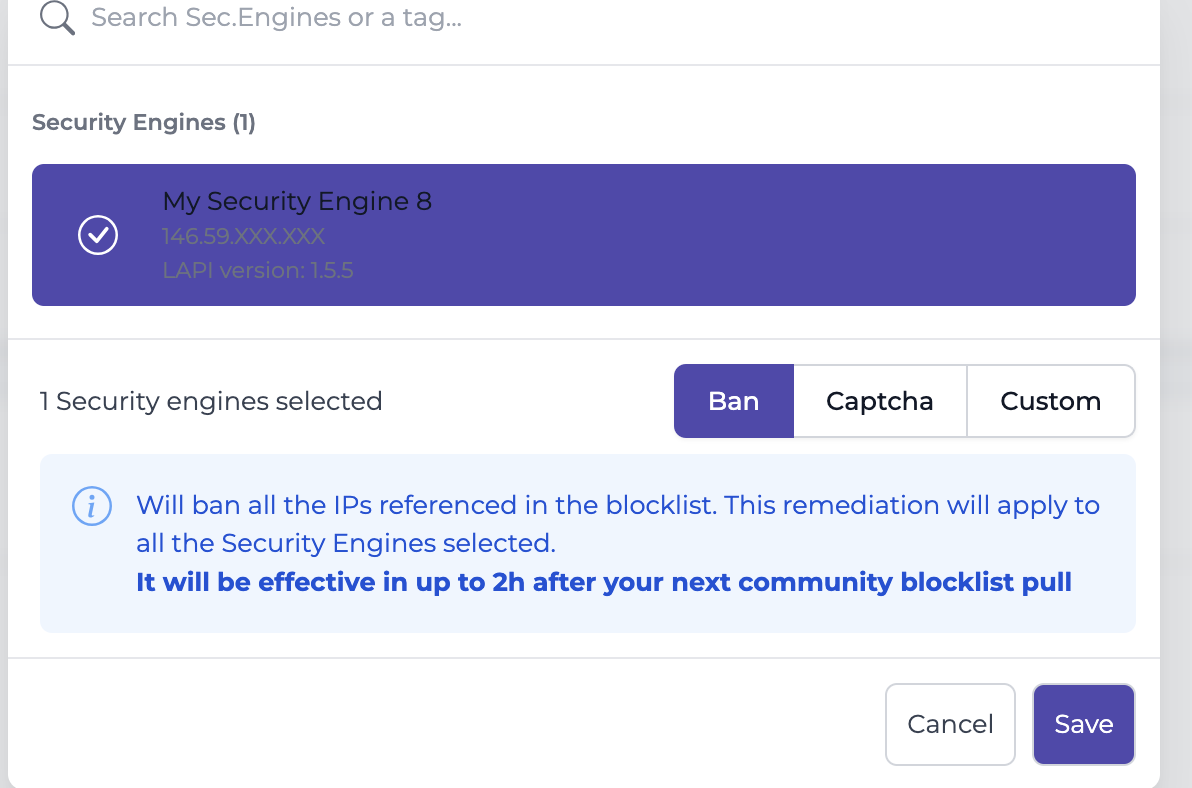
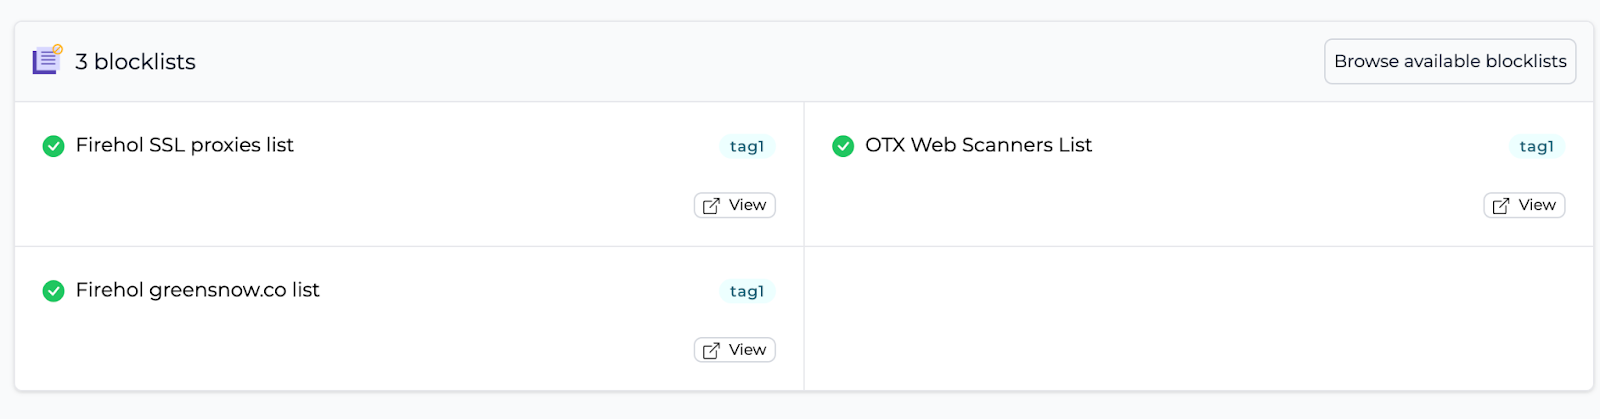
As you can see, in just a few clicks, you can ban thousands of malicious IPs in seconds, and for free! It’s better than searching for blocklists on GitHub, isn’t it? 😆
Last tips
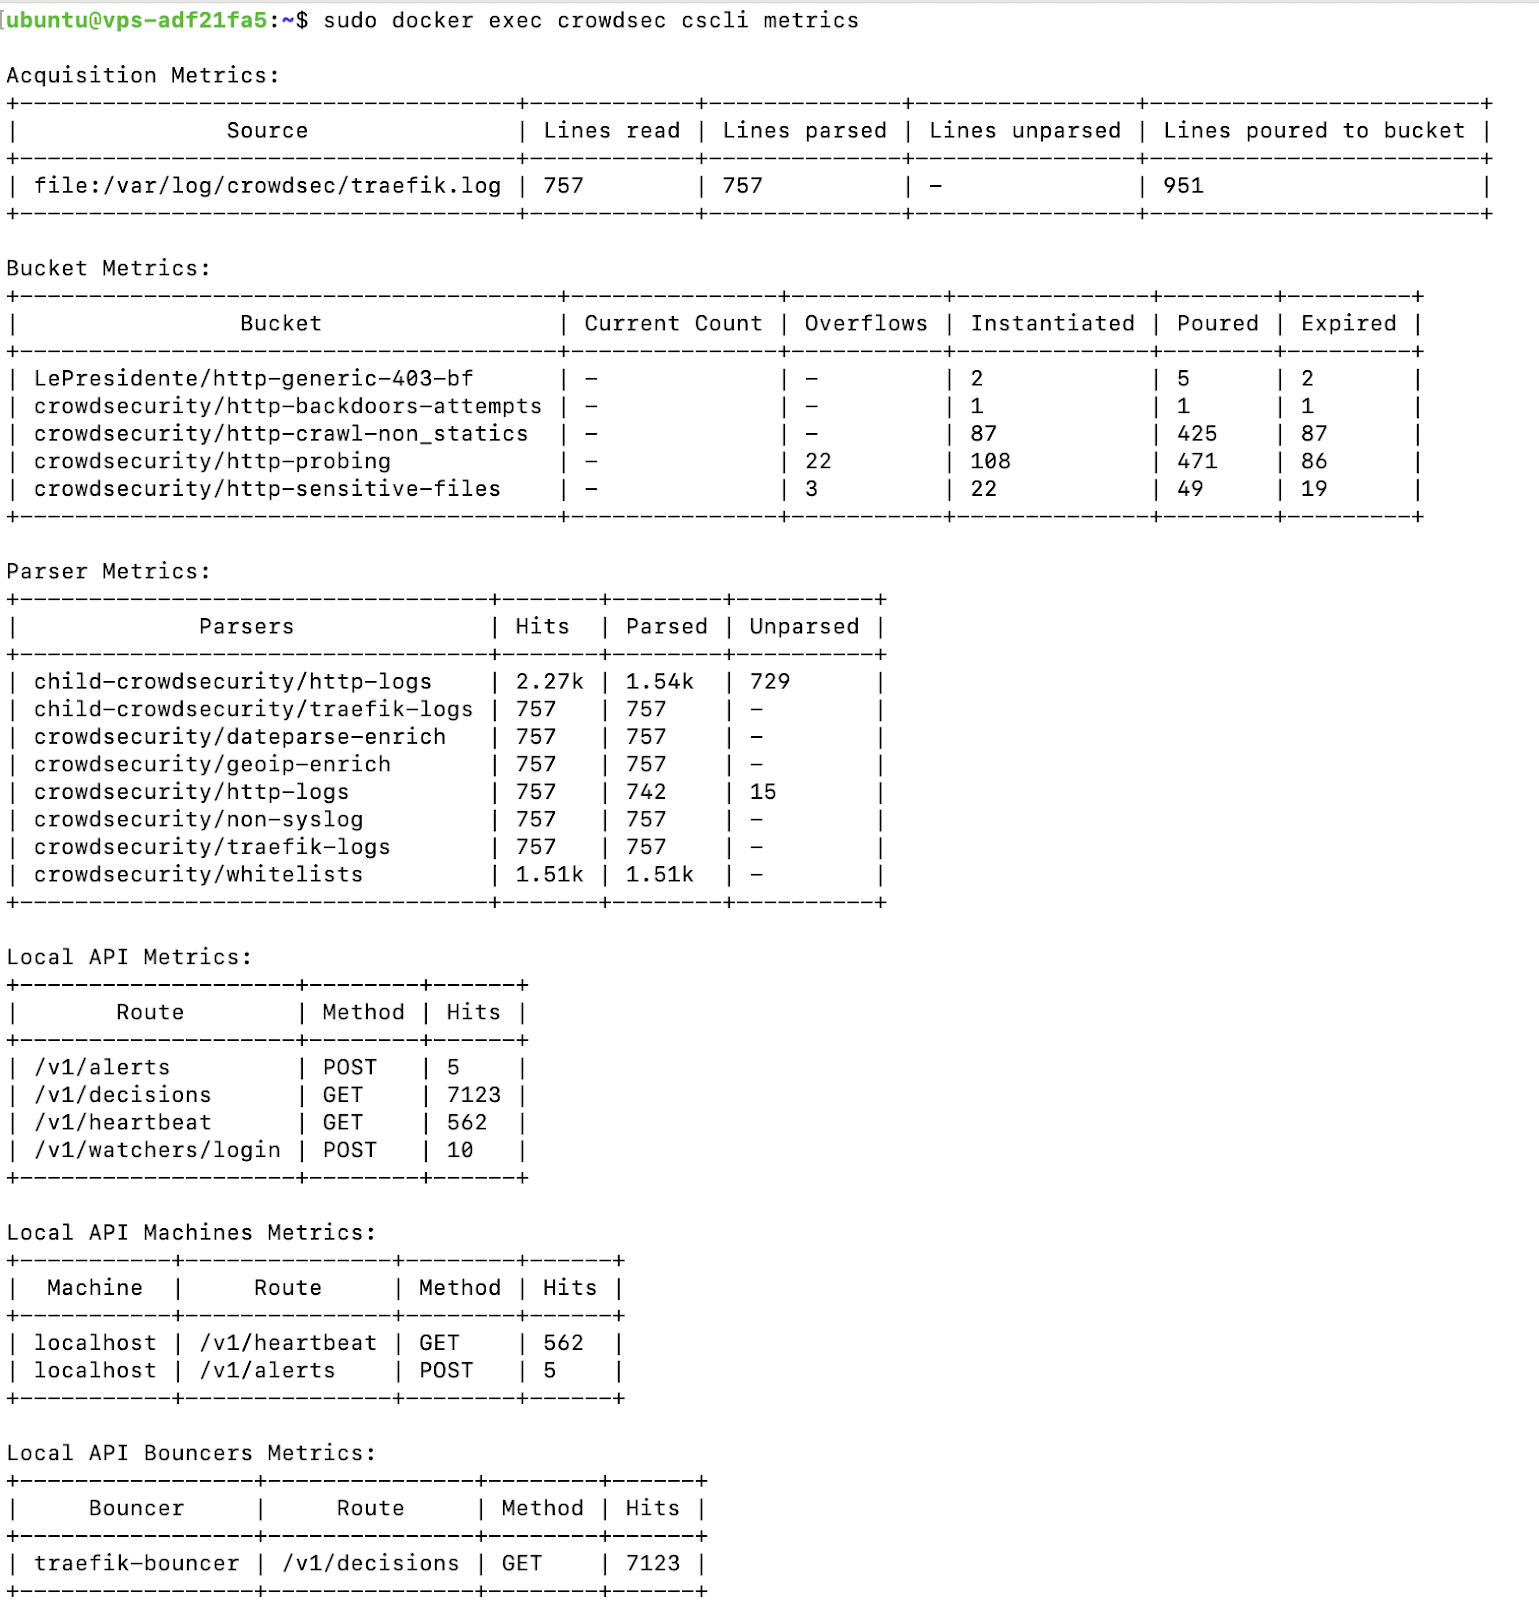
In this article, I haven’t explored the commands available via the CrowdSec CLI. I recommend you take a look at the documentation, which will give you an overview of all the available commands.
Here’s a shortcut: The cscli metrics command is very useful for getting an overview of your CrowdSec components and also for checking which logs are being processed, which is quite handy when troubleshooting.
That’s all for this article!
I hope this tutorial provided you with a helpful overview of the capabilities of the CrowdSec suite. Personally, I install it on all my configurations and find it very reassuring to have so much information on the security status of my machine.
Let’s not forget to thank the CrowdSec team for this complete solution! ❤️
Thanks for reading, and see you soon!
About Killian Stein
As a young IT enthusiast and teaching enthusiast, Killian tries to demystify modern technologies. He is a DevSecOps Engineer at Aidalinfo, where he is learning and consolidating his experience of the cloud and open source tools. If you liked Killian’s article and are curious to follow his next projects, don’t hesitate to connect with him on LinkedIn. New projects are coming soon!


