In this article, I’ll describe how to install the CrowdSec agent and the firewall bouncer directly on Raspberry Pi OS and convert it into a sort of honeypot using endlessh (an ssh tarpit) and a web server which only purpose is for CrowdSec to detect attacks in its logfiles.
Raspberry Pi is a perfect device for this as it’s a cheap way to help out collecting CTI – while hopefully annoying criminals who are lured into wasting time in our ssh tarpit. What’s not to like?
One of the biggest changes in CrowdSec from v1.3.0 has happened behind the scenes as we now produce precompiled binaries for arm and Raspberry Pi OS.
Theoretically, they should work on all versions of Raspberry Pi but this hasn’t been tested yet. So if you run into any problems please let us know. In this example, I’m using Raspberry Pi OS v11.3 on Raspberry Pi 4.
So far only the firewall bouncers for iptables and nftables are available. If you wish to have other bouncers ported to Raspberry PI OS please let us know. We are very community-driven in this area.
Installing CrowdSec agent and firewall bouncer
First, install CrowdSec repositories. This can be done automatically using the script provided by packagecloud.io or manually if you prefer. I will describe the scripted installation:
pi@raspberrypi:~ $ curl -s https://install.crowdsec.net/ | sudo bashDetected operating system as raspbian/bullseye.
Checking for curl...
Detected curl...
Checking for gpg...
Detected gpg...
Running apt-get update... done.
Installing apt-transport-https... done.
Installing /etc/apt/sources.list.d/crowdsec_crowdsec.list...done.
Importing packagecloud gpg key... done.
Running apt-get update... done.

The repository is setup! You can now install packages.
Next, I’ll install the CrowdSec agent and the firewall bouncer. It’s quite important not to add them on the same apt command as we can’t control which package is installed first. And if the firewall bouncer is installed before the agent then the bouncer won’t be registered automatically with the agent (which is not a big deal but less easy).
pi@raspberrypi:~ $ sudo apt install crowdsec
Reading package lists... Done
Building dependency tree... Done
Reading state information... Done
The following NEW packages will be installed:
  crowdsec
0 upgraded, 1 newly installed.
Need to get 18.7 MB of archives.
After this operation, 75.7 MB of additional disk space will be used.
Get:1 https://packagecloud.io/crowdsec/crowdsec/raspbian bullseye/main armhf crowdsec armhf 1.3.0 [18.7 MB]
..
You can always run the configuration again interactively by using '/usr/share/crowdsec/wizard.sh -c
Unpacking crowdsec (1.3.2) ...
Setting up crowdsec (1.3.2) ...
Creating /etc/crowdsec/acquis.yaml
INFO[01/26/22:10:13:51] crowdsec_wizard: service 'sshd': /var/log/auth.log
INFO[01/26/22:10:13:51] crowdsec_wizard: service 'linux': /var/log/syslog /var/log/kern.log /var/log/messages
WARN[26-01-2022 10:13:51 AM] can't load CAPI credentials from '/etc/crowdsec/online_api_credentials.yaml' (missing field)
INFO[26-01-2022 10:13:51 AM] push and pull to Central API disabled
INFO[26-01-2022 10:13:51 AM] Machine '3e23e34d17484a28b9473f69f7d9d21cxJ9nNdsesBoSb42b' successfully added to the local API
INFO[26-01-2022 10:13:51 AM] API credentials dumped to '/etc/crowdsec/local_api_credentials.yaml'
WARN[26-01-2022 10:13:51 AM] can't load CAPI credentials from '/etc/crowdsec/online_api_credentials.yaml' (missing field)
INFO[26-01-2022 10:13:51 AM] push and pull to Central API disabled
INFO[26-01-2022 10:13:55 AM] Successfully registered to Central API (CAPI)
INFO[26-01-2022 10:13:55 AM] Central API credentials dumped to '/etc/crowdsec/online_api_credentials.yaml'
WARN[26-01-2022 10:13:55 AM] Run 'sudo systemctl reload crowdsec' for the new configuration to be effective.
Updating hub
INFO[26-01-2022 10:14:01 AM] Wrote new 241780 bytes index to /etc/crowdsec/hub/.index.json
INFO[01/26/22:10:14:01] crowdsec_wizard: Installing collection 'crowdsecurity/linux'
INFO[01/26/22:10:16:41] crowdsec_wizard: Installing collection 'crowdsecurity/sshd'
...
In spite of the messages that look like errors, they’re just warnings. So this is fine. Next, I’ll install the firewall bouncer. There are two options here: the iptables- and the nftables-based bouncer. Which you’re choosing doesn’t matter much unless you are already running a firewall script based on one of them. In that case, install the corresponding firewall bouncer.
I’ll just install the iptables-based bouncer:
pi@raspberrypi:~ $ sudo apt install crowdsec-firewall-bouncer-iptables
Reading package lists... Done
Building dependency tree... Done
Reading state information... Done
The following additional packages will be installed:
  ipset iptables libip6tc2 libipset13 libnetfilter-conntrack3 libnfnetlink0
Suggested packages:
  firewalld
The following NEW packages will be installed:
  crowdsec-firewall-bouncer-iptables ipset iptables libip6tc2 libipset13 libnetfilter-conntrack3 libnfnetlink0
0 upgraded, 7 newly installed, 0 to remove and 56 not upgraded.
Need to get 2646 kB of archives.
After this operation, 9721 kB of additional disk space will be used.
Do you want to continue? [Y/n]
...
Get:1 https://packagecloud.io/crowdsec/crowdsec/raspbian bullseye/main armhf crowdsec-firewall-bouncer-iptables armhf 0.0.22 [2130 kB]
Fetched 2646 kB in 7s (397 kB/s)
...
Setting up crowdsec-firewall-bouncer-iptables (0.0.22) ...
cscli/crowdsec is present, generating API key
API Key : 031db44dbe9e10cdbc1400d8010c69c4
Processing triggers for man-db (2.9.4-2) ...
Processing triggers for libc-bin (2.31-13+rpt2+rpi1) ...
The lines in bold indicate that the firewall bouncer has registered automatically with the agent. Let’s check to make sure:
pi@raspberrypi:~ $ sudo cscli bouncers list
-------------------------------------------------------------------------------------------------------------------------------------------------------------------
 NAME                        IP ADDRESS  VALID  LAST API PULL         TYPE                       VERSION
-------------------------------------------------------------------------------------------------------------------------------------------------------------------
 FirewallBouncer-1643192418  127.0.0.1         2022-01-26T10:35:10Z  crowdsec-firewall-bouncer  v0.0.22-debian-pragmatic-f64e94b59a948717c3dc848f9abebb27b5974714
-------------------------------------------------------------------------------------------------------------------------------------------------------------------
The output of the cscli bouncers list shows that a locally running firewall bouncer is registered. It’s probably safe to assume that it’s the one we just installed.
Installing shell completion
If you’re an experienced Linux user one of the first things you’ll notice is that there’s no shell completion, meaning that you’re on your own when typing in cscli commands in terms of remembering commands. One grows tired of that really fast. Luckily there’s support for bash completion as documented here. Basically, I am just following the instructions below.
pi@raspberrypi:~ $ cscli completion bash | sudo tee /etc/bash_completion.d/cscli
# bash completion for cscli                                -*- shell-script -*-

__cscli_debug()
{
    if [[ -n ${BASH_COMP_DEBUG_FILE} ]]; then
        echo "$*" >> "${BASH_COMP_DEBUG_FILE}"
    fi
}

.
.
.

.
.
.

if [[ $(type -t compopt) = "builtin" ]]; then
    complete -o default -F __start_cscli cscli
else
    complete -o default -o nospace -F __start_cscli cscli
fi

# ex: ts=4 sw=4 et filetype=sh
pi@raspberrypi:~ $ source ~/.bashrc
pi@raspberrypi:~ $
After installation, verify that it works by typing sudo cscli and double-tapping the key:
pi@raspberrypi:~ $ sudo cscli
alerts      collections  console      explain     hubtest     metrics       scenarios
bouncers    completion   dashboard    help        lapi        parsers       simulation
capi        config       decisions    hub         machines    postoverflows version
It works!
Installing scenarios
CrowdSec is not much fun without the right scenarios installed and since the server I am installing on is directly exposed to the internet there’s a high risk of it being hit by drive-by port scanning. We want to detect those and block them. Luckily there’s a scenario for that.
pi@raspberrypi:~ $ sudo cscli scenarios list
SCENARIOS
--------------------------------------------------------------------------------------
 NAME                        STATUS   VERSION  LOCAL PATH
--------------------------------------------------------------------------------------
 crowdsecurity/ssh-bf         enabled  0.1      /etc/crowdsec/scenarios/ssh-bf.yaml
 crowdsecurity/ssh-slow-bf    enabled  0.2      /etc/crowdsec/scenarios/ssh-slow-bf.yaml
--------------------------------------------------------------------------------------
With this project, I am aiming to collect as much CTI as possible so I also want to report hosts that constantly portscans the internet. That is being done with the iptables-scan-multi_ports scenario.
pi@raspberrypi:~ $ sudo cscli scenarios install crowdsecurity/iptables-scan-multi_ports
INFO[26-01-2022 09:10:10 PM] crowdsecurity/iptables-scan-multi_ports : OK
INFO[26-01-2022 09:10:10 PM] Enabled scenarios : crowdsecurity/iptables-scan-multi_ports
INFO[26-01-2022 09:10:10 PM] Enabled crowdsecurity/iptables-scan-multi_ports
INFO[26-01-2022 09:10:10 PM] Run 'sudo systemctl reload crowdsec' for the new configuration to be effective.
pi@raspberrypi:~ $ sudo systemctl reload crowdsec
Remember to reload the CrowdSec service as described for the new scenario to take effect.
Enrolling in the CrowdSec console
Next, you probably want to enroll your brand new CrowdSec instance in the Console at https://app.crowdsec.net to get fancy graphs and statistics and to be able to get more information on the IPs that are attacking you. And if you deploy more CrowdSec instances (regardless of OS) the console will give you a nice overview of your instances.
In order to be able to enroll your CrowdSec instance in the Console, the very first thing you need to do is to sign up by clicking the ‘Subscribe (Beta)’ button on https://app.crowdsec.net. Once you’ve done that it’s time to enroll agents!
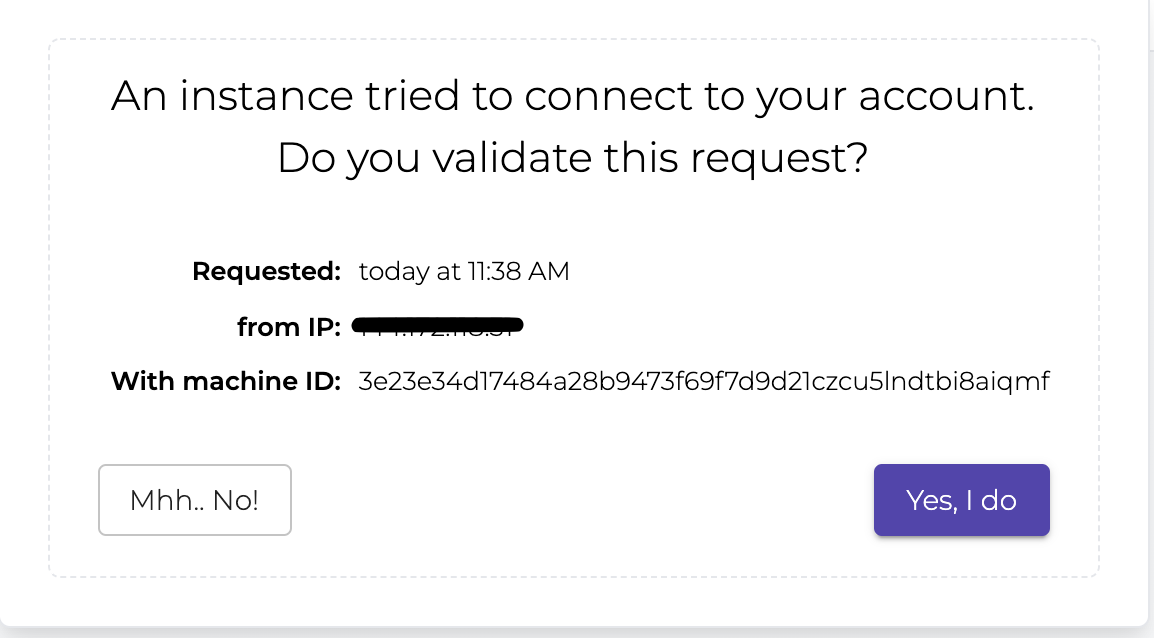
This is a two-step process:
- Tell the CrowdSec agent to enroll in the console.
- Accept that connection request.
Under ‘Instances’ click ‘Add Instance’. Then copy the sudo enroll command that shows itself on the screen and paste it into your terminal and run it:
pi@raspberrypi:~ $ sudo cscli console enroll ckskqgawm00000wmpic6zffjgAfter that, you will need to accept the connection in the console.
Next, you can edit the instance to give it a name that makes more sense to you or you can tag it in a group if you wish.
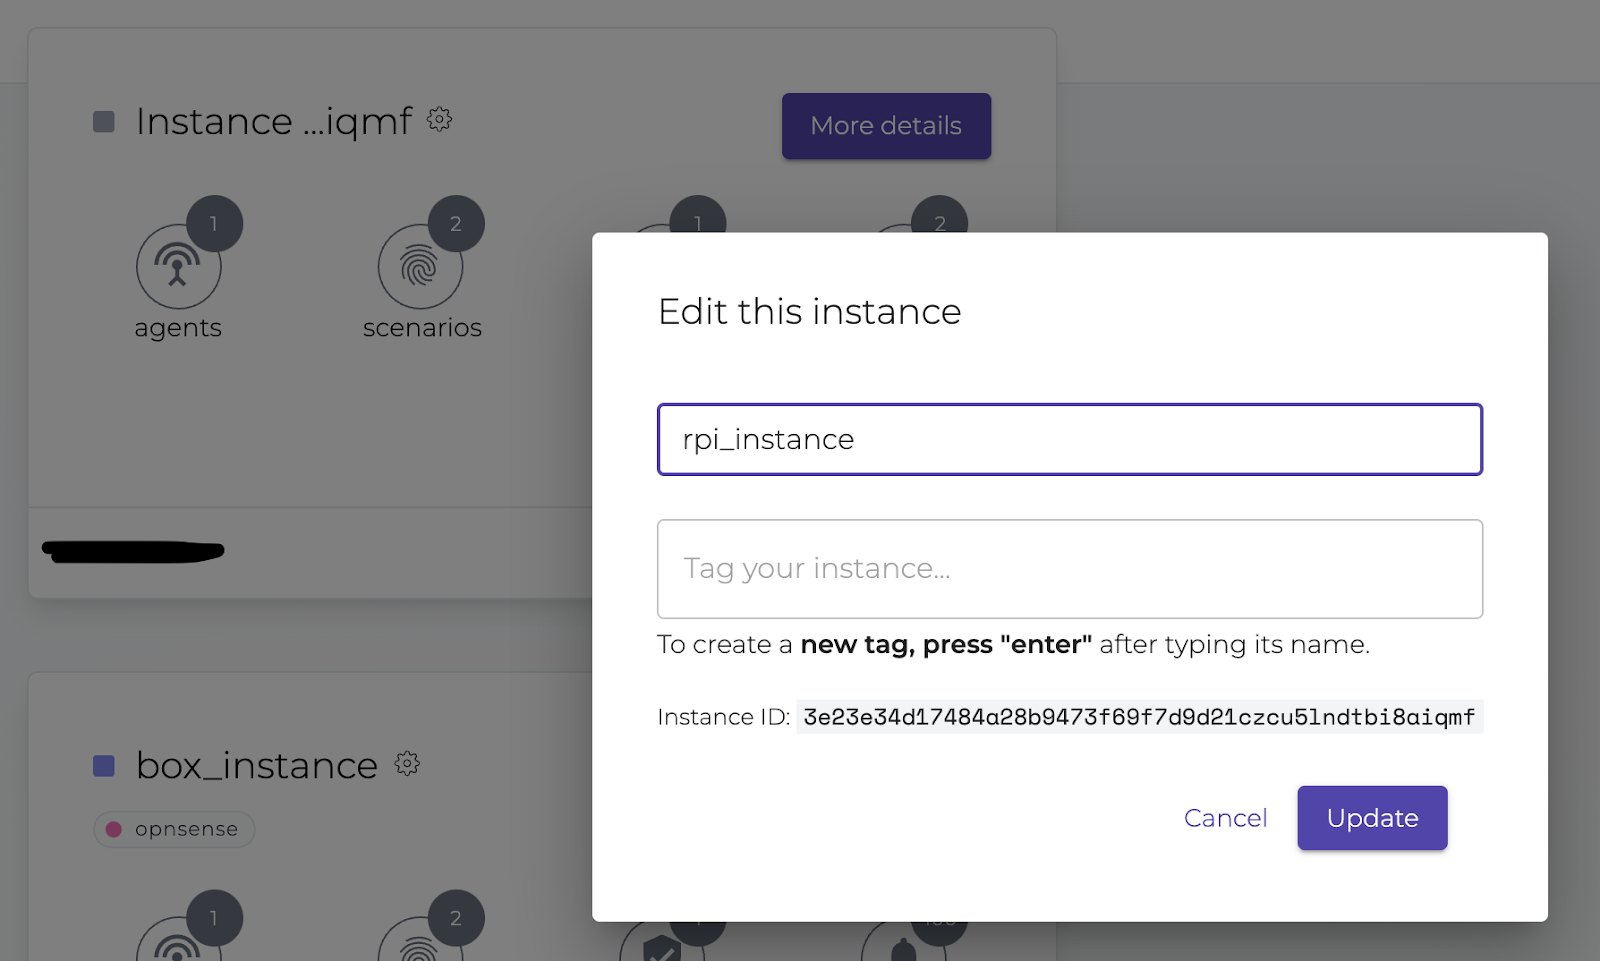
Now your Raspberry Pi-powered CrowdSec instance is successfully enrolled.
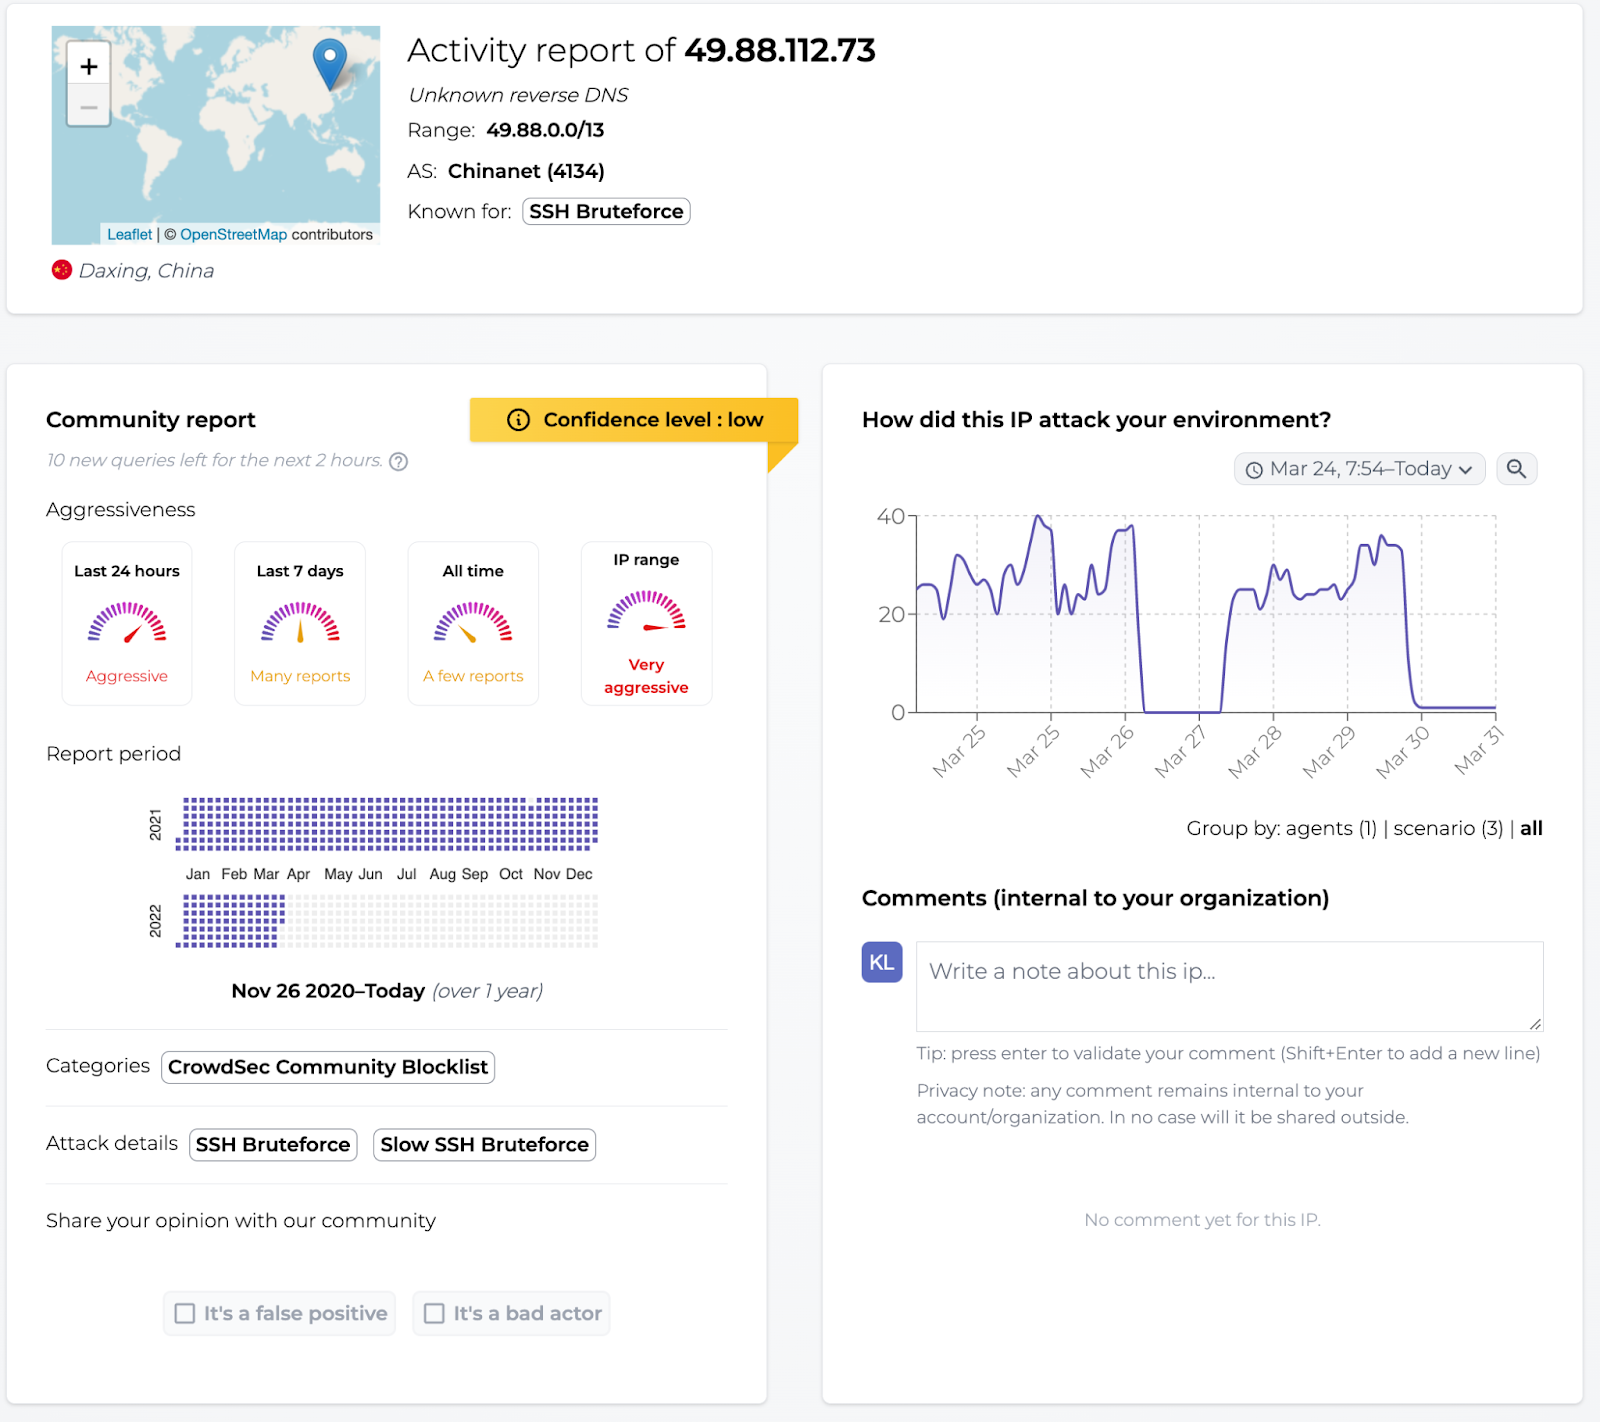
In the Console, there’s a rich opportunity to see who attacks your servers. This is an overview of which attacks are being detected.

Who’s attacking?
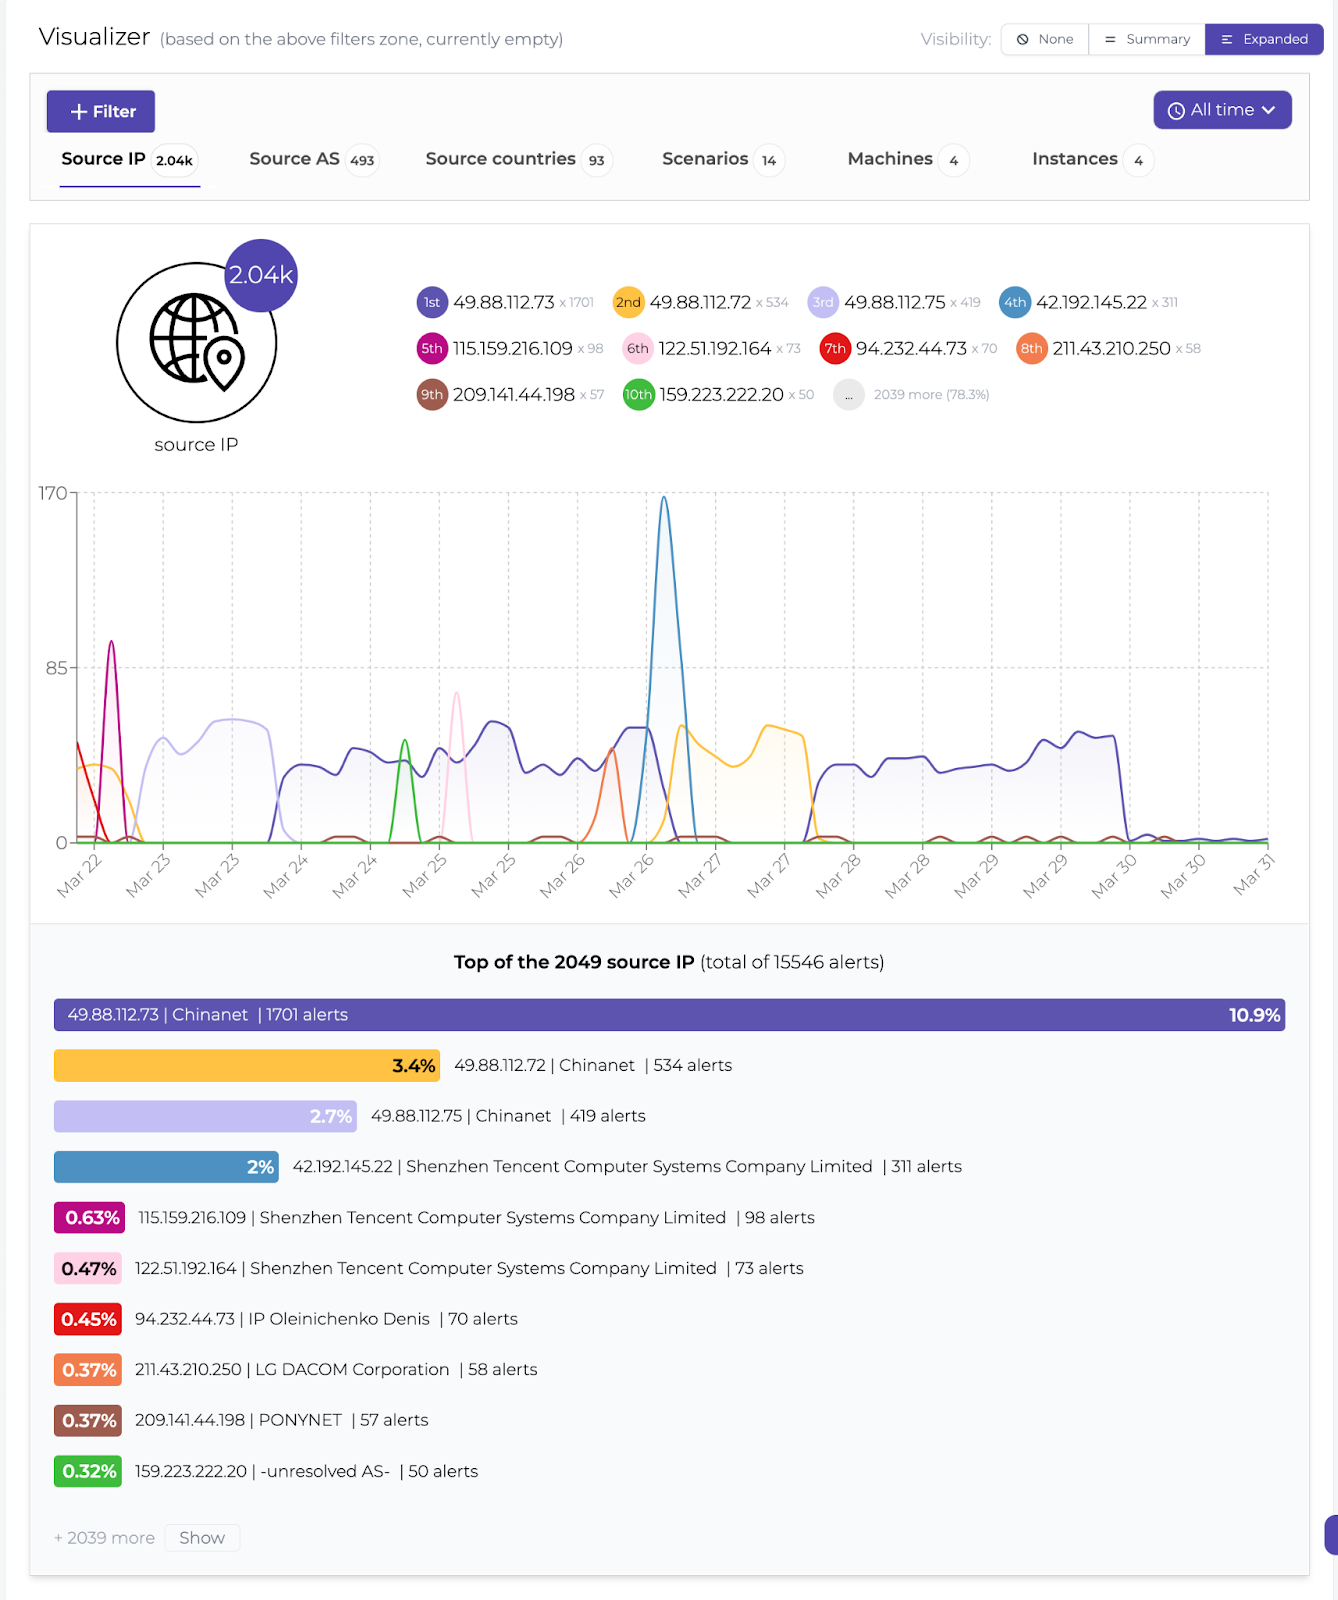

Oh, it’s that the same netblock we’ve been reporting frequently since the beginning of CrowdSec:
Installing services
CrowdSec is all about collecting and sharing threat intelligence so I want to install endlessh, an ssh tarpit that’s really good at annoying attackers by keeping them busy and wasting their time as well as the webserver Nginx.
I’m not setting anything up in Nginx other than the default web page since we just want a web server to listen for drive-by attacks so we can collect information on which attacks are being performed and by whom. The crowdsecurity/http-cve collection consists of scenarios designed to detect the exploitation of a number of common web-based vulnerabilities. This is a good collection to install when you have CrowdSec and a web server since we are looking into expanding this collection with even more detections over time. Also, you get to help the crowd even more by contributing more CTI.
This part of the article is not limited to Raspberry Pi OS but would work exactly the same on any Debian-derived Linux distro. So feel free to use it anywhere you want.
Endlessh
Open /etc/ssh/sshd_config in your favorite text editor and uncomment the #Port line and change the number after it to ‘22022’:
I want to run endless on port 22 which is the standard port for the ssh service to be able to detect as many attacks as possible. This means that I would need to change the configuration of openssh-server which is the standard ssh service so it listens on another port, say 22022.
Port 22022Remember to restart the ssh service for the changes to take effect.
Depending on how brave you are, you might want to keep ssh listening on port 22 until you verify that the new port works. In that case, just add an extra line with the number 22:
Port 22
Port 22022
After making sure you can connect to port 22022, comment out the Port 22 line in sshd_config and restart ssh again.
Next install endlessh via apt:
pi@raspberrypi:~ $ sudo apt install endlesshThen install the endlessh collection with cscli:
pi@raspberrypi:~ $ sudo cscli collections install crowdsecurity/endlessh
INFO[30-03-2022 09:54:13 AM] crowdsecurity/endlessh-logs : OK
INFO[30-03-2022 09:54:13 AM] Enabled parsers : crowdsecurity/endlessh-logs
WARN[30-03-2022 09:54:13 AM] crowdsecurity/dateparse-enrich : overwrite
INFO[30-03-2022 09:54:14 AM] crowdsecurity/endlessh-bf : OK
INFO[30-03-2022 09:54:14 AM] Enabled scenarios : crowdsecurity/endlessh-bf
INFO[30-03-2022 09:54:14 AM] crowdsecurity/endlessh : OK
INFO[30-03-2022 09:54:14 AM] Enabled collections : crowdsecurity/endlessh
INFO[30-03-2022 09:54:14 AM] Enabled crowdsecurity/endlessh
INFO[30-03-2022 09:54:14 AM] Run 'sudo systemctl reload crowdsec' for the new configuration to be effective.
pi@raspberrypi:~ $ sudo systemctl reload crowdsec
Remember to reload CrowdSec for the new collection to be installed properly.
By default, endlessh is not permitted to start on privileged ports (< 1024). So we need to fix that:
pi@raspberrypi:~ $ sudo su
root@raspberrypi:/home/pi# echo 'net.ipv4.ip_unprivileged_port_start=0' > /etc/sysctl.d/50-unprivileged-ports.conf
root@raspberrypi:/home/pi# sysctl --system
root@raspberrypi:/home/pi# reboot
Endlessh needs to be configured to run on port 22 and to log (to /var/log/syslog by default). Create the file /etc/endlessh/config, using your favorite text editor and add the following lines:
Port 22
Delay 10000
MaxLineLength 32
MaxClients 4096
LogLevel 1
BindFamily 0
The next step to getting CrowdSec to detect attacks on our fake ssh service is to tell /etc/crowdsec/acquis.yaml where to look and which format the log file is in. Add the following lines:
---
filenames:
  - /var/log/syslog
labels:
  type: endlessh
---
Make sure that each entry is separated by ‘—’. The ‘—’ in the end is not mandatory.
Lastly, both services would need to get restarted:
pi@raspberrypi:~ $ sudo service endlessh restart
pi@raspberrypi:~ $ sudo service crowdsec restart
After a little while, you should see entries like these in /var/log/crowdsec.log:
time="30-03-2022 13:32:23" level=info msg="Ip 49.88.112.73 performed 'crowdsecurity/endlessh-bf' (7 events over 6m1.534221648s) at 2022-03-
30 12:32:23.216551502 +0000 UTC"
time="30-03-2022 13:32:23" level=info msg="(3e23e34d17484a28b9473f69f7d9d21cxJ9nNdsesBoSb42b/crowdsec) crowdsecurity/endlessh-bf by ip 49.88.112.73 (CN/4134) : 4h ban on Ip 49.88.112.73"
Nginx
We’re simply installing Nginx from the package repository:
pi@raspberrypi:~ $ sudo apt install nginxAfter installation, make sure to start up the webserver.
pi@raspberrypi:~ $ sudo service nginx startFor CrowdSec to know the location and type of the log files, add the following to /etc/crowdsec/acquis.yaml
---
filenames:
  - /var/log/nginx/error.log
  - /var/log/nginx/access.log
labels:
  type: nginx
---
Make sure to remember ‘—’ or else you’ll get weird errors.
Install the crowdsecurity/http-cve collection to detect those drive-by attacks:
pi@raspberrypi:~ $ sudo cscli collections install crowdsecurity/http-cve
INFO[30-03-2022 01:55:55 PM] crowdsecurity/http-cve-2021-41773 : OK
INFO[30-03-2022 01:55:55 PM] Enabled scenarios : crowdsecurity/http-cve-2021-41773
INFO[30-03-2022 01:55:55 PM] crowdsecurity/http-cve-2021-42013 : OK
INFO[30-03-2022 01:55:55 PM] Enabled scenarios : crowdsecurity/http-cve-2021-42013
INFO[30-03-2022 01:55:55 PM] crowdsecurity/grafana-cve-2021-43798 : OK
INFO[30-03-2022 01:55:55 PM] Enabled scenarios : crowdsecurity/grafana-cve-2021-43798
INFO[30-03-2022 01:55:55 PM] crowdsecurity/vmware-vcenter-vmsa-2021-0027 : OK
INFO[30-03-2022 01:55:55 PM] Enabled scenarios : crowdsecurity/vmware-vcenter-vmsa-2021-0027
INFO[30-03-2022 01:55:55 PM] crowdsecurity/fortinet-cve-2018-13379 : OK
INFO[30-03-2022 01:55:55 PM] Enabled scenarios : crowdsecurity/fortinet-cve-2018-13379
INFO[30-03-2022 01:55:55 PM] crowdsecurity/pulse-secure-sslvpn-cve-2019-11510 : OK
INFO[30-03-2022 01:55:55 PM] Enabled scenarios : crowdsecurity/pulse-secure-sslvpn-cve-2019-11510
INFO[30-03-2022 01:55:55 PM] crowdsecurity/f5-big-ip-cve-2020-5902 : OK
INFO[30-03-2022 01:55:55 PM] Enabled scenarios : crowdsecurity/f5-big-ip-cve-2020-5902
INFO[30-03-2022 01:55:55 PM] crowdsecurity/thinkphp-cve-2018-20062 : OK
INFO[30-03-2022 01:55:55 PM] downloading data 'https://raw.githubusercontent.com/crowdsecurity/sec-lists/master/web/thinkphp_cve_2018-20062.txt' in '/var/lib/crowdsec/data/thinkphp_cve_2018-20062.txt'
INFO[30-03-2022 01:55:55 PM] Enabled scenarios : crowdsecurity/thinkphp-cve-2018-20062
INFO[30-03-2022 01:55:55 PM] crowdsecurity/apache_log4j2_cve-2021-44228 : OK
INFO[30-03-2022 01:55:55 PM] downloading data 'https://raw.githubusercontent.com/crowdsecurity/sec-lists/master/web/log4j2_cve_2021_44228.txt' in '/var/lib/crowdsec/data/log4j2_cve_2021_44228.txt'
INFO[30-03-2022 01:55:55 PM] Enabled scenarios : crowdsecurity/apache_log4j2_cve-2021-44228
INFO[30-03-2022 01:55:55 PM] crowdsecurity/jira_cve-2021-26086 : OK
INFO[30-03-2022 01:55:55 PM] downloading data 'https://raw.githubusercontent.com/crowdsecurity/sec-lists/master/web/jira_cve_2021-26086.txt' in '/var/lib/crowdsec/data/jira_cve_2021-26086.txt'
INFO[30-03-2022 01:55:56 PM] Enabled scenarios : crowdsecurity/jira_cve-2021-26086
INFO[30-03-2022 01:55:56 PM] crowdsecurity/http-cve : OK
INFO[30-03-2022 01:55:56 PM] Enabled collections : crowdsecurity/http-cve
INFO[30-03-2022 01:55:56 PM] Enabled crowdsecurity/http-cve
INFO[30-03-2022 01:55:56 PM] Run 'sudo systemctl reload crowdsec' for the new configuration to be effective.
pi@raspberrypi:~ $ sudo systemctl reload crowdsec
Make sure to reload the CrowdSec agent after installation.
In this article, I’ve shown you how to install CrowdSec on your Raspberry Pi and explained how to set it up as a sort of honeypot device. I hope you will find it inspiring and want to join me in annoying the cybercriminals just a little bit more.
Don’t forget to join our Discord server for more support and discussions with the largest cyber threat community 💪🏻.


