
Cloudflare is a CDN (a global network for distributing web content) that provides various services that among other things allow you to manage DNS zones, distribute web content, secure applications and infrastructure.
There are several subscription types available. Today I will show what is achievable using Cloud flare’s free plan.
CrowdSec is a FOSS security tool that works using collaborative security in that users are helping each other out by sharing information about attacks and blocking them both locally and among all other CrowdSec users.
CrowdSec consists of two parts: the agent which parses log files, detects attacks and also holds the local api (lapi) as well as the bouncer which actually mitigates those. We’re installing both components in this tutorial.
One of the services that CrowdSec is able to protect is HTTP. Along with Cloudflare it provides an extra layer of security against attacks like aggressive crawling, scanning/probing, path traversal, accessing sensitive data, L7 DDos attacks, SQL injection and much more.
CrowdSec is able to mitigate threats directly on Cloudflare by utilizing the API provided by Cloudflare to either block traffic or force suspicious users to go through a CAPTCHA challenge using the CrowdSec Cloudflare bouncer.
In this article, I will show you how to configure the Cloudflare bouncer. You will need to have the CrowdSec agent running already. If you don’t have that yet, you’ll find a guide on how to install CrowdSec on various platforms and operating systems here. If the website you’re trying to protect runs on Windows you will need to have the Cloudflare bouncer running on a Linux host – at least for now.
Configuring Cloudflare bouncer
As a first step, we generate an API token with the right permissions here.
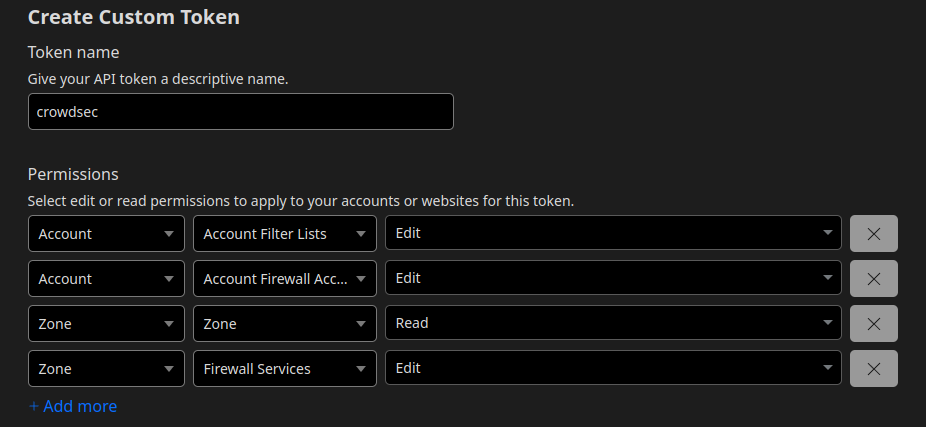
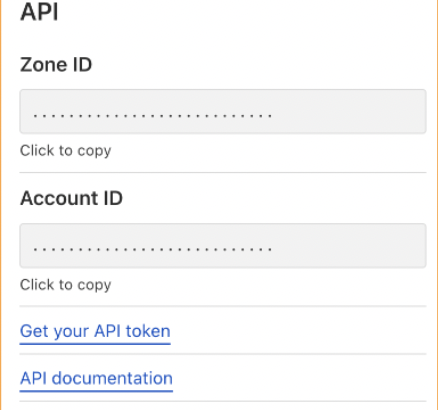
We save and secure the newly generated API token and retrieve the zone and account ids starting from the “Overview” tab of the zone. Here you can find a more thorough guide.
Installing and configuring the CrowdSec bouncer
We will install the Cloudflare bouncer on a Debian 11 machine like this:
# apt install crowdsec-cloudflare-bouncerAt this point we just need to configure our bouncer by editing the file /etc/crowdsec/bouncers/crowdsec-cloudflare-bouncer.yaml
# CrowdSec Configcrowdsec_lapi_url: http://localhost:8080/
crowdsec_lapi_key: ${LAPI_KEY}
crowdsec_update_frequency: 10s

# Cloudflare Config.
cloudflare_config:
  accounts:
  - id: [ID]
    token: [TOKEN]
    ip_list_prefix: crowdsec
    default_action: challenge
    zones:
    - actions:
      - challenge # valid choices are either of challenge, js_challenge, block
      zone_id: [ZONE_ID]

  update_frequency: 30s # the frequency to update the cloudflare IP list

# Bouncer Config
daemon: true
log_mode: file
log_dir: /var/log/
log_level: info # valid choices are either debug, info, error
cache_path: /var/lib/crowdsec/crowdsec-cloudflare-bouncer/cache/cloudflare-cache.json

prometheus:
  enabled: false
  listen_addr: 127.0.0.1
  listen_port: 2112
Things to focus on are:
- id: Account id of your Cloudflare account
- token: The token generated by CrowdSec
- zone_id: ID of the Cloudflare zone you want to protect
- prometheus: If we don’t care let’s disable it.
Let’s start the service:
# systemctl start crowdsec-cloudflare-bouncerIf all goes as it should we will find the list in the dark section of the configured zone, just as shown on the screenshot below.

Managing multiple zones
Should we want to manage multiple zones, we need to slightly modify the configuration file:
# Cloudflare Config.
cloudflare_config:
  accounts:
  - id: [ID]
    token: [TOKEN]
    ip_list_prefix: crowdsec
    default_action: challenge
    zones:
      - zone_id: [ZONE1_ID]
        actions:
        - challenge
      - zone_id: [ZONE2_ID]
        actions:
        - challenge
      [...]
We assume that the zones belong to the same account.
In case you have already started the service you will find the cache file /var/lib/crowdsec/crowdsec-cloudflare-bouncer/cache/cloudflare-cache.json.
I find it better to stop the service, delete the cache file and restart it, so as to force a configuration to reload.
Obviously, that’s just my opinion; feel free to do it in any different way and share with us how it goes.
If you want to learn more on how to mitigate an applicative-layer DDoS attack using CrowdSec and Cloudflare, read a dedicated article here.


