
The CrowdSec Console is a centralized UI that helps you manage and monitor all your CrowdSec Security Engine installations. The Console comes with real-time security events monitoring, metrics, dashboards, management of Blocklists and Decisions.
It also uses the CrowdSec CTI to retrieve intelligence on specific IP addresses, their level of aggressiveness, and their past behaviors.
In this article, I want to walk your through the CrowdSec concept of Decisions and how to levarage real-ime Decision Management — one of the latest features introduced with the Security Engine 1.5 release — to manage ingress traffic for a fleet of servers.
Let’s dig in!
The Home of Proactive Cybersecurity
The CrowdSec Console provides real-time security events monitoring, metrics, dashboards, blocklist monitoring, and so much more!
What is a Decision?
In the CrowdSec Security Engine, Decisions dictate what actions will be taken by the system to block an IP address or a range of IP addresses.
Prior to the 1.5 release, were created in two ways:
- Automatically: Generated by the Security Engine, based on an attack Scenario, and enforced by the Remediation Component. For example, if an IP address repeatedly tries to access a protected resource and fails, CrowdSec will enforce the Decision to block that IP address for a period of time.
- Manually: Applied locally to one or multiple Security Engines by the administrator to block incoming requests from a set of IP addresses.
In Security Engine 1.5, we introduced the Decisions Management feature that allows users to:
- Configure and manage ingress traffic
- View the existing Decisions
- Take action to block or unblock IP addresses as needed.
Centralizing Decision management helps improve the overall security and performance of a system by reducing the risk of attacks and preventing malicious activity.
Prerequisites
Before we dive into the exciting world of CrowdSec Decisions, let’s make sure everyone’s on the same page.
- Sign up for a Console account
Simply go to https://app.crowdsec.net/signup and follow the easy steps to get started. - Install CrowdSec on your server
Follow these instructions for the installation process. - Enable Polling API
This is a must-do step to initiate the polling of updates from the security engine. Read our documentation to learn more. - Install a Remediation Component
This component is key for blocking malicious incoming traffic. Learn how to install it in our documentation. - Get an Enterprise plan
You need an Enterprise plan to access the Decision Management feature in the Console. Go ahead and check the Enterprise plan here.
Introducing Decisions Management
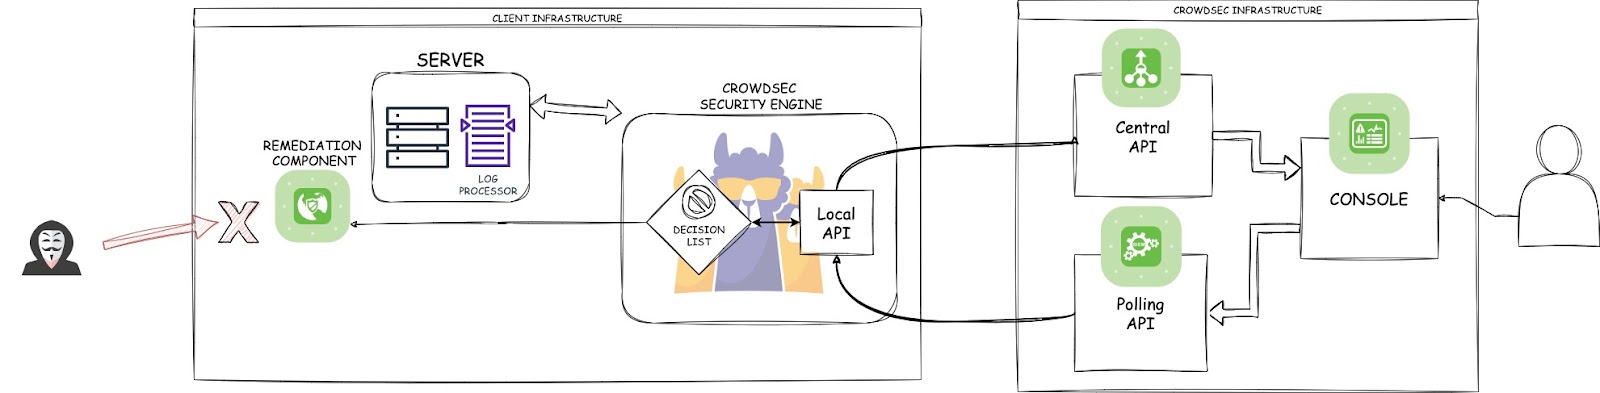
Decisions taken by the security engine are communicated to the central API. You can then manages the Decisions for all your Security Engines via the Console:
- Create new Decisions or remove existing ones
- Target one or multiple Security Engines
The Security Engine actively listens the polling API to safely retrieve updates in real-time. The Remediation Component then acts upon defined Decisions to block or hinder malicious activity.
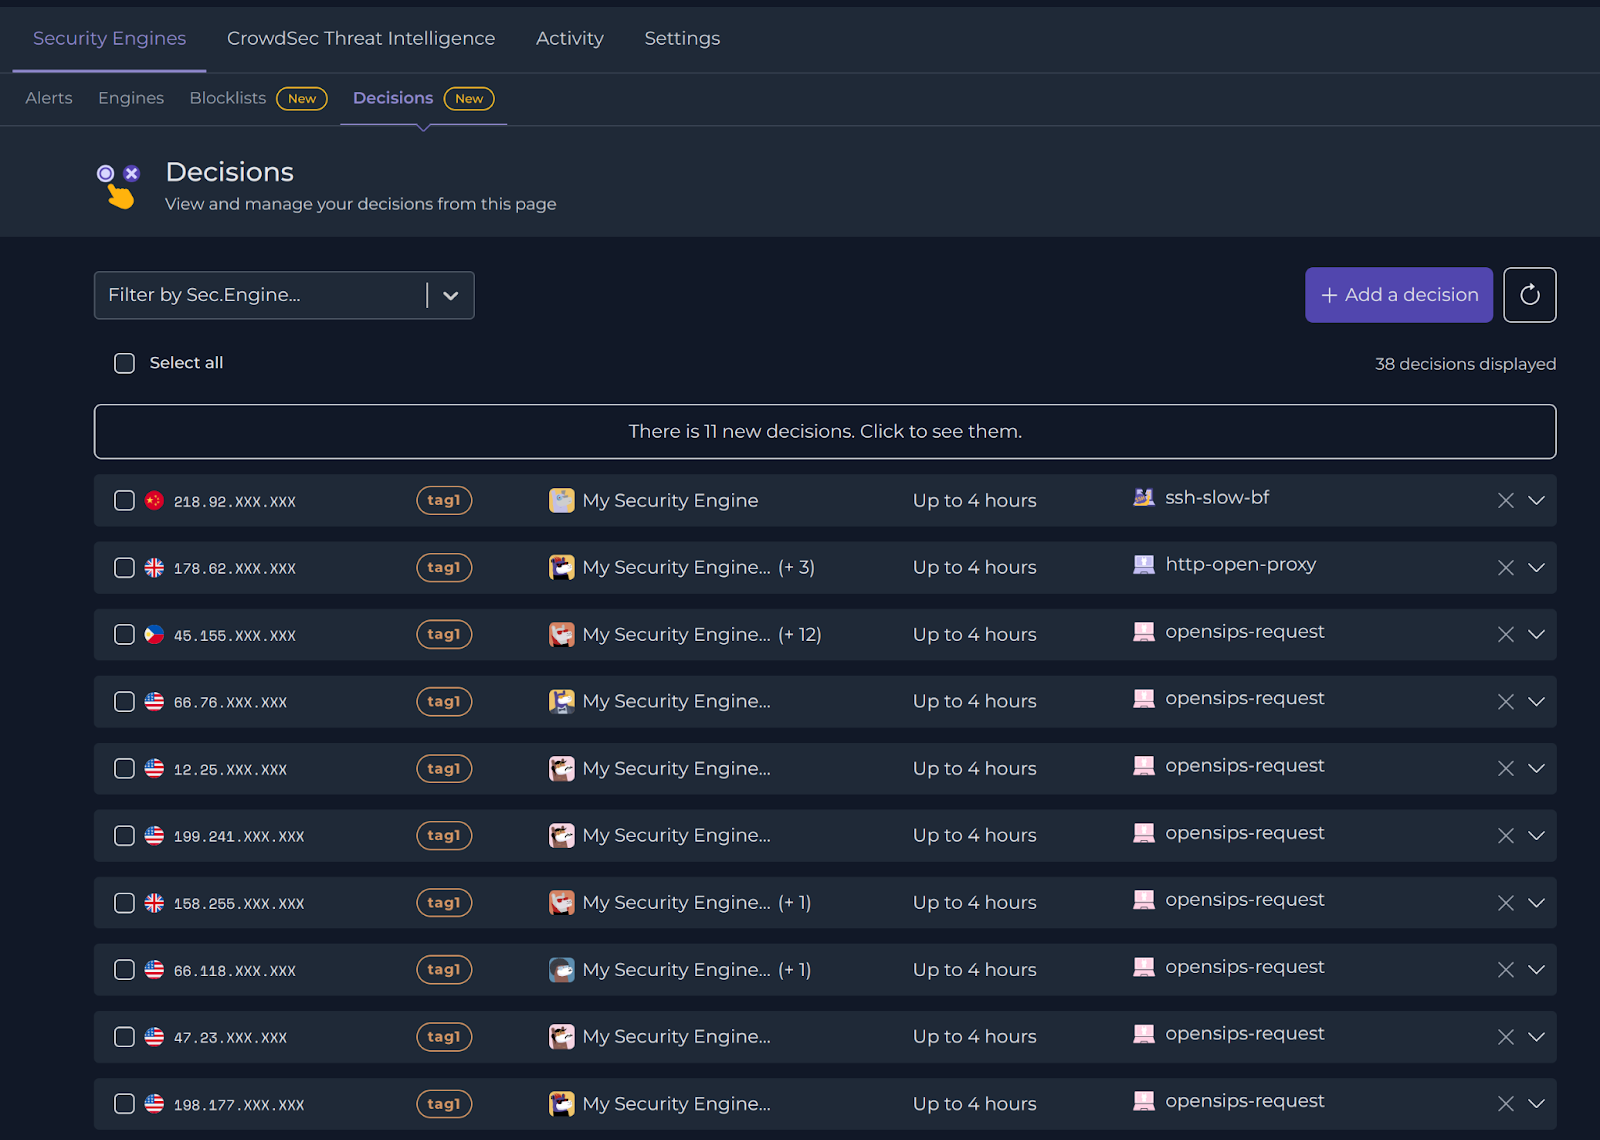
The Decisions dashboard
The Decisions dashboard can be found inside the Security Engines menu. Here you see the fulllist of all the Decisions that apply to your fleet of Security Engines. All Decisions are either created automatically by the Security Engines, or manually by a user of the organization.
Clicking on a blocked IP address will redirect you to the CTI which provides all the details available for this IP.
Expand a Decision to view the comprehensive list of Security Engines that are protected from a particular IP. You can also find information on the status of the Decision and whether it has been applied or not.

To remove a Decision for a specific Security Engine a cross is available in each row.
You can also globally select all the Security Engines impacted by an aggressive IP using the checkbox.
Adding a decision
Click on the Add a Decision button at the top right corner and fill out the relevant fields toconfigure the new Decision.
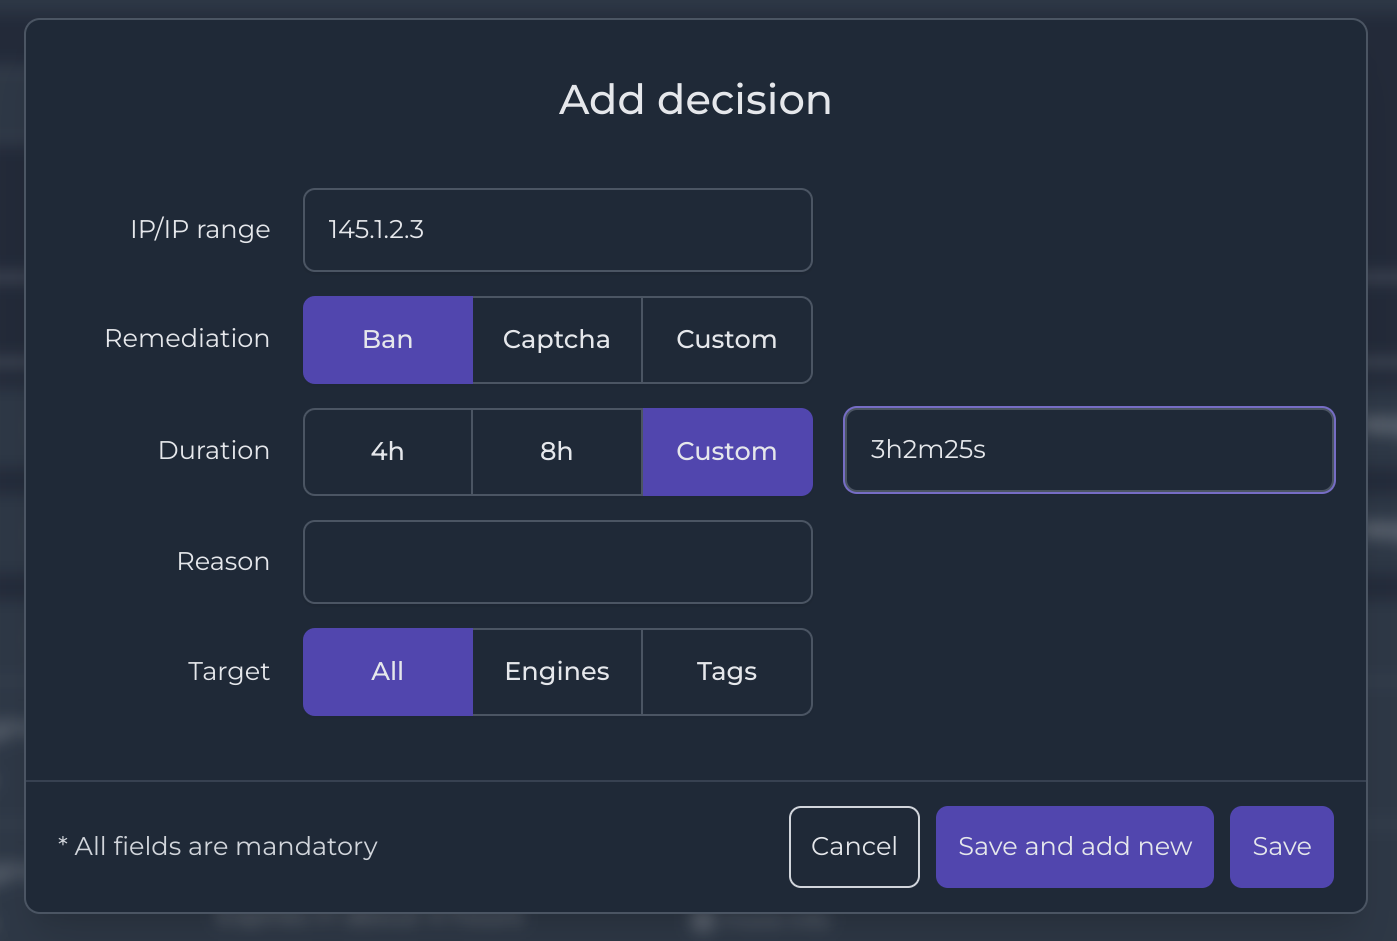
IP/IP Range
The IP / IP Range field allows you to specify the IP address or range of IP addresses that will be added to the Decision. This field accepts one or multiple IP addresses, which can be separated by a semi-colon. In order to apply a Decision over a range of IP addresses, you can add the CIDR mask. For example, if you want to cover all IPs between 1.2.3.0 and 1.2.3.255, you could write: 1.2.3.0/24
This is handy for building a Decision and then applying it to multiple IPs at once.
Remediation
The remediation type that you can use depends on the Remediatio Components installed with your Security Engine. Remediation Components have different capabilities — some enforce a ban policy while others have the ability to apply a CAPTCHA. For example, the firewall Component only handles ban remediation whereas the Nginx one can also deal with CAPTCHA. Other Remediation Components may be able to handle any predefined remediation, and that is where custom remediation is useful.
Duration
The Duration field allows you to set the time duration for which the IP address or range of IPs should be blocked.
Three preset options are provided: 4 hours, 8 hours, or Custom. If the Custom option is selected, the input must be a custom time duration using valid time units, namely h for hour, m for minute, and s for second. This option provides flexibility in setting the duration of the decision to suit specific needs.
Note: Attacking IPs are often attached to compromised machines or temporary attributed IPs.his isof the strength of the CrowdSec real-time blocklist: no stale information and no false positive. So, unless you’re certain about it, I don’t recommend setting an expiration date too far in the future. If you do want to set the expiration date for days ahead, you cannot do so using the day (d) unit. Instead, set the expiration date for a Decision in hours — for example, 2 days and 3 hours would be 51h.
Reason
The Reason field is a short open field you can use to add a description to let your teammates know why you created this Decision.
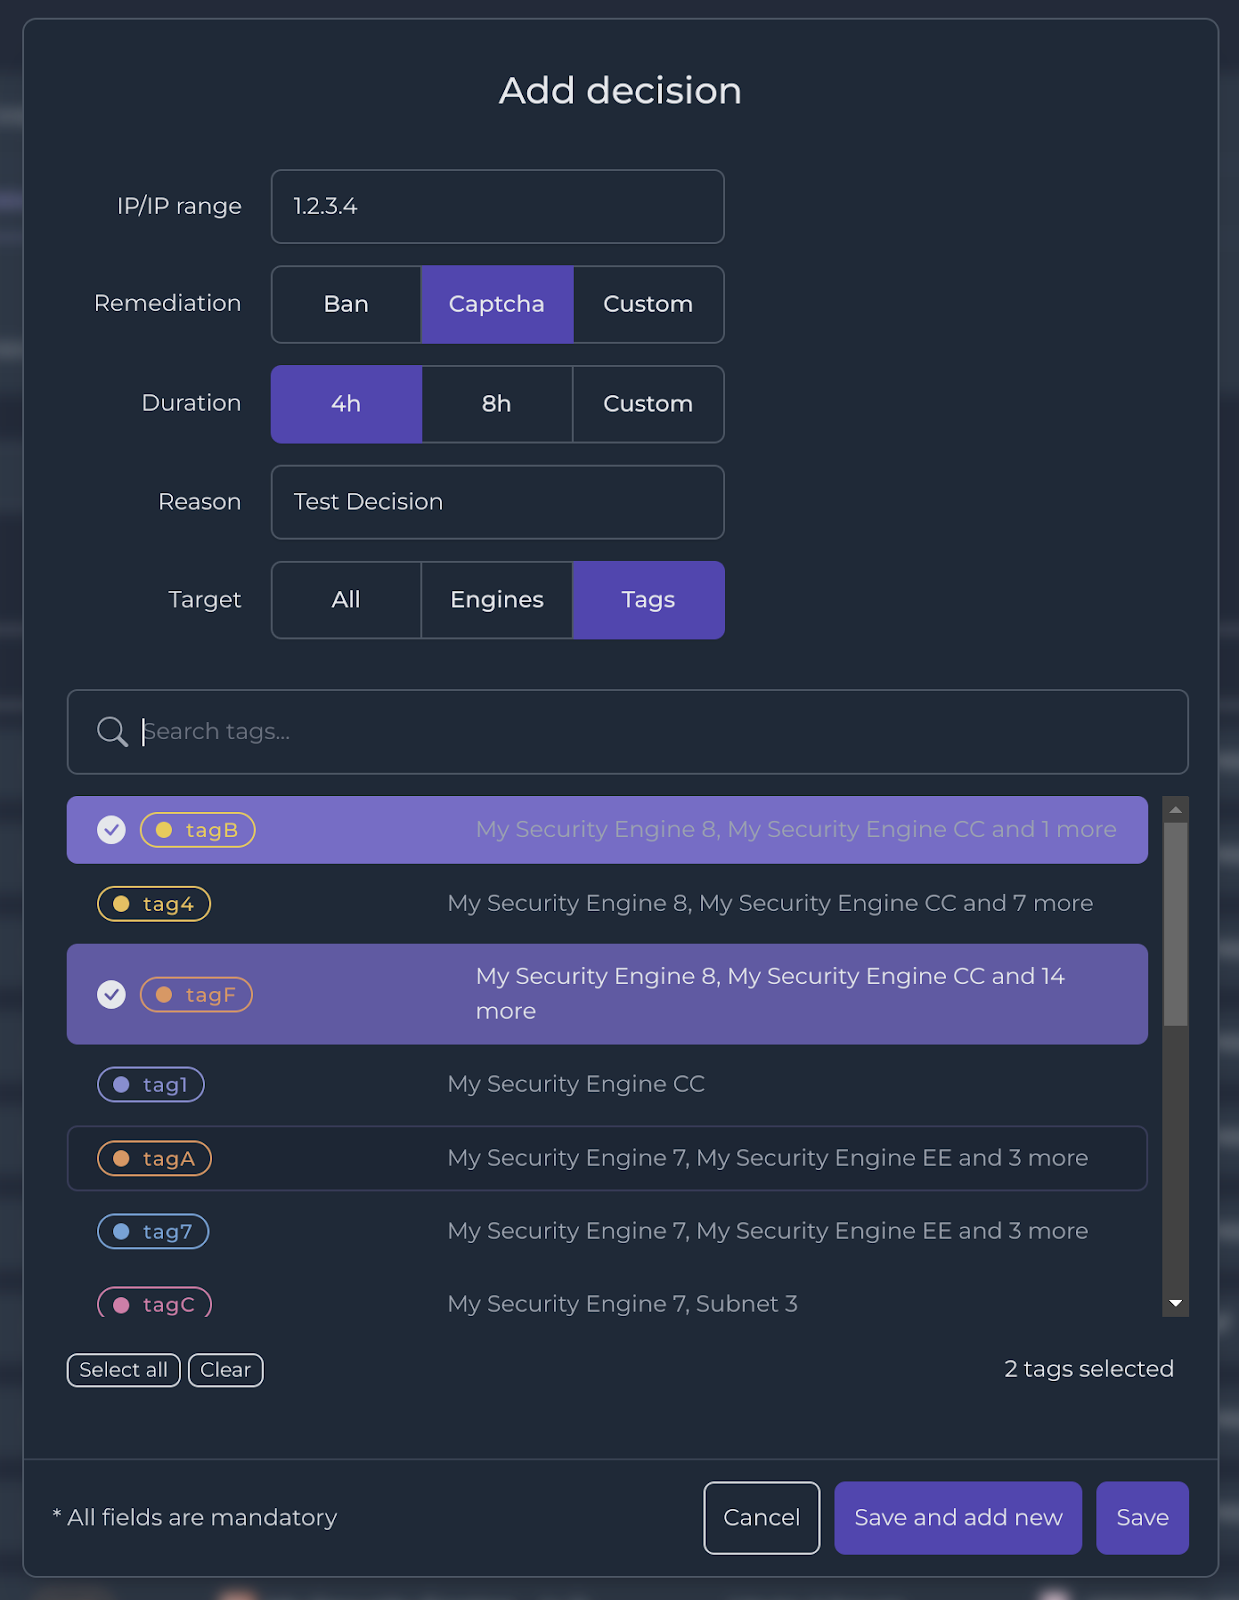
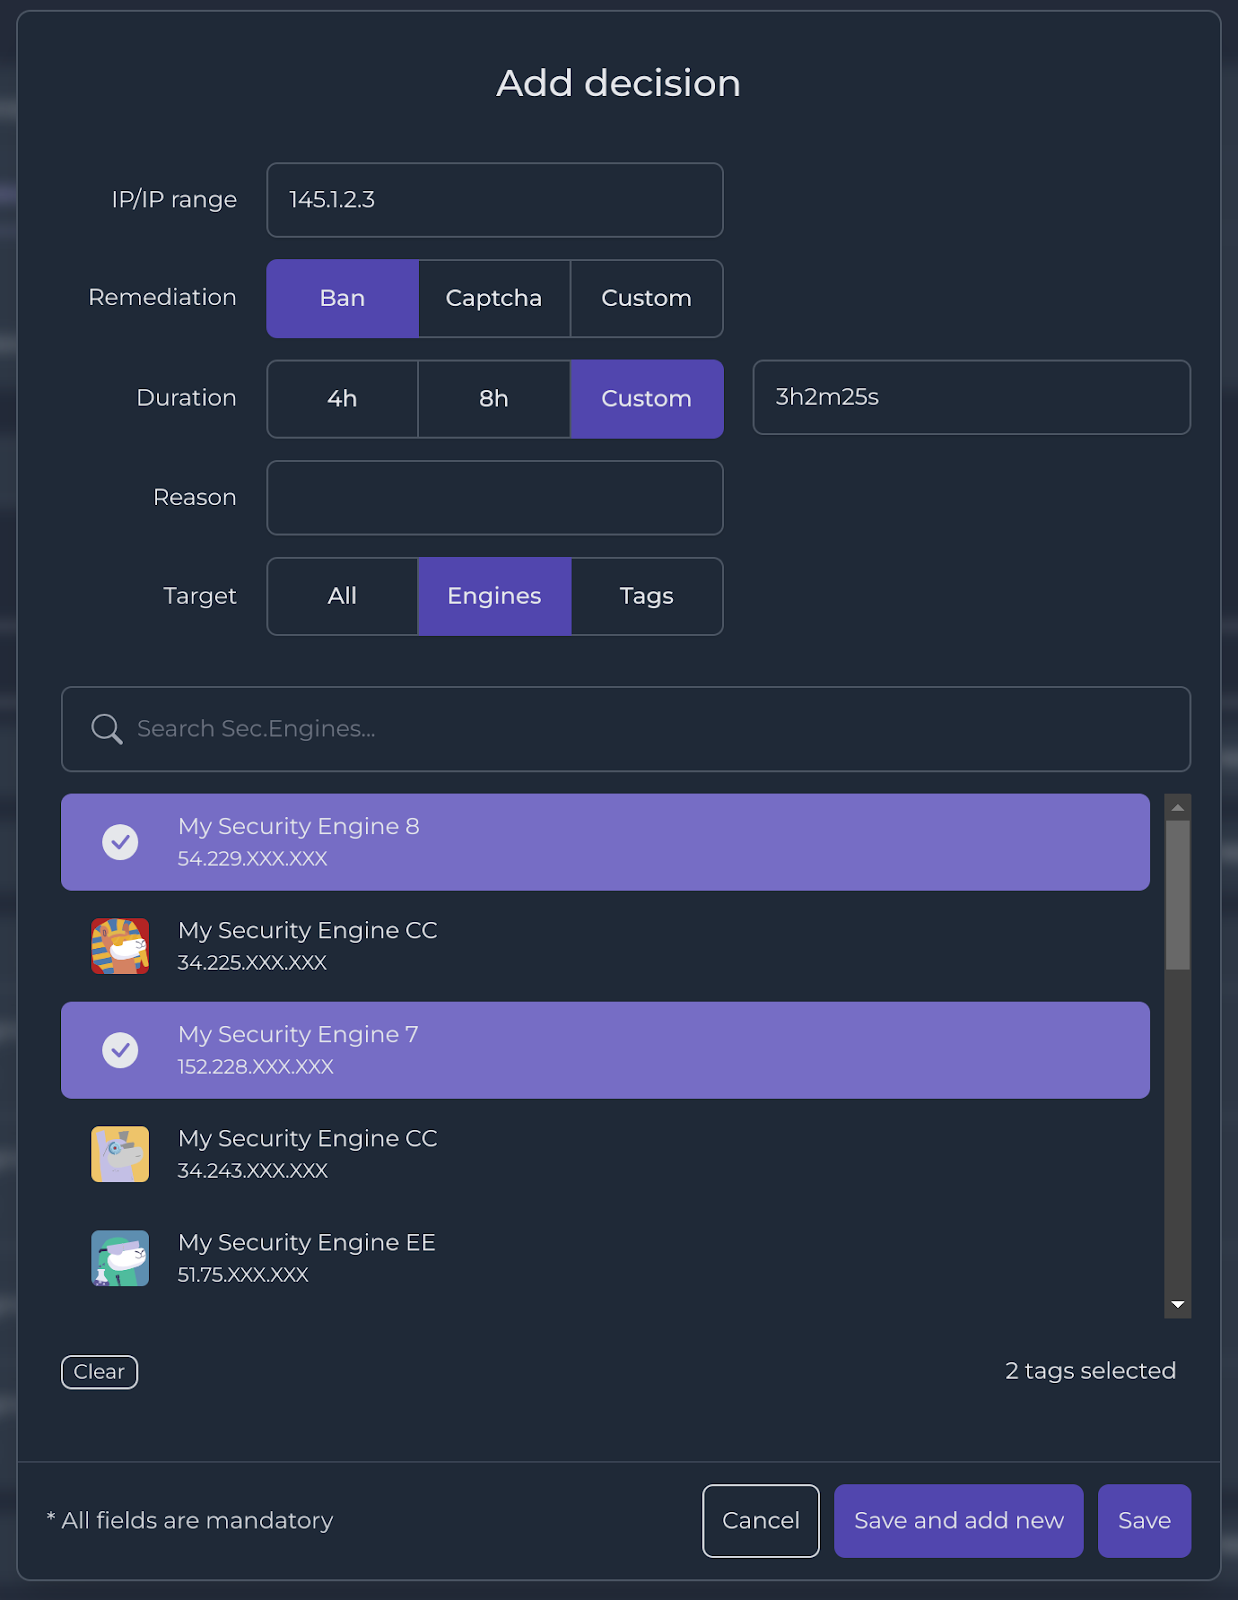
Targeting tags or Security Engines
You can target specific Security Engines in three ways:
- Select All Security Engines linked to your account
- Select one or multiple Security Engines individually
- Select one or multiple Tags grouping a bunch of Security Engines
Use case
Now, let’s see the Decisions Management feature in action by following John, the owner of an e-commerce website with a microservices architecture.
John’s infrastructure consists of a set of small, independently deployable services, each responsible for a specific task. For example, one service handles user authentication, while another handles product catalog management, and yet another handles order processing and fulfillment. Each service is typically hosted on its own container, allowing for scalability and fault tolerance.
Unfortunately, John recently experienced a series of unavailabilities on the catalog. After checking the logs, it turns out that he has been targeted by a distributed denial-of-service (DDoS) attack to overwhelm the server with traffic and render the page inaccessible to legitimate users.
The money loss due to this attack has been considerable for the company, in addition to the tarnished reputation of being down for several hours. He knew he needed to take action to protect his infrastructure and decided to protect his infrastructure and turned to CrowdSec for a robust solution.
Once he finished all necessary steps to get started with CrowdSec, laid out in the Prerequisites section earlier, John used tags to group servers based on their function.
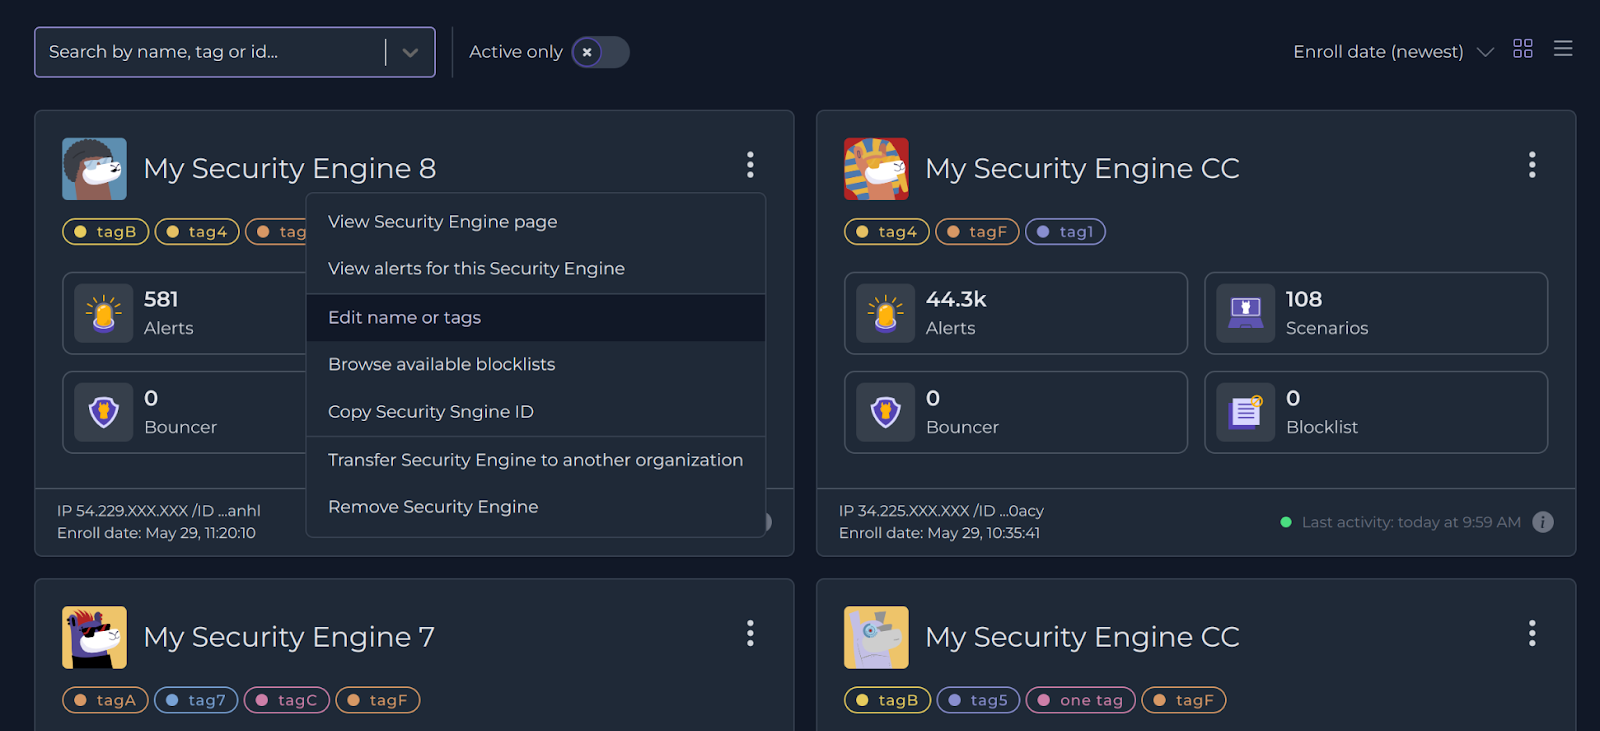

Once all Security Engines have been tagged properly, John was in the perfect situation to leverage the power of the CrowdSec Decisions.
The first step to enforce a solid security setup is to get into the Decisions area of the Console, and click add a new Decision. The first Decision John set up was to fully forbid any access to the resources set with private flags, for an attacking IP, for a duration of 2 weeks.
Note: The current infrastructure setup by John is still not safe. Private resources such as a database should not be publicly accessible on the internet.
After having secured his database, John applied the tags he created for each type of instance — catalog, payment, and authentication. This allowed him to apply Decisions to entire groups of Security Engines instead of having to configure them individually, saving him time and effort, and avoiding mistakes.
To protect his public servers from bots and other malicious traffic, John applied the Decision to the tags catalog, payment, and authentication. This triggered a CAPTCHA challenge for the IP address that was blocklisted, preventing bots from accessing his website.
Thanks to the easy-to-use interface of the CrowdSec Console, John was able to implement this powerful protection in just a few clicks. He can now rest easy knowing that his infrastructure is safe from attacks. With the CrowdSec Decision Management feature, you too can protect your infrastructure with ease.
Stay tuned for future CrowdSec releases and be among the first to leverage the full power of CrowdSec’s advanced security capabilities. To give you a sneak peek into upcoming features, with the Decision Batch Management feature that uses CSV files and a powerful web API (coming to you soon), you’ll be able to seamlessly integrate CrowdSec into your existing IT systems and effortlessly automate your security workflows.
Get the CrowdSec Security Engine today and help us outnumber cybercriminals all together!
The Home of Proactive Cybersecurity
The CrowdSec Console provides real-time security events monitoring, metrics, dashboards, blocklist monitoring, and so much more!


