
Welcome to the second part of our trilogy where the goal is to inspire you to create a very efficient firewall to protect your remote work environment, family, or your small business, which offers a serious level of security, at a low cost.
Have you not yet read the first part that focuses on selecting hardware and installing the base OS it’s not too late. Find it here.
This second part is focused on how to set up firewall functionality, setup client VPN to protect your identity online, setting up AdGuard for the entire network, DuckDNS if you don’t have a static IP as well as port knocking which is a cool way to close down your internet exposed services to anyone but you (or anyone else who knows the secret combination to enter). The third and final part will be about how to secure your network even more with CrowdSec – how to set up a canary device that ‘tweets’ when unexpected events like for instance port scanning occurs; something you would typically never do yourself.
It’s also being part of a larger project, CrowdSec, which is blocking Internet attacks and sharing IPs that launched them. You protect yourself and others at the same time. In essence, this comprehensive guide will show you how to:
- Create security robust enough to resist even if passwords are compromised
- Create a reliable hardware environment for your firewall
- Install the OS on it and create a rock-solid Firewall to protect your activities
- Add CrowdSec to protect your WLAN services you’d like to expose over the Internet and detect if any local IoT device is going rogue (e.g. cams, assistants, connected speakers, etc.)
- Allow external access to DMZ-like services to control your home on distance and access your firewall
- Add a VPN to protect your anonymity online
- Add an anti-advertisement & anti-tracking system
Part 2: The Software stack
The firewall
It’s already in there, provided by the netfilter subsystem, which is integrated into the kernel. The nft (nftables) command is here to help us interact with the netfilter layer. The following script is commented so that you can easily modify it according to your needs and projects or even port it to iptables (nftable predecessor). All scripts can be found here.
Out of the box, it handles:
- Multiple internet connection with a dynamic routing table capable of sending packets to one or the other connection based on your rules (destination port, src or destination IP, protocols, etc.)
- Protection against usual network shenanigans
- Inbound, forward and outbound traffic filtering
- CrowdSec integration to defend your exposed services and have a Canary to detect if your LAN is being scanned
- Port knocking integration so that you can simply use a port knocking app to unlock access to your network from wherever you are.
Just cut/paste it from this doc:
$ cat | sudo tee /etc/nftables.confHere is the script to adapt and copy/paste:
#!/usr/sbin/nft -f
#Part 1: Setting statics
define wan                     = eth0
define lan                       = lan0
define vpn                      = tun0
define localhost            = lo
define vpn_net              = 10.8.0.0/24
define vpnserver           = tun1
define vpn_server_net  = 10.0.0.0/24
define machine1           = 192.168.0.2
define machine2           = 192.168.0.3
define antilanscan        = { 22, 8080 } #Part 8: Anti lan scan
define cameras             = { 192.168.0.4, 192.168.0.5 }
define icmp_v6          = { destination-unreachable, echo-reply, echo-request, nd-neighbor-solicit, nd-router-advert, nd-neighbor-advert, packet-too-big, parameter-problem, time-exceeded }

#Part 2: Reset nft tables
flush ruleset

#Part 3: NAT
table ip nat {
  chain prerouting {
    type nat hook prerouting priority -100; policy accept;
      iif $wan tcp dport 2222 dnat to $machine1:22 # incoming connexion on port 2222 will be forwarded to 192.168.0.2  on 22
      iif $wan tcp dport 5001 dnat to $machine2      # sames port 5001 and 192.168.0.3 but this time port is 5001 to 5001, no change
  }
  chain postrouting {
    type nat hook postrouting priority 100; policy accept;
      oif $wan snat to 192.168.1.1
      oif $wan2 snat to 192.168.2.1
      oifname $vpn masquerade # snat to $vpnip
      oifname $vpnserver snat to 10.0.0.1
  }
}

#Part 4: Creating IP sets
table inet filter {

  set whitelist_candidates {
    type ipv4_addr . inet_service
    flags timeout
  }

  set whitelist {
     type ipv4_addr
     flags interval, timeout
  }

  set whitelist_portknockd {
     type ipv4_addr
     flags timeout
  }

  chain input {
    type filter hook input priority 0; policy drop;
      icmpv6 type $icmp_v6 accept
    #Part 5: Portknocking (next 4 lines)
      tcp dport 314 add @whitelist_candidates {ip  saddr . 18 timeout 2s}
      tcp dport 18 ip saddr . tcp dport @whitelist_candidates add @whitelist_candidates {ip  saddr . 939 timeout 2s}
      tcp dport 939 ip saddr . tcp dport @whitelist_candidates add @whitelist_candidates {ip  saddr . 101 timeout 2s}
      tcp dport 101 ip saddr . tcp dport @whitelist_candidates add @whitelist {ip saddr timeout 180s} log prefix "Portknocked: "
      ct state related,established            accept
      iif $lan tcp dport != $fwopenports log prefix "LAN SCAN:"  drop #Part 8: Anti lan scan
      ip saddr @whitelist                            accept
      ip saddr @whitelist_portknockd      accept
      iifname $lan                                       accept
      iifname $localhost                            accept
      iifname $vpnserver                           accept
      iifname $wan ip saddr != @whitelist                             drop
      iifname $wan ip saddr != @whitelist_portknockd       drop
      iifname $wan ct state invalid                                        log prefix "Invalid packet:" drop
      iif != lo ip saddr 127.0.0.0/8                                            log prefix "Fake localhost:" drop
  }

  chain forward {
    type filter hook forward priority 0; policy drop;
    #Part 6: Prerouting (next two lines)
      iifname $vpn meta l4proto udp ip daddr $machine1 udp dport 22 accept
      iifname $vpn meta l4proto tcp ip daddr $machine2 tcp dport 5001 accept
    #Part 4: Creating IP sets (next two lines)
      ip saddr @whitelist                       accept
      ip saddr @whitelist_portknockd accept
      iif $lan                                            accept
      iifname $vpnserver                      accept
      ct state established,related       accept
      ip saddr $cameras log prefix "Camera trying to exit:" drop
      ct state invalid log prefix "Invalid packet:" drop
  }

  chain output {
    type filter hook output priority 0; policy accept;
  }
}
#Part 7: Mangling
table ip mangle {
  chain prerouting {
    type filter hook prerouting priority -150; policy accept;
      mark != 0x0                                               meta mark set ct mark
      ip saddr $machine1 tcp sport 10001    meta mark set 0x2
      ip saddr $machine1 udp sport 10001   meta mark set 0x2
      ip saddr $machine1                                meta mark set 0x1
      ip saddr $machine2                                meta mark set 0x4
  }

  chain postrouting {
    type filter hook postrouting priority -150; policy accept;
      ct mark set mark
  }
}
After inserting it, save the file by pressing CTRL+D.
This version is a simplified version of the firewall script available from the repo above, but the most important part is here already. This nftables.conf file would not be enough by itself to handle several possible routes. Be sure to also use the ip rules script to create your routing tables, see below, section IP route.
NFtables (netfilter) Firewall details
- Part 1 are basic variable definitions.
- Part 2 resets all nft tables. (Used to take 10 lines with Iptables)
- In part 3 (NAT) we are defining what happens to packets that are incoming and destined to another machine behind the firewall. They are dealt with very early in the filtering process, in a prerouting chain. The postrouting chain is about telling what IP should be used for translating IPs coming from various subnets.
- The second table, filter, is part 4 that create IP sets. They are tables that contain IP addresses, sometimes with expiry dates. Three sets are created, one for potential candidates to whitelisting, the second for confirmed whitelisted IPs and the third will be used in conjunction with port knocking. The reason for creating two different whitelists of IPs is that the port knocking integrated in this NFT configuration (part 5) will only store the IP that knocked. Logical? No, not really. But CGNAT, used by telecom operators to run 4G networks, ruins it all and usually, it’s not a 1:1 IP translation but a range of IP that is used. So when your phone is port knocking 3 ports quickly, it’s usually with one IP but then when you connect on your SSH port, another IP is used. Luckily, they often sit in the same /24 range. The problem doesn’t exist with IPv6 obviously. So knockd will fill the second set with a range and the first one is still useful when you connect from elsewhere like a hotel. (I didn’t find any way to add a range to the set directly from an nft configuration file)
- Part 6 is related to prerouting. It’s not enough to redirect the connection since the packet is passing two interfaces, we also need to accept this in the forward rules.
- Part 7 is mangling. This is where we instruct the firewall to mark packets according to our own rules. 0x03 is the VPN server you host yourself and where you receive inbound traffic, 0x02 is the VPN client which you use to establish an outbound tunnel through a VPN provider. It’s through here you send the traffic of machine 1. In this example, we want machine1 to be using connection 2 when it’s starting a connection on port UDP or TCP 10001, otherwise it will be using connection 1. Machine 2 will always use your alt connection (here marked as 0x4) and machine 1, except for ports 10001 will use connection 1. This can be adapted with ports, source addresses, destination addresses, protocols, etc. (Note that the table has the highest priority and will be “executed” first, before all other rules). Use cases are easy here: you can send your professional workstation packets through a dedicated connection for example. Or send all your peer-to-peer traffic through a VPN or your TV IP through a VPN to avoid Geo limitations, etc. See the IP route section to understand fully how nft mangle + IP route cooperate here.
- Part 8, Anti lan scan will be covered later on in this guide, but the global concept is to watch for unusual port scans, coming from our LAN-facing ethernet adapter, that would denote an IoT device being compromised or a hacker doing a lateral move in your network (classic in Ransomware scenario). We’ll have a canary setup here, see below for a more detailed description.
Obviously, all those rules are given as examples but it should be fairly easy for you to adapt them to your own context.
Port knocking
So this script handles port knocking by itself with the lines tagged in yellow, but the CGNAT problem forces us to have a fallback plan. We’ll use knockd to handle the matter on our machine.
But why is port knocking in the first place?
Well, take for granted that any application you expose might have an unknown security flaw. Or that your passwords are compromised. If the attacker doesn’t have access to the application port in the first place, even if he knows your pass or has a secret “headshot” 0 days exploit to launch, with port knocking he cannot even try in the first place, except if he uses the exact same IP as you do. This very heavily limits the risks of getting compromised. Also, using your 4G connection is far less risky than connecting to a Hotel (or public place) Wifi. But how to just allow a temporary connection from those locations? Well, port knocking is the (very underrated) key.
So before connecting to your machine, you will just launch a little app that will port “knock” your machine, nicely whitelisting the public IP you’re using and give you access to VPN, SSH, RDP, whatever you want.
KnockonD will do nicely on iOS, Knock on Ports for Android). It sends a stream of packets, in a certain order, to add your current IP address in a set that is whitelisted in the firewall. (Careful, some ISPs (like broadband carriers) are doing CGNAT, which can cripple this technique, but we’ll try to put a workaround together)
On the OPI you just need to run:
$ apt-get install knockdAnd edit the configuration file (/etc/knockd.conf) as follows. Modify to your own port sequence:
[options]
        logfile = /var/log/knockd.log
        interface = eth0

[open]
	sequence    = 17:tcp,19:tcp,39:tcp,105:tcp
	seq_timeout = 10
	command     = nft add element inet filter whitelist_portknockd "{ `echo %IP% | cut -f1,2,3 -d "."`".0/24" timeout 180s }"
     	tcpflags    = syn

[open2]
	sequence    = 443:tcp,25:tcp,53:udp,80:tcp,53:udp,80:tcp,443:tcp
	seq_timeout = 10
	command     = nft add element inet filter whitelist_portknockd "{ `echo %IP% | cut -f1,2,3 -d "."`".0/24" timeout 180s }"
	tcpflags    = syn
Two sequences here, one classic and another one that is compatible with heavily filtered networks that won’t allow you to access all ports freely. Both add not just your IP but your IP in a 24 range in the whitelisted set. This one is really made to address the pesky CGNAT problem.
IP Route
You also need a script that will create those multiple routing tables, and that will be able to use the marks we set in the script (part 7 in the nftables script).
Here is the script creating multiple routing tables, allowing different default routes for different usages. It’s also available from my GitHub:
Note: If you don’t have multiple wan connections like me, adjust accordingly by removing all occurrences of WAN2.
#!/bin/bash

### BEGIN INIT INFO
# Provides:                  multiroute
# Required-Start:        $network
# Required-Stop:        $network
# Should-Start:
# Should-Stop:
# Default-Start:            2 3 4 5
# Default-Stop:            0 1 6
# Short-Description:    Multiroute manager
# Description:              Manage multi-routing
### END INIT INFO

Set_variables()
{
   WAN="eth0"
   LAN="lan0"
   WAN2="eth2"
   VPN=`ifconfig|grep tun0`
   VPNSERVER=`ifconfig|grep tun1`
 [[ ! -z "$VPN" ]] && VPNIF="tun0" && VPN=1 && VPNCLIENTIP=`ip -o addr | grep -v inet6 | grep tun0 | awk '{split($4, a, "/"); print a[1]}'` &&  VPNCLIENTROUTE=`ip route show|grep -v inet6 | grep "tun0 proto" | cut -f 1 -d " "`
  [[ ! -z "$VPNSERVER" ]] && VPNSERVERIF="tun1" && VPNSERVER=1 && VPNSERVERIP=`ip -o addr |grep -v inet6 | grep $VPNSERVERIF |awk '{split($4, a, "/"); print a[1]}'` && VPNSERVERROUTE=`ip route show |grep -v inet6 | grep $VPNSERVERIF | cut -f 1 -d " " | head -1`
}

Env_Cleanup()
{
  ip rule del from all fwmark 1 2>/dev/null
  ip rule del from all fwmark 2 2>/dev/null
  ip rule del from all fwmark 3 2>/dev/null
  ip rule del from all fwmark 4 2>/dev/null
  ip rule del lookup maincnx    2>/dev/null
  ip rule del lookup vpnclient  2>/dev/null
  ip rule del lookup vpnserver  2>/dev/null
  ip rule del lookup altcnx     2>/dev/null
  ip route flush table maincnx
  ip route flush table vpnclient
  ip route flush table vpnserver
  ip route flush table altcnx
  for i in /proc/sys/net/ipv4/conf/*/rp_filter; do echo 0 > "$i"; done # To avoid packet drop
}

Routing_Init()
{
  [[ $VPN ]] && echo -e "$ORANGE -> VPN IS UP (route: $VPNCLIENTROUTE, on dev: $VPNIF, ip: $VPNCLIENTIP) $END"

  ip route add table maincnx default dev $WAN via 192.168.1.2
  ip route add table maincnx 192.168.0.0/24 dev $LAN src 192.168.0.1
  ip route add table maincnx 192.168.1.0/24 dev $WAN src 192.168.1.1
  ip route add table maincnx 192.168.2.0/24 dev $WAN2 src 192.168.2.1
  [[ $VPN ]] && ip route add table maincnx $VPNCLIENTROUTE dev $VPNIF src $VPNCLIENTIP
  [[ $VPNSERVER ]] && ip route add table maincnx 10.0.0.0/24 dev $VPNSERVERIF src 10.0.0.1
  ip rule add from 192.168.1.2 table maincnx

  [[ $VPN ]] && ip route add table vpnclient default dev $VPNIF via $VPNCLIENTIP
  [[ $VPN ]] && ip route add table vpnclient $VPNCLIENTROUTE dev $VPNIF src $VPNCLIENTIP
  [[ $VPN ]] && ip route add table vpnclient 192.168.0.0/24 dev $LAN src 192.168.0.1
  [[ $VPN ]] && ip route add table vpnclient 192.168.1.0/24 dev $WAN src 192.168.1.1
  [[ $VPN ]] && ip route add table vpnclient 192.168.2.0/24 dev $WAN2 src 192.168.2.1
  ip rule add from $VPNCLIENTIP table vpnclient

  [[ $VPNSERVER ]] && ip route add table vpnserver default dev $VPNSERVERIF via $VPNSERVERIP
  [[ $VPNSERVER ]] && ip route add table vpnserver 192.168.0.0/24 dev $LAN src 192.168.0.1
  [[ $VPNSERVER ]] && ip route add table vpnserver 192.168.1.0/24 dev $WAN src 192.168.1.1
  [[ $VPNSERVER ]] && ip route add table vpnserver 192.168.2.0/24 dev $WAN2 src 192.168.2.1
  [[ $VPNSERVER ]] && ip route add table vpnserver 10.0.0.0/24 dev $VPNSERVERIF src 10.0.0.1
  [[ $VPNSERVER ]] && ip rule add from $VPNSERVERIP table vpnserver

  ip route add table altcnx default dev $WAN2 via 192.168.2.2
  ip route add table altcnx 192.168.0.0/24 dev $LAN src 192.168.0.1
  ip route add table altcnx 192.168.1.0/24 dev $WAN src 192.168.1.1
  ip route add table altcnx 192.168.2.0/24 dev $WAN2 src 192.168.2.1
  ip rule add from 192.168.2.2 table altcnx

  ip rule add from all fwmark 1 table maincnx
  [[ $VPN ]] && ip rule add from all fwmark 2 table vpnclient
  [[ $VPNSERVER ]] && ip rule add from all fwmark 3 table vpnserver
  ip rule add from all fwmark 4 table altcnx
  ip route flush cache

  for i in /proc/sys/net/ipv4/conf/*/rp_filter; do echo 0 > "$i"; done # To avoid packet drop
  echo 1 | sudo tee /proc/sys/net/ipv4/ip_forward > /dev/null
}

case "$1" in

start)
  Set_variables
  [[ $VPN ]] && sleep 5 # Wait for VPN to be up if not yet started when the firewall script kicks in
  /usr/bin/logger -t "Multi route" "Starting" -p4
  /usr/bin/logger -t "Multi route" "VPN CLIENT DETECTED, ADDING RULES" -p4
  /usr/bin/logger -t "Multi route" "VPN SERVER DETECTED, ADDING RULES" -p4
  Env_Cleanup
  Routing_Init
  exit 0
;;

stop)
  Set_variables
  /usr/bin/logger -t "Multi route" "Stopped" -p4
  echo 0 | sudo tee /proc/sys/net/ipv4/ip_forward > /dev/null
  ip rule del from all fwmark 1 2>/dev/null
  ip rule del from all fwmark 2 2>/dev/null
  ip rule del from all fwmark 3 2>/dev/null
  ip rule del from all fwmark 4 2>/dev/null
  ip route flush cache
  exit 0
;;

restart)
  /usr/bin/logger -t "Multiroute" "restart initiated" -p4
  $0 stop
  sleep 1
  echo -e 'n'
  $0 start
;;

*)
  echo -e "$YELLOW Usage: /etc/init.d/multiroute.sh {start|stop|restart}$END"
  exit 1
;;

esac
exit 0
The script is an old-fashioned SysV init script that goes into /etc/init.d after you’ve made it executable with chmod 755 and will be executed during startup.
This script basically creates four different routing tables. So instead of having just one “default route” for all your machines, your firewall now has four different tables, each containing a set of specific routing rules. So if you mark a packet with 0x2, (see in the nftables configuration, the mangle part) the machine will ship it through the VPN connection. If you tag it with 0x4, it will use your alternate connection, say a 4G for example. The tag 0x3 will be for the VPN Server and the 0x2 for VPN client. It’s just magic how many opportunities this kind of IPtables / Nftables mangling system, coordinated with IP routing can open.
VPN
We speak here of a client VPN. A VPN that you subscribed to and want to be able to use in certain situations, or more precisely with certain packets. If you want to bypass a geographical lock from some TV broadcasters or Netflix or use some protocols rather on an anonymous connection than the usual one, or just to preserve your anonymity this is the way to do it.
Once you find your dream VPN provider, they will most likely give you files to set up your VPN connection, and usually, they are made for both Wireguard and OpenVPN. I will show you how to install and configure the latter.
You will just need to install OpenVPN, upload those files (usually a .conf file also embedding all certificates and a user.pass file with the credentials) in the /etc/openvpn directory, enable openvpn in /etc/default/openvpn and you should be able to connect.
$ sudo apt-get install openvpn
$ sudo sed -i '/#AUTOSTART="all"/s/^#//g' /etc/default/openvpn
A typical OpenVPN client configuration looks like this:
client
dev tun
proto udp
remote [OPENVPN SERVER IP] 1194
resolv-retry infinite
remote-random
nobind
tun-mtu 1500
tun-mtu-extra 32
mssfix 1450
persist-key
persist-tun
ping 15
ping-restart 0
ping-timer-rem
reneg-sec 0
comp-lzo no
log /var/log/openvpn.log
remote-cert-tls server
auth-user-pass /etc/openvpn/user.pass.vpn
route-nopull
verb 3
pull
fast-io
cipher AES-256-CBC
auth SHA512
script-security 2
up "/etc/init.d/firewall restart"
down "/etc/init.d/firewall restart"

-----BEGIN CERTIFICATE-----
[YOUR CERTIFICATE]
-----END CERTIFICATE-----

key-direction 1

#
# 2048 bit OpenVPN static key
#
[YOUR KEY]
CAUTION:
There is a minor security vulnerability here. Using the auth-user-pass /etc/openvpn/user.pass.vpn file is not ideal. This file contains your credentials for connection in plaintext to avoid providing them manually during initialization of the VPN. This plaintext isn’t encrypted and could expose your credentials if your firewall is ever seized or you become prone to a very critical vulnerability, like a 0day buffer overflow of some sort, would successfully compromise your firewall. On my end, I live with it, but you’ve been warned.
PS: The firewall is automatically reloaded when the VPN goes up or down to add the proper rules.
Create the directory for custom scripts
We need a directory to save custom scripts. Create /usr/local/scripts and sudo chown it to your current user for convenience.
DuckDNS
While we are at it, let’s make this machine easy for you to locate online. Should you have a dynamic IP address, just crash by DuckDNS, create yourself an account and register your IP and duckdns.org subdomain for free. Here is a little script to help you update it on a regular basis:
$ echo url="https://www.duckdns.org/update?domains=YOUR_DOMAINE&token=YOUR_TOKEN&ip=" | curl -k -o /var/log/duckdns.log -K -The token is found under your login at duckdns.org after clicking the ‘>>> reCAPTCHA <<<’ button.
Use the script by saving it to e.g. /usr/local/scripts/duckdns.sh, chmod 755 it and execute it every half an hour with a crontab like this:
$ crontab -e
It should look somewhat like this:
MAILFROM=[YOUR_SENDING_EMAIL]
MAILTO=[YOUR_RECEIVING_EMAIL]

#m   h  dom mon dow      command
17   *   *   *   *       cd / && run-parts --report /etc/cron.hourly
45  10   *   *   *       test -x /usr/sbin/anacron || ( cd / && run-parts --report /etc/cron.daily )
47   6   *   *   7       test -x /usr/sbin/anacron || ( cd / && run-parts --report /etc/cron.weekly )
52   6   1   *   *       test -x /usr/sbin/anacron || ( cd / && run-parts --report /etc/cron.monthly )
30   *   *   *   6       /usr/local/scripts/duckdns.sh
Only the last line is added by us. The first lines are usually present default. YMMV.
Note: In order for the user who executes the duckdns.sh script to have permissions to write a log file in /var/log it needs to be part of the syslog group. This can easily be done by running sudo addgroup
Adguard
Adguard is a really cool piece of software that is basically running a DNS that resolves all advertisement servers to 127.0.0.1 (resulting in many ads not being shown. Hooray!). You install it on your LAN and instead of connecting directly to 8.8.8.8 or your ISP DNS, you tell all your LAN users to rather use it.
If your request is not going toward an Ad server, it’s just resolved by the DNS you instructed Adguard to use. Otherwise, your client, say your mobile phone, will just ask this ad from 127.0.0.1 (himself), getting nothing in return. With this, a chrome plugin like Adblock as well as youtube Adblock and advertisement will be a thing of the past.
I highly recommend visiting their Github here. Installation is fairly easy:
$ curl -s -S -L https://raw.githubusercontent.com/AdguardTeam/AdGuardHome/master/scripts/install.sh | sh -s -- -vNote: The script will obtain root permissions and ask for those as needed.
Now we have a DNS relay running on localhost.
You can also just use the DNS servers of Adguard directly. These are present at 94.140.14.14 and 94.140.15.15.
If you want to finalize your setup of Adguard, just connect with a browser to the firewall (likely on 192.168.0.1 at this stage), on port 3000. It should look like this:
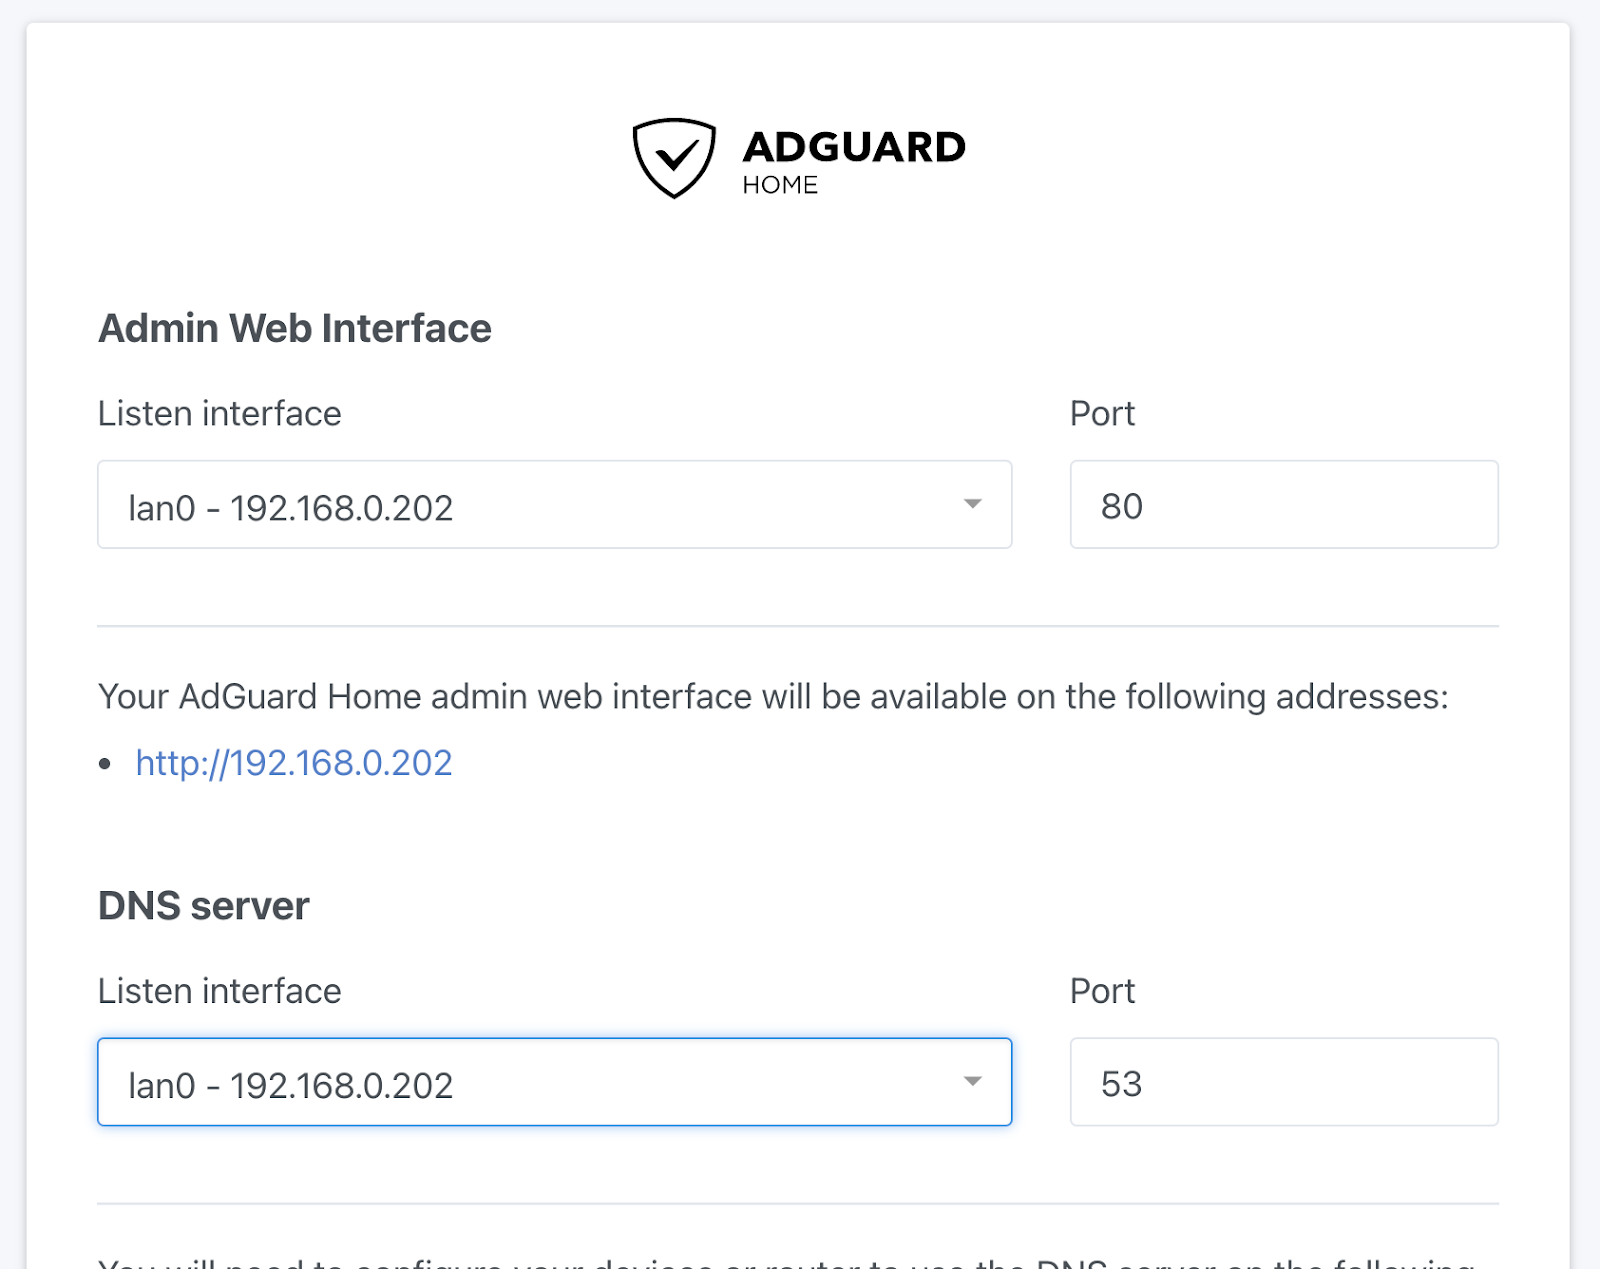
Use the wizard to set up Adguard and continue the tutorial.
Adding a DHCP server to finalize our LAN setup
Well, now that most of the tools are up & running, let’s have a DHCP running to give addresses to machines in the LAN, which your ISP box won’t do anymore since it’s on the other side of the firewall. While we are at it, we can now ship IP addresses with the local Adguard DNS to get rid of ads.
$ sudo apt-get install isc-dhcp-server
$ cat | sudo tee /etc/dhcp/dhcpd.conf
Copy/paste this (and end with CTRL+D):
deny declines;
log-facility local7;
authoritative;

subnet 192.168.0.0 netmask 255.255.255.0 {
  interface eth1;
  range 192.168.0.5 192.168.0.200;
  option routers 192.168.0.1;
  option broadcast-address 192.168.0.255;
  option domain-name-servers 192.168.0.1, 94.140.14.14; # Local adguard DNS proxy + online adguard DNS
  default-lease-time 259200;
  max-lease-time 604800;
}

host machine1 {
  hardware ethernet 00:11:22:33:AA:DD;
  fixed-address 192.168.0.3;
}

host machine2 {
  hardware ethernet 85:55:85:42:12;
  fixed-address 192.168.0.4;
}
Given as an example, I advise you to have static IPs directly like for machine 1 & 2 in this file if you can. This makes it easier to locate them later. We point the DNS to our local instance of Adguard and, as a backup also to their online DNS if our own is not replying fast enough.
So this was part 2 of our trilogy of how to install the CrowdWall. I hope you enjoyed reading it as much as I enjoyed writing it. Stay tuned for part 3 where things really start to get interesting once we add CrowdSec to the mix.


