Welcome to the first part of our trilogy where the goal is to inspire you to create a very efficient firewall to protect your remote work environment, family, or your small business, which offers a serious level of security, at a low cost.
This first part will be centered around the basics: choosing hardware and installing the operating system and doing basic configuration. Part two will be on how to set up firewall functionality, setup client VPN to protect your identity online, setting up AdGuard for the entire network, DuckDNS if you don’t have a static IP as well as port knocking which is a cool way to close down your internet exposed services to anyone but you (or anyone else who knows the secret combination to enter). The third and final part will be about how to secure your network even more with CrowdSec – how to set up a canary device that ‘tweets’ when unexpected events like for instance port scanning occurs; something you would typically never do yourself.
It’s also being part of a larger project, CrowdSec, which is blocking Internet attacks and sharing IPs that launched them. You protect yourself and others at the same time. In essence, this comprehensive guide will show you how to:
- Create security robust enough to resist even if passwords are compromised
- Create a reliable hardware environment for your firewall
- Install the OS on it and create a rock-solid Firewall to protect your activities
- Add CrowdSec to protect your WLAN services you’d like to expose over the Internet and detect if any local IoT device is going rogue (e.g. cams, assistants, connected speakers, etc.)
- Allow external access to DMZ-like services to control your home on distance and access your firewall
- Add a VPN to protect your anonymity online
- Add an anti-advertisement & anti-tracking system
Needed skills
You should have basic knowledge of Linux and Shell. If you can download and install a Linux distribution by yourself, nothing should sound overly difficult.
Enough talk. Let’s get started!
Part 1: Choosing hardware and installing OS
Needed hardware
The CrowdWall is among the cheapest possible decent security setup you can get.
The components are correct but your networks will not be very isolated internally. The advanced version offers both better security and performance. The “expert” CrowdWall is made to protect a small business of tens of coworkers.
In the basic CrowdWall setup, you can also add cost-efficient Wifi Access Points like this Tenda (around 45€) or add a third Ethernet interface or Wifi connection (over USB).
Should you want to organize a large distribution of the CrowdWall, say equip all your remote working force with it, you can look at the GL Inet products line. They are nicely priced if you go for volumes and offer real good performances for the money.
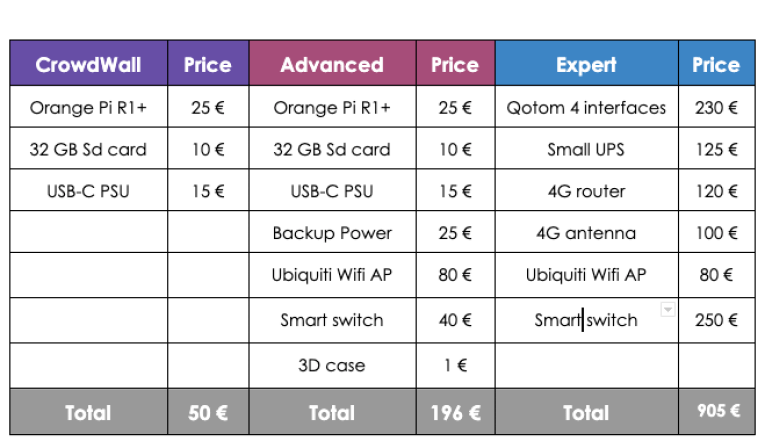
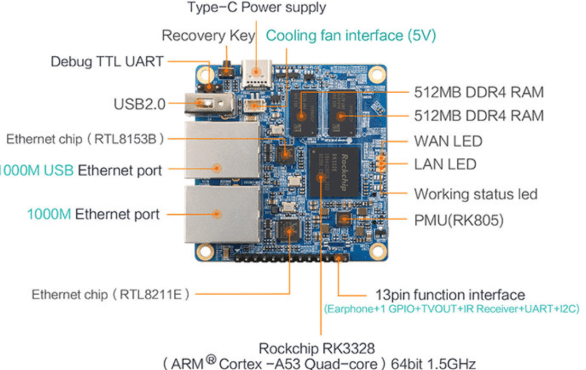
The Orange PI R1+ benefits from very interesting characteristics beyond its small price tag. It runs on a 1.5 GHzGhz SoC with 1 GB ram which is enough for the job. It also provides two ethernet ports, has marginal power consumption, and even provides a USB port and a GPIO. (The Rock Pi-E can also do the job nicely and offers a bigger GPIO but for slightly more money)
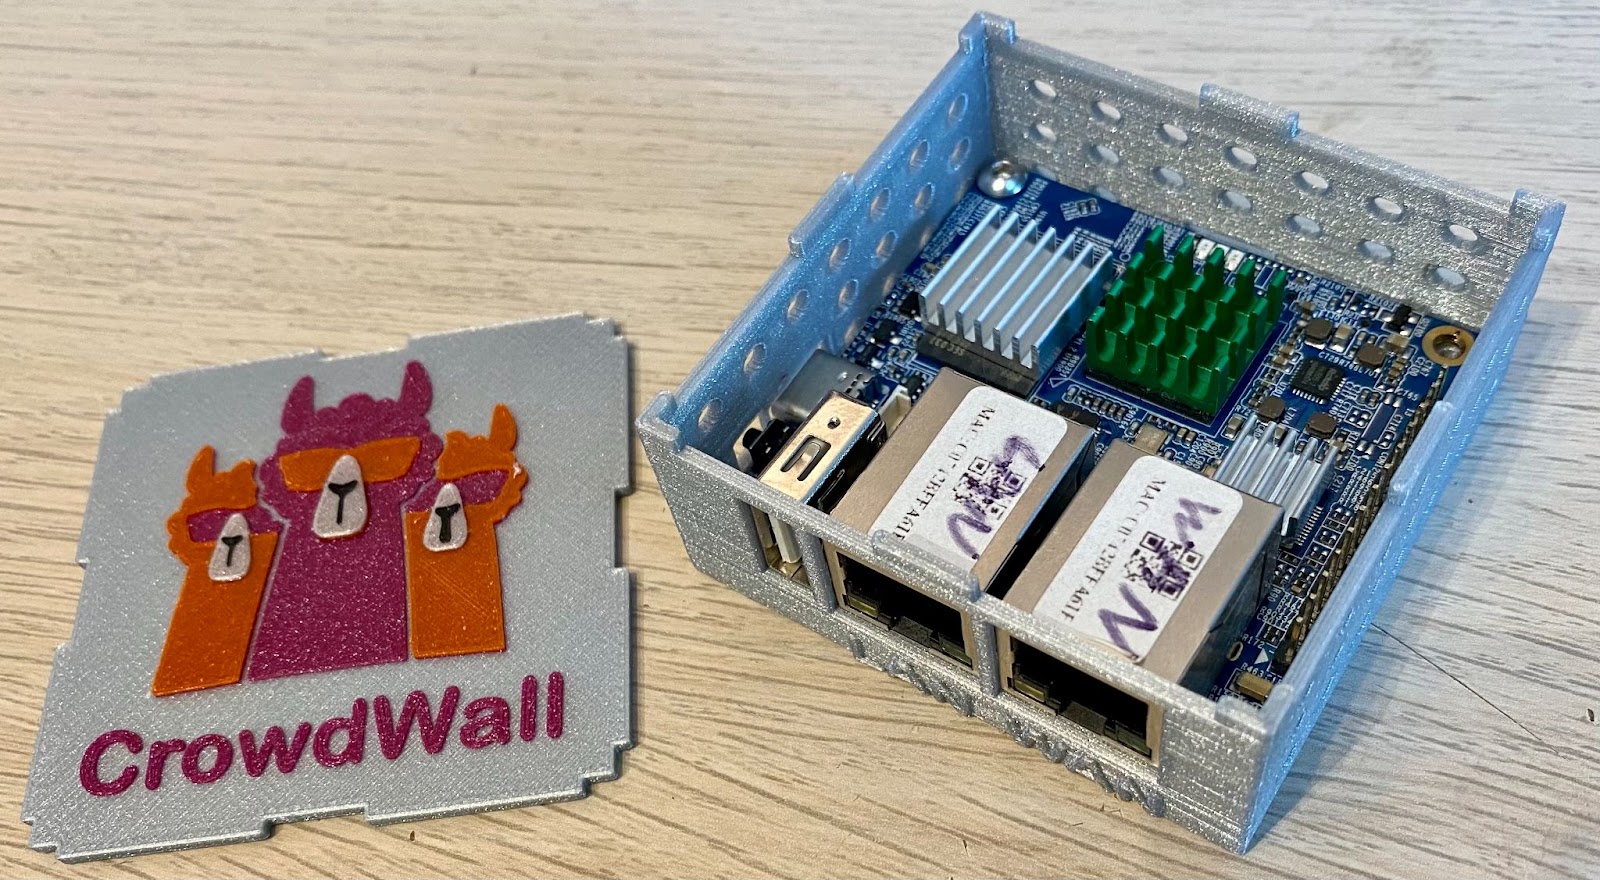
Photo 1, an Orange PI 1 R+, 2 & 3, its 3D printed case
If you don’t have an Orange PI R1+ other similar single-board computers can be used instead: Orange PI R1+ LTS (Same SOC, slower, low power RAM), NanoPi R2S, NanoPi R4S, ROCK Pi E, or even a Raspberry Pi 3 or 4 with an extra ethernet plug. In the latter case, you probably want to use one connected via HAT. In either case, you won’t be able to use the same fancy case but would have to design your own or adapt mine.
Setting up your firewall
Going forward I will describe setting up using Orange PI R1+.
Physical setup
Just plug your Internet connection (usually the Box from your ISP) to the lower port (the one down, closest to the GPIO, on the above picture) and your LAN (usually your switch) to the left port above picture.
Plug the Orange Pi (from hereon ‘OPI’) to the Power supply, or if you want for redundant power supply, power up the OPI from the power bank and the bank from a regular power plug. This should give you some hours before the firewall shuts down and eventually give it time to notify you beforehand.
The physical setup should look like this:
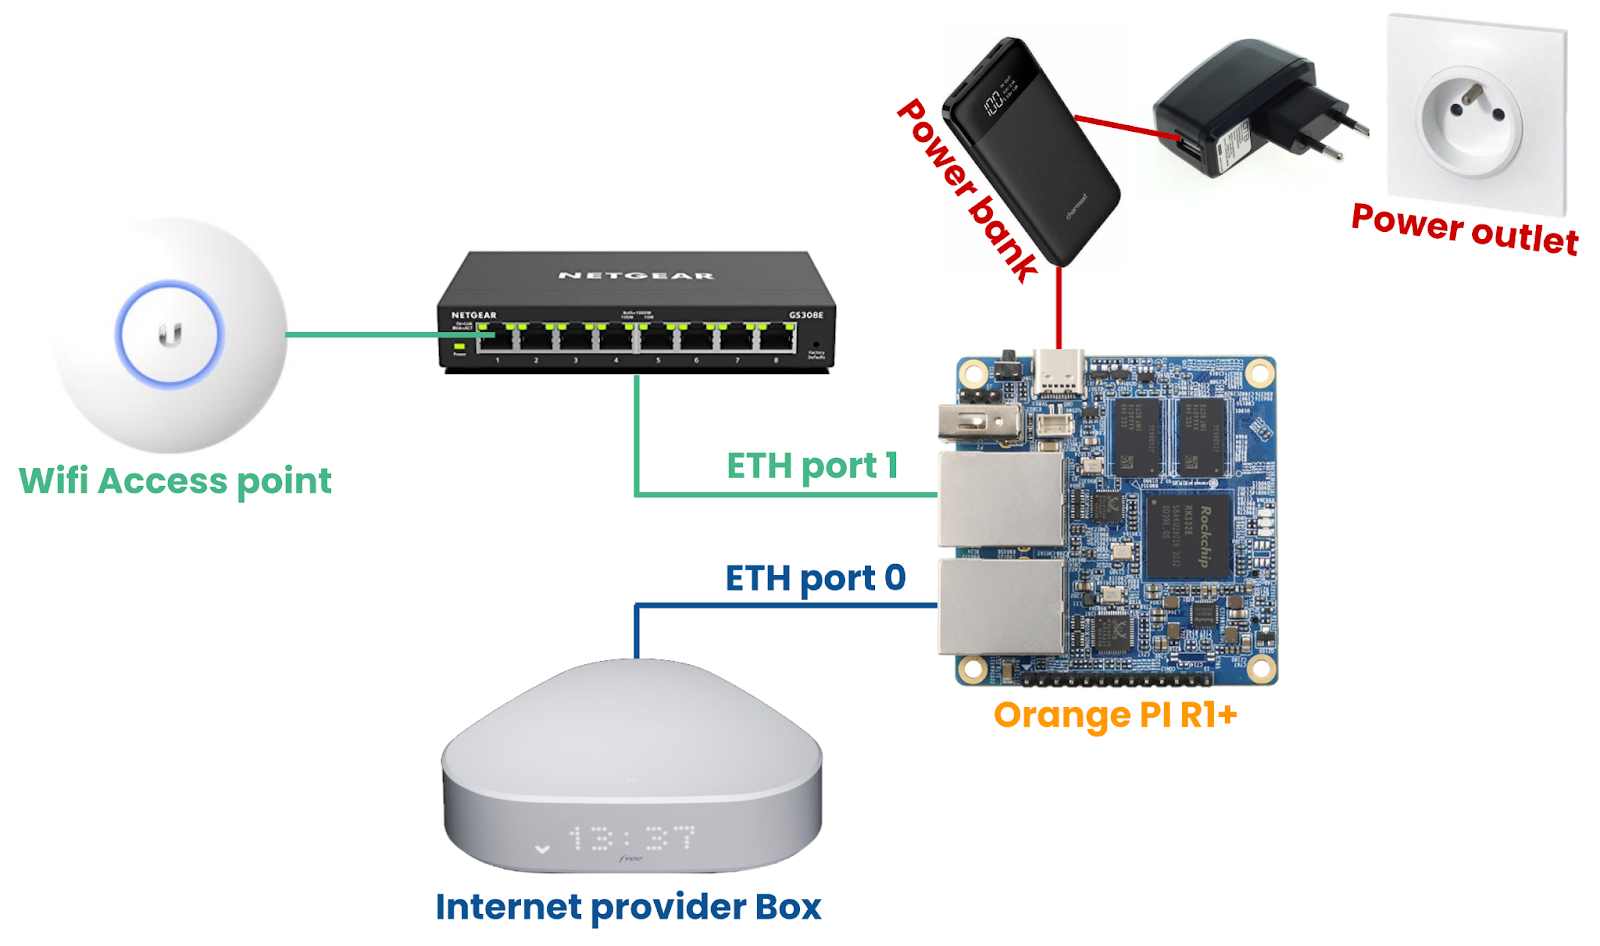
Figure 1: The set-top box, local LAN & WAN setup, you can leave the Box Wifi for home & family use and dedicate the other Access Point to business.
Software initial setup
1/ At the time of writing the newest supported version of Armbian is Armbian 22.05 Jammy, based on Ubuntu 22.04 Jammy Jellyfish. It doesn’t matter too much if the version of Armbian you install on is based on Debian or Ubuntu as long as it’s a supported version. Download it here. Other Debian-based distros like https://dietpi.com/ should also work although this hasn’t been tested.
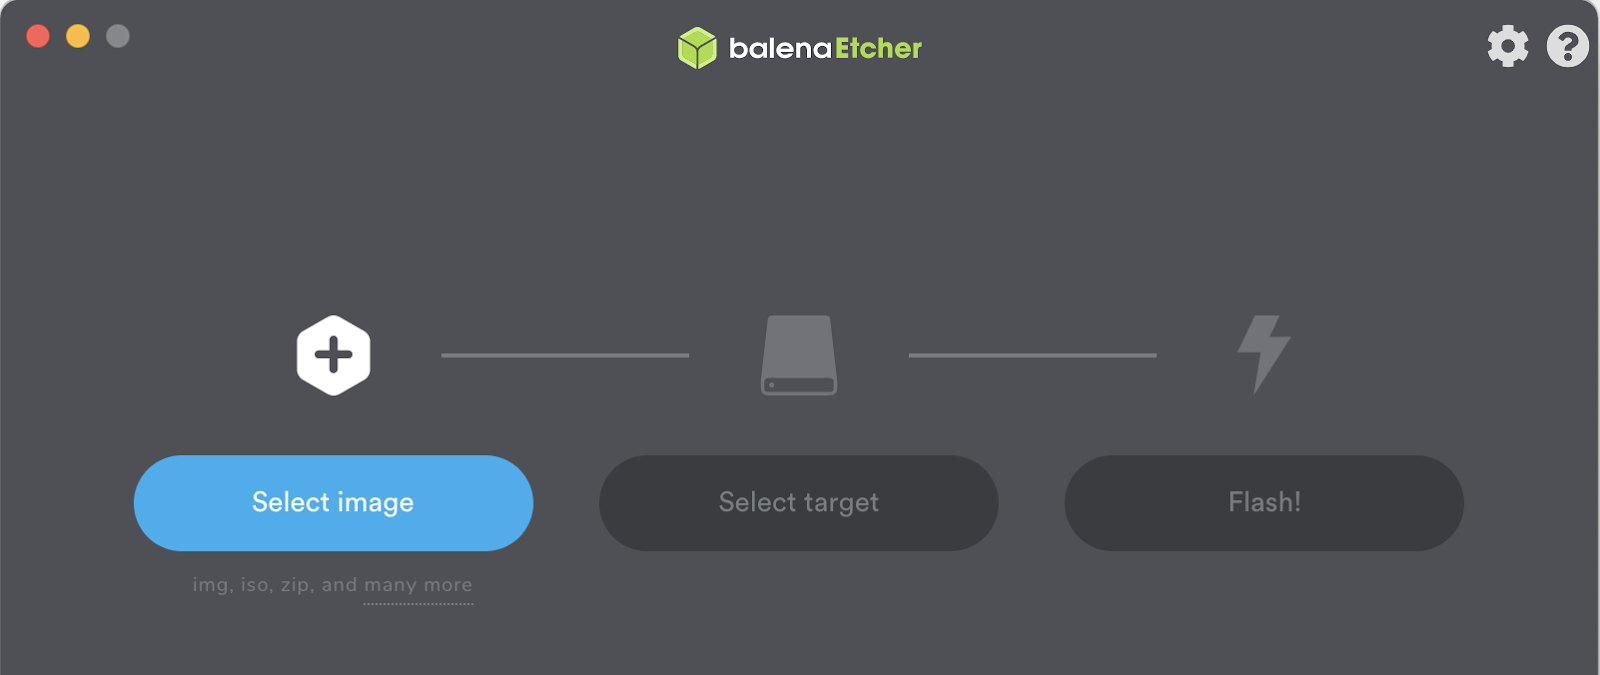
2/ Download a USB stick/SDcard flasher. Balena etcher is great for this. It’s very straightforward to use and runs on both Windows, Linux & macOS environments.
Remember we are on a headless device with no HDMI port, so we are going to use it in command-line (CLI) mode only. That being said you could get a serial TTY console, but the effort and complication is really not worth the time (unless you need it for debugging).
After flashing and booting your appliance you should connect it to the eth0/WAN ethernet plug (furthest away from the power connector). You will have to check your DHCP server which IP is assigned to your CrowdWall (it’s usually residing on the box you got from your internet provider). The default ssh login is root and the password is 1234. After connecting to it you will be walked through an installation wizard that will set you up with a personal user account and sudo.
The other ethernet interface will be called lan0. And for everything to work you will need to configure it.
Setting up lan0
Configure a static IP on lan0 by editing /etc/network/interfaces and adding the following:
auto lan0iface lan0 inet static
address 192.168.0.1/24
Start lan0 with the new configuration by typing sudo ifup lan0. Verify that the lan0 interface is up by typing ip addr show lan0 in a terminal.
Setting up your Internet Box in DMZ mode (Full NAT)
No two providers have the same box, OS, hardware, interface etc. hence no universal cut/paste commands, or screenshots to help here.
The feature you’re looking for is usually named “DMZ IP”. Enabling this feature requires you to input a LAN IP address, which will be the one to which all the Internet traffic will be redirected, without filtering. This is essential if you later intend to accept connections from the Internet to your home by exposing some services, like your home automation, NVR / IP cameras, or even a VPN server.
There are other ways of doing this, like enabling ports one by one, probably in a “Network”, “NAT” or “Network Address Translation” tab, but this requires you to get into the box interface every time you need to update a port, it’s error-prone and less flexible.
Basically, where/when possible, one shouldn’t trust the ISP’s Box either. So if you can bypass it totally, do it. Often enough, specifically in an FDDI context, you can just use the little modem that connects to your fiber and connects with Ethernet to your box, and plug yourself right in instead of the ISP box. There are tutorials online, just Duckduckgo (same as Googling but with privacy) for “how to bypass [BOX PROVIDER NAME] box”.
Absolutely not mandatory and mainly interesting for paranoïd people, but if you can do it, this is an even safer setup, even though bringing back the TV and Phone feature (should you want them), could be slightly more complicated, but far from impossible for advanced users.
So this was part 1 of our trilogy of how to install the CrowdWall. Part 2 will continue with configuring your installation with essential firewall functionality like traffic filtering, anti-ad features, and much more. Stay tuned!


